
Table of contents
A guide to working with the SharePoint API


Since its launch in 2001, Microsoft SharePoint has transformed document sharing and workplace collaboration, essentially providing the blueprint for many modern cloud-based platforms. Today, SharePoint remains a leading platform in its domain because of its continuous evolution (and its inclusion in Microsoft 365).
The SharePoint API provides enterprises with deeper integrations and customizations, enabling them to tailor SharePoint to their needs. However, implementing the SharePoint API can be challenging because of its use of OData querying, platform compatibility issues, and performance optimization requirements.
The following guide simplifies the process of integrating with the SharePoint API, as we'll explore all the available endpoints and the best ways to integrate with them.
SharePoint API overview
The SharePoint API is a collection of disparate interfaces that grant developers the ability to interact with SharePoint data and services. Each interface is designed for a specific use case:
- REST API: When developers refer to the SharePoint API, they're usually talking about this. It enables developers to use standard HTTP requests to perform create, read, update, and delete (CRUD) operations on SharePoint lists, libraries, and sites
- Client-side object model (CSOM): A .NET-based API introduced with SharePoint 2010 as a way for developers to interact with SharePoint remotely. It's often used with custom desktop applications
- JavaScript object model (JSOM): This was introduced along with the CSOM to facilitate direct SharePoint data access and manipulation from within a web page
- Graph API: Introduced in 2015 as a broader Microsoft API, this provides a single endpoint not just for SharePoint but also for other Microsoft services, such as OneDrive, Outlook, and Teams
- SOAP Web Services: An older method for interacting with SharePoint, now largely replaced by REST and Graph API
These interfaces were designed to accomplish similar objectives across different contexts. The REST API, CSOM, JSOM, and Graph API enable you to do the following:
- Access content: Retrieve site collections, lists, libraries, and individual documents stored in SharePoint, which is useful for applications that need to display or process SharePoint data dynamically
- Managing documents: Automating operations like uploading, updating, deleting, and versioning files within SharePoint document libraries, which is essential for document-heavy workflows
- Reading metadata: Extracting and generating metadata from files, lists, and libraries, such as author details, timestamps, and custom properties, helping organize and categorize content efficiently
- Integrating with enterprise workflows: Automate business processes by integrating SharePoint with other enterprise systems, such as customer relationship management (CRM) platforms, enterprise resource planning (ERP) solutions, and communication tools like Microsoft Teams
Related: How to work with the Google Drive API
The SharePoint data structure
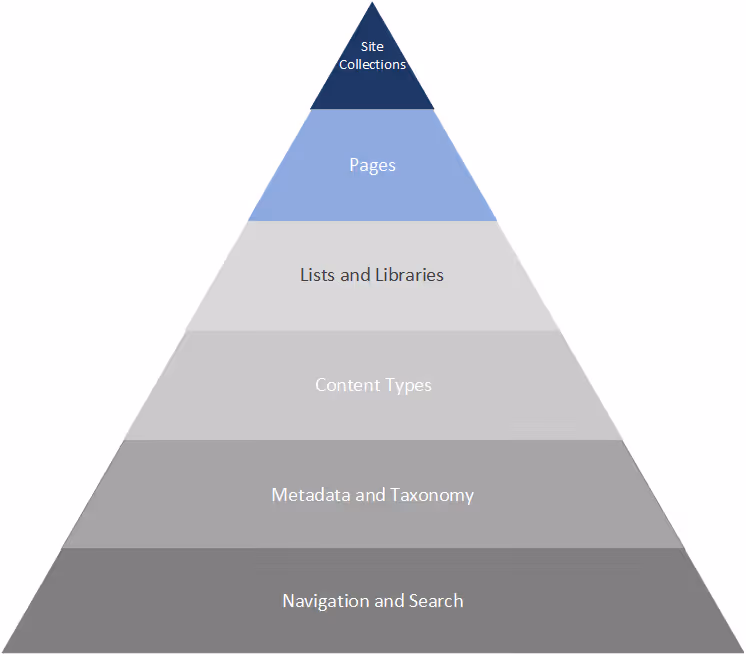
The SharePoint data structure can be best understood through its approach to information architecture. This essentially provides you with a foundation to organize, manage, and navigate content within an enterprise.
These are the key elements involved in the SharePoint data structure and information architecture:
- Sites and site collections are the building blocks of SharePoint, where each site can host multiple subsites
- Pages display content within a site (or subsite), often serving as landing pages or dashboards
- Lists and libraries store structured data (lists) and documents (libraries), making it easy to manage and retrieve information
- Content types define the schema for items and documents within lists and libraries, ensuring consistency across different types of content
- Metadata and taxonomy help categorize and organize content, improving searchability and compliance. These include internal names (system-generated names assigned when a column is created) and display names (displayed on the SharePoint interface)
- Navigation and search define how users access and interact with the content, ensuring security and structure. This includes global, hub, and local navigation structures, such as field types, content types, and lookup fields
The SharePoint architecture and the connection between its elements can sometimes feel unintuitive. You can visualize the hierarchy of these elements as a pyramid with site collections at the top and navigation and search as the foundation:
Related: How the OneDrive API works
Authentication with the SharePoint API
SharePoint uses OAuth 2.0 authentication, which requires obtaining and managing access tokens. This process can be especially confusing for developers trying to integrate it with Microsoft Entra ID access management (formerly Azure AD). In addition to obtaining the necessary access tokens, refreshing tokens, and handling scopes, developers must also manage Entra ID authentication, permissions, and identity federation.
The complexity increases exponentially when you're trying to work across multiple SharePoint tenants, which typically have varying security policies.
Robust authentication is the foundation of security and data access in SharePoint and Azure. Without strong authentication measures, organizations risk unauthorized access, data breaches, and compliance violations.
In the following sections, we'll run through the workflow for authenticating the SharePoint Rest API with Microsoft Entra ID.
Register your application in Microsoft Entra ID
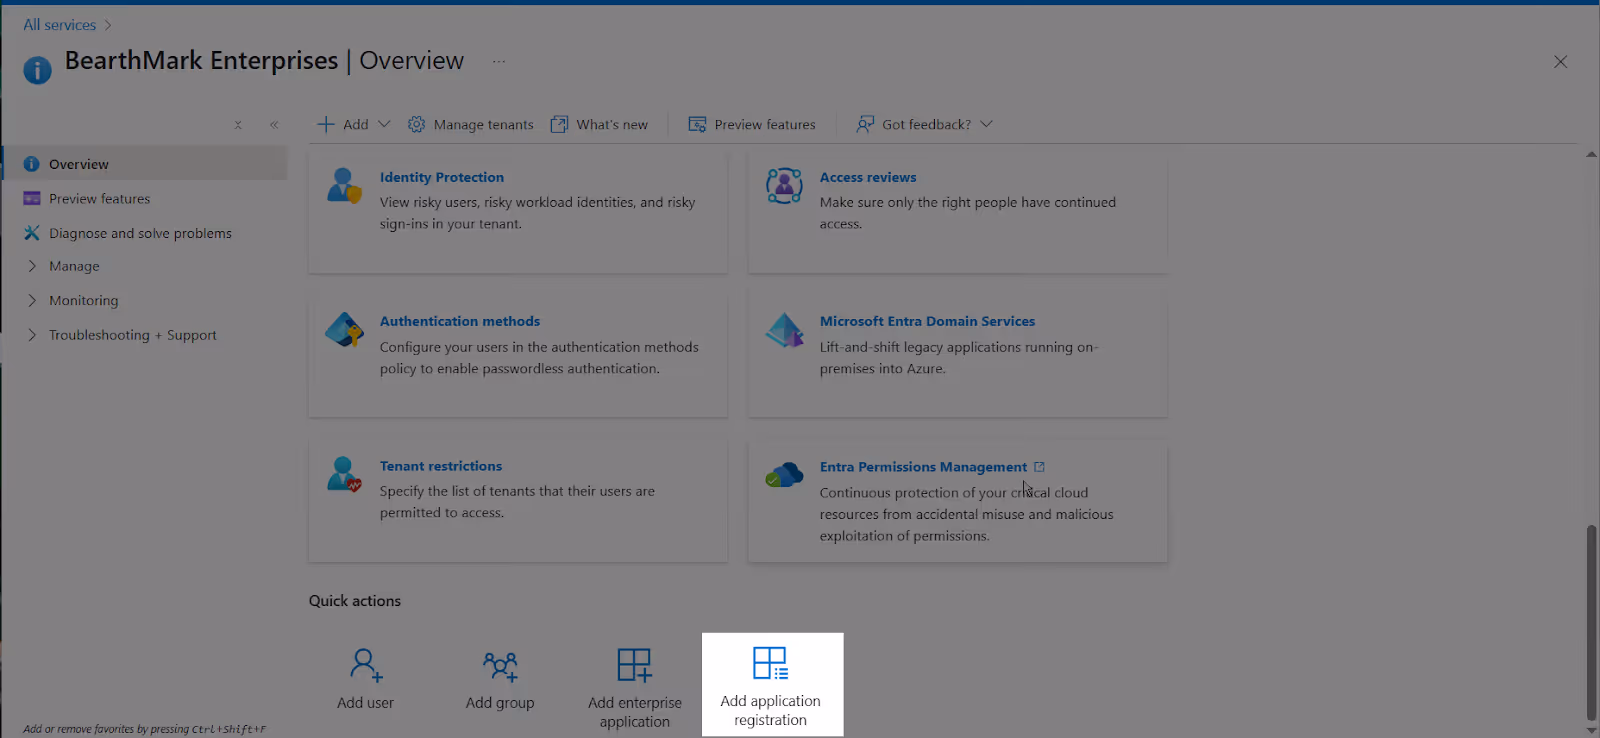
Navigate to the Azure Portal and sign in to your account (if you're not already signed in). Click the More services button, scroll down, and then select Microsoft Entra ID (FKA Azure Active Directory) from Security:

Click Add application registration under Quick actions:
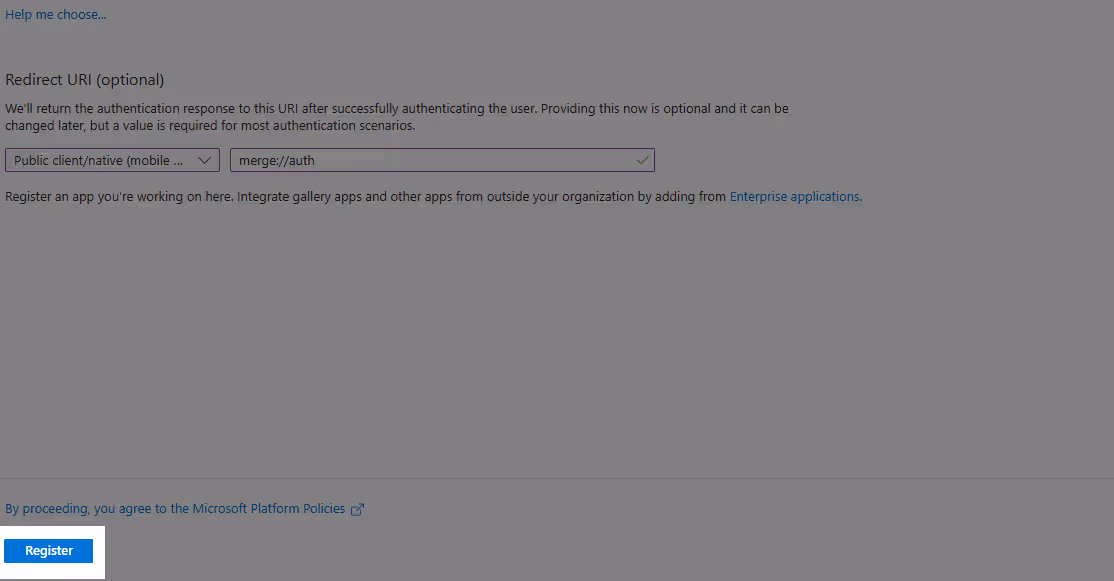
This takes you to the application registration (Register an application) screen, which asks you to fill in details related to the application using the SharePoint Rest API. This includes the user-facing display name, access details (Supported Accounts), and the Authentication URI.
It's best to select Accounts in this organizational directory only for Supported account types. This ensures that the app remains single-tenant, meaning that only users within your organization can access it. Enter your SharePoint site URL in the Redirect URI field. OAuth 2.0 requires a valid redirect URL to complete its authentication process, and setting your SharePoint site as the redirect URI also helps you maintain session integrity. Azure also allows you to change and add more redirect URIs after registration in case you prefer to use a different URI.
Once you're done filling in all the necessary details, click the Register button:
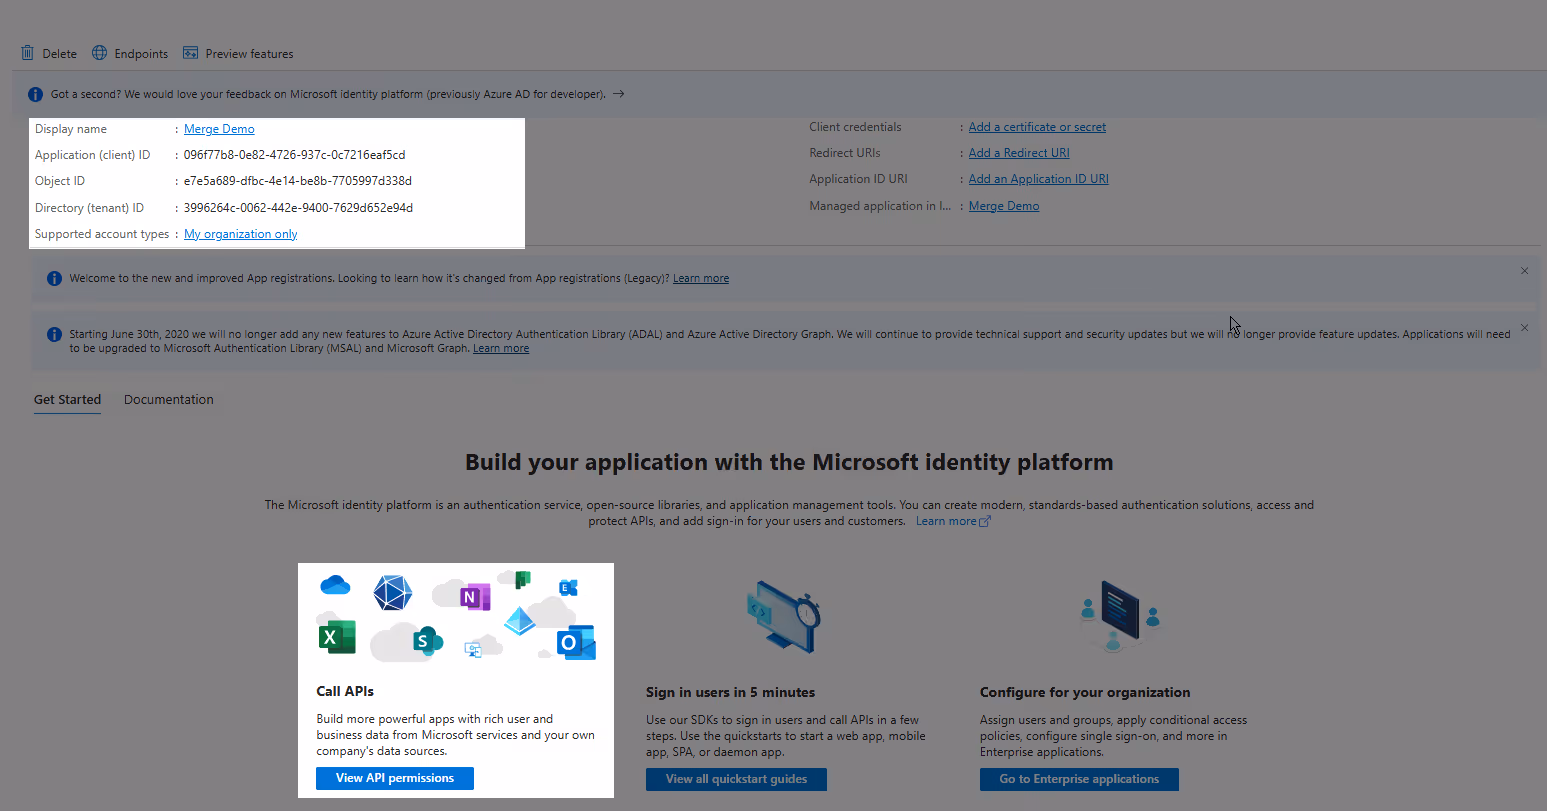
Azure directs you to an overview screen where you can view and further configure your application. Copy or make a note of the Application (Client) ID and Directory (Tenant) ID from the Essentials section. You need them for your SharePoint application manifest later.
Related: How to authenticate with the Dropbox API
Configure permissions for SharePoint API
You also need to set the necessary permissions for your API. This lets you control which SharePoint operations and capabilities your application and its users can access. For example, you can allow document reading while preventing document creation through your application.
Scroll down and click View API permissions from the Call APIs category under the Get Started section:
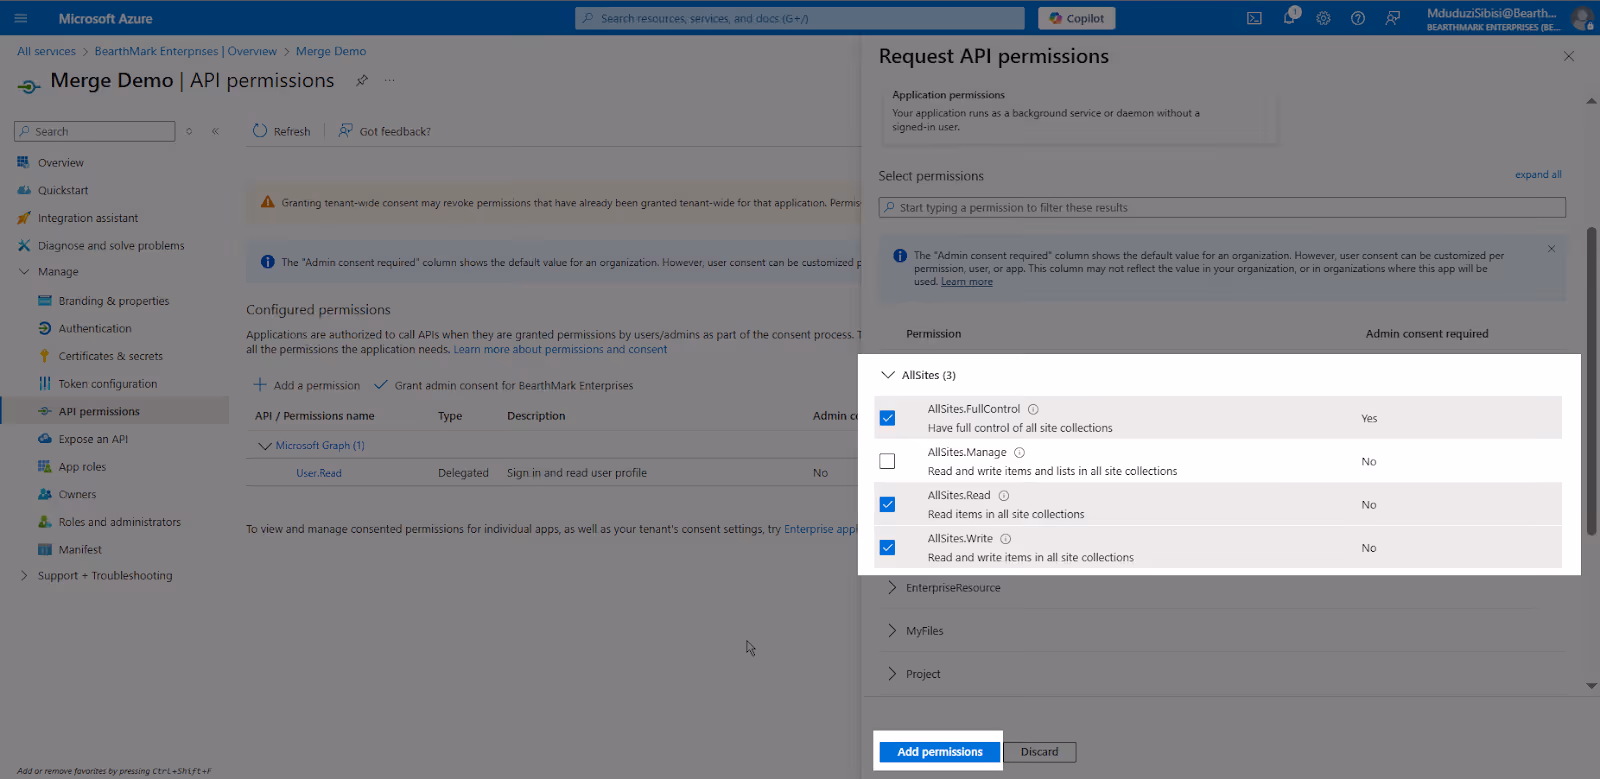
Click Add a permission under Configured permissions. This brings up a pop-up screen titled Request API permissions. Scroll down and select SharePoint from its menu and then click the Delegated permissions button:

You should see another pop-up menu, allowing you to choose what permissions your application should have. For instance, if you want your app to perform CRUD operations on documents and list items in all site collections, you can check the AllSites.Write and AllSites.Read options (or AllSites.FullControl for unfettered nongranular access).
Once you've marked your permissions from the menu, click Add permissions:
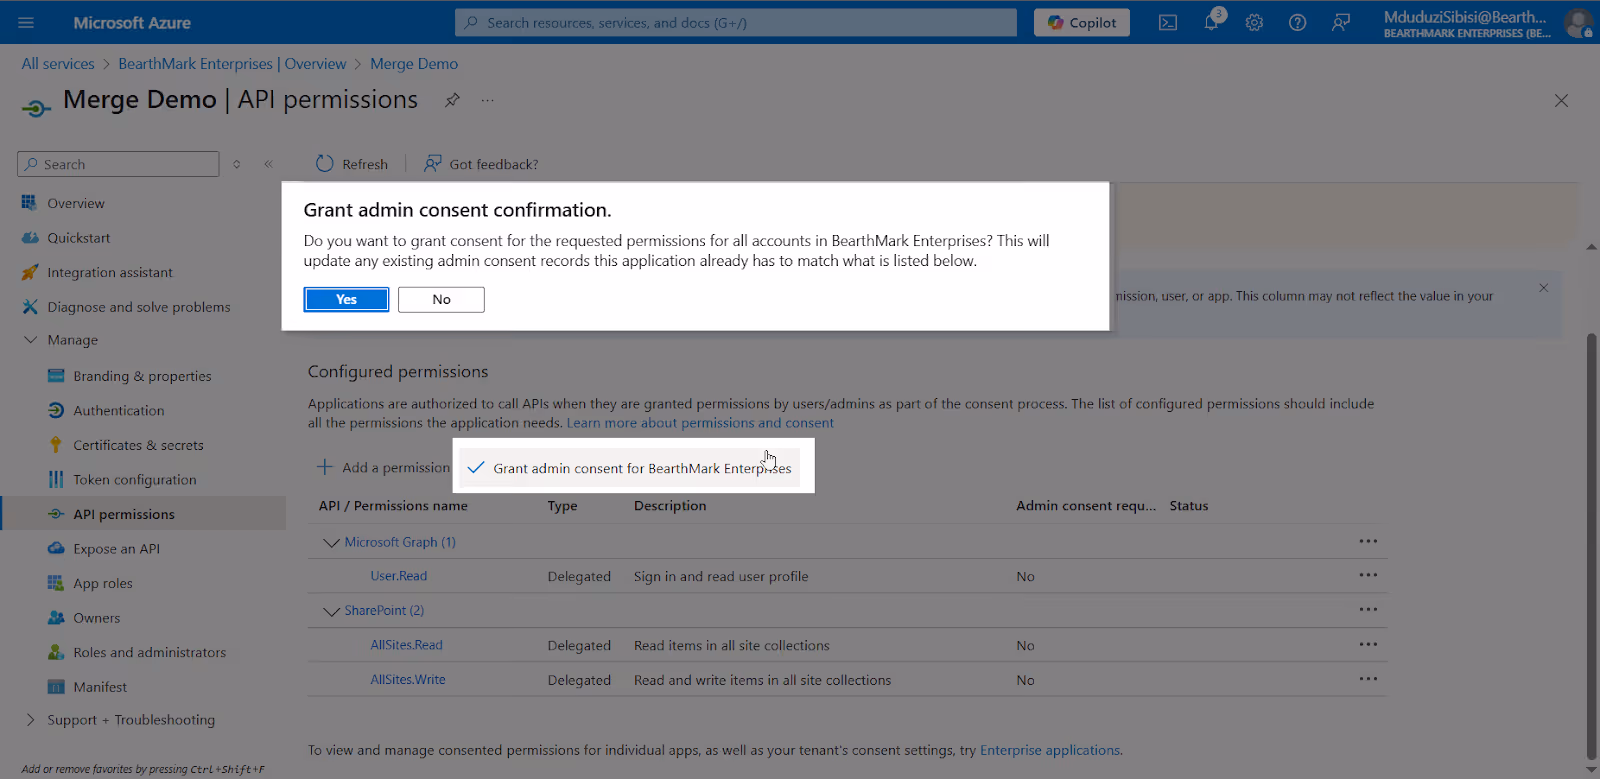
You also need to grant admin consent for your domain or organization. Without admin consent, users may be prompted individually to grant permissions, which can be hindering and can lead to inconsistent security policies.
Click Grant admin consent for \ and then the Yes button from the Grant admin consent confirmation.
Create your client certificate and secrets
Your application needs a client secret to prove its identity when it requests a token from the Azure authentication service. This essentially acts as an application password, introducing another layer of authentication.
To create the secret, select Certificates & secrets from the left menu bar and then select New client secret. This brings up a pop-up menu on the right side of the screen. Enter a description for the secret (like "Application password") and then set its expiry date (six months). Once that's done, click the Add button near the bottom of the screen:
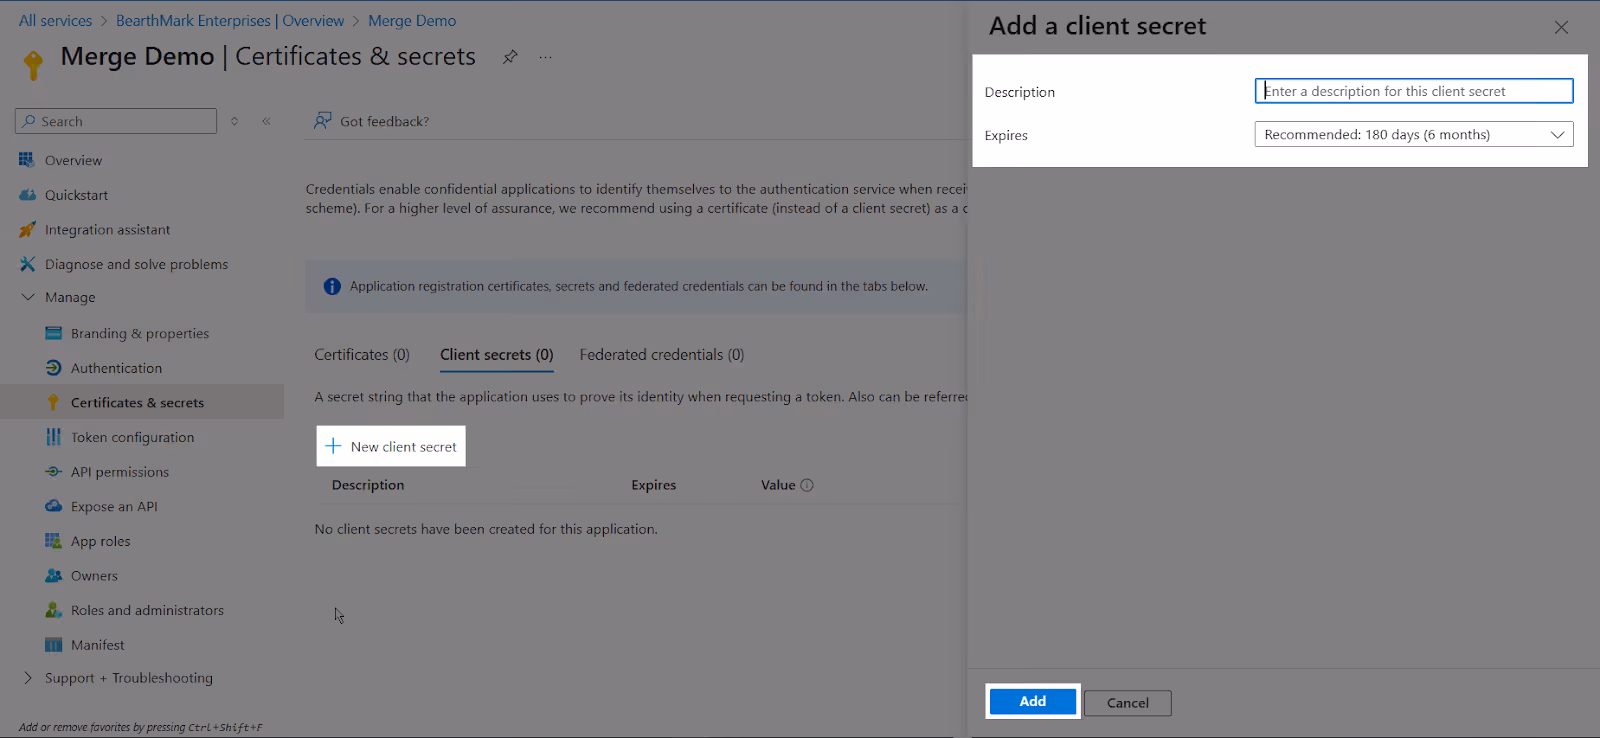
Once Azure creates the secret, copy its value and store it somewhere secure. As with your application and directory ID, you will need the client secret to acquire an access token and authenticate your application.
Obtain an access token from Entra ID
Microsoft and Entra ID use the OAuth 2.0 flow to provision access tokens. This process requires users to post a request to a designated Microsoft endpoint using their Tenant-ID and authentication details.
You can make this step slightly easier using a service like Postman, or you can write your own implementation from scratch (and even include it in your app). In the case of the latter, you need to create a new POST request with the following endpoint URL: https://login.microsoftonline.com/{tenant-id}/oauth2/v2.0/token
Remember to replace the {tenant-id}. Also, the request body (x-www-form-urlencoded) should contain the following content:
You'd just need to replace the following values:
- {client_id} with your client ID
- {client_secret} with the secret you created earlier
- {scope} with https://<your site domain>/.default (where <your site domain> is the domain of your SharePoint site, such as draft.dev.sharepoint.com)
When this is successfully posted, it returns an access token. Copy the value of this access token and use it when performing REST API requests:
You can learn more about the OAuth 2.0 authorization flow in this tutorial.
Note: If your Azure or Sharepoint configuration is using app-only authentication, you’ll need to generate a certificate to produce a valid access token.
Now that the SharePoint API has been successfully authorized, you can start exploring a few fundamental operations that can be performed.
Related: How to GET files from Sharepoint’s REST API
Common SharePoint API operations and examples
Many of the SharePoint API functions and operations seem straightforward at first glance. However, due to its specific idiosyncrasies and response patterns, the SharePoint API can present unexpected obstacles. Here are a few examples of SharePoint API common operations.
Retrieve list items
This operation is especially useful for data management. You can use it to pull and display SharePoint lists dynamically in a dashboard or to generate reports. The following is an example of how you can fetch list items using the SharePoint REST API:
You need to replace {site_url} with your SharePoint site URL, List Name with the name of your list, and {access_token} with your OAuth 2.0 access token. You can refine the earlier request by adding a filter or sort:
This retrieves lists where the title is "Home". You can sort items by created date (descending) using this request:
Create and update documents
The SharePoint API document creation and update features are some of its most useful capabilities. They enable seamless automation of document workflows, which is especially valuable for streamlining business processes, reducing manual effort, and ensuring efficient document management within SharePoint and Azure.
You can use the following POST request to upload a file to a SharePoint document library:
This request uploads myDocument.txt to your SharePoint site ({site_URL}). The overwrite=true portion of the request ensures that any existing file with the same name is replaced. Remember to replace the "Contents of file" with your actual content.
If you need to update a file, you can use the following PUT request:
Before running the preceding request, you must ensure that you have permission to modify the file. You can use the following POST request to check the file out:
This fetches the file and ensures that no one else can modify it. Once you're done updating it, you can check it back in:
Note: It's good practice to leave a descriptive comment (comment='comment') explaining the changes you've made to a file when checking it back in.
You can delete a file completely using the following command:
Manage metadata and permissions
For greater control over how the SharePoint elements and components are organized, you need to be able to access and manipulate the necessary metadata. In SharePoint, metadata refers to information about content that helps organize, classify, and retrieve documents, lists, and other items efficiently. It acts as structured data that eases searchability and content management.
You can fetch metadata for list items using the following GET request:
The preceding code fetches the titles and categories for all items within a list. For instances where you need to update the metadata of a SharePoint element, such as a document, you can use the following POST request:
The previous code fetches item 1 from the document list and then updates its Category field to "Finance". This is another example of how you can use SharePoint and its API to group documents and list items to make them easier to organize and sort.
Permissions in SharePoint allow you to control who can access SharePoint content. You can view user permissions for the document from the previous request using the following:
You can then update permissions with the following:
The <code class="blog_inline-code">PrincipalId</code> identifies the user or group receiving the permission, while the <code class="blog_inline-code">"RoleDefId"</code> portion of the code specifies the role permission (read is 1073741826, edit is 1073741830, and full control is 1073741829).
This is another challenge of using the SharePoint Rest API—assigning role definitions using their IDs. You can fetch all available role definitions using the following request:
Best practices for working with the SharePoint API
Understanding how and when to appropriately use SharePoint API operations is crucial as this allows you to circumvent and manage its limitations.
To that end, here are some best practices for working with the Sharepoint API.
Understand and respect throttling limits
This is crucial for maintaining optimal performance and avoiding disruptions. SharePoint Online enforces throttling to prevent excessive API requests and ensure system stability.
If you exceed the limit, SharePoint returns this response:
Fortunately, this response includes a Retry-After header, indicating how long to wait before retrying. You can use it to build and implement an effective retry logic.
You can avoid throttling by grouping requests (batch processing). This reduces the number of individual API calls. Microsoft provides RateLimit headers to help manage request limits efficiently. Along with this feature, it's a good idea to monitor API usage by tracking request rates and adjusting accordingly.
Normalize the use of data structures and plan for long-term maintenance
Normalizing data structures in the SharePoint API improves the integration by reducing redundancy, ensuring consistency, and optimizing query performance. You can do this by structuring lists and libraries efficiently. You can use content types to standardize metadata across lists and prevent duplicate data from being stored by using lookup columns.
It's also good practice to limit your queries to fetching only the most essential data. You can use $select and $filter parameters to optimize your queries.
In terms of handling permissions and access control, role-based permissions must be applied at the list level instead of on individual items. This limits API calls, makes the data more manageable, and helps with long-term maintenance.
You can also optimize queries and the maintainability of your integrations using a tool like Merge to automatically create optimized requests for the SharePoint REST API. This is especially useful when you're trying to manage authentication across multiple clients and applications.
Manage common SharePoint API errors effectively
When troubleshooting SharePoint API errors, it's crucial to examine the inner Error object rather than relying solely on the top-level message. SharePoint often provides detailed error context within the response, which can help pinpoint the exact issue. As covered earlier, error responses such as HTTP 429 contain headers that can be used for more refined API error handling.
Because the SharePoint REST API authentication process spans across different layers, your approach to validation must be as thorough. For instance, a 403 Forbidden error in the SharePoint API can stem from multiple layers of permission restrictions. In a case like this, you need to ensure that your applications have the necessary API permissions in the Azure Portal and SharePoint site.
You can simplify troubleshooting and validation using tools like Graph Explore and Postman, which allow you to interactively build custom API requests (GET, POST, PUT, DELETE), inspect tokens, and view detailed error messages and response payloads for troubleshooting.
Integrate SharePoint and other file storage apps with your product quickly and easily via Merge
Regardless of your integration use case(s) with Sharepoint, it'll likely take your engineers several hours to implement the initial connection and countless more hours to maintain it. And if you need to add additional security functionality to the integration, like access control lists (ACLs), the level of time and resources involved will increase significantly.
To simplify this process as well as integrate with any of the other file storage tools your customers use, you can simply build to Merge's File Storage Unified API.

Learn more about how you can use Merge to add file storage integrations—and hundreds of other integrations—to your product by scheduling a demo with a member of their team.

.jpg)
.png)
.png)

