Table of contents
Just for you
How to connect an Expensify MCP with Claude Code (4 steps)


Finance and engineering teams that need to automate expense workflows, reconcile corporate card charges, or enforce policy compliance have to hit the Expensify API directly.
That means setting up partner credentials, handling request signing, and writing one-off integrations every time a new workflow needs a different slice of report or transaction data.
To help your developers export reports, create expenses, and manage spend policies in a matter of seconds from the terminal, we'll show you how to connect Expensify with Merge Agent Handler's Expensify MCP server.
How it works
Merge Agent Handler connects Claude Code to the Expensify API through a single CLI setup.
You install the Merge CLI, authenticate once with your Merge Agent Handler account, and register the connection with one command. Merge handles Expensify partner credentials and API request signing on your behalf, so you never store those credentials locally or manage them across environments.
Here's the command that registers the connection:
Prerequisites
Before getting started, you'll need the following:
- A Merge Agent Handler account
- Claude Code installed (run
claude --versionto confirm) - pipx installed (run
pipx --versionto confirm, or install viapip install pipx) - An Expensify account with policy admin access to authenticate the connector
If you want to connect Merge Agent Handler's Expensify MCP with internal or customer-facing agentic products, you can follow the steps in our docs.
1. Install the Merge CLI
Install with pipx: pipx install merge-api
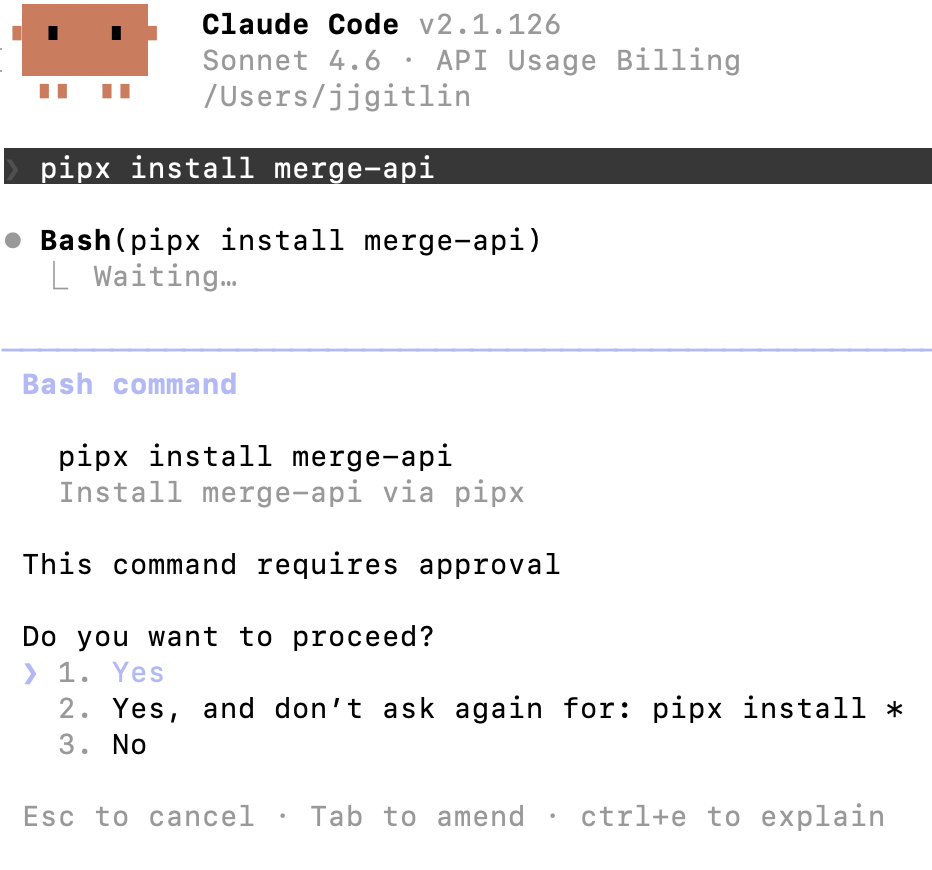
Then verify the installation: merge --version
2. Configure the CLI and log in
Authenticate the CLI with your Merge Agent Handler account: merge login
Once complete, the CLI can make authorized API requests on your behalf.
3. Add Agent Handler to Claude Code
To add Agent Handler to Claude Code, run:
Or register manually with:
Open Claude Code and run: /mcp. agent-handler should appear under Local MCPs with a connected status.

Related: How to integrate a Freshdesk MCP with Claude Code
4. Authenticate Expensify
Open a Claude Code session and test it with: "Export all submitted expense reports from the last 30 days that are still pending approval. List each one with the employee name, total amount, policy name, and number of days since submission."
The first time you use an Expensify tool, a Magic Link will appear to authenticate the connector.

Once authenticated, you should see an output like the following:

{{this-blog-only-cta}}
Expensify MCP FAQ
In case you have more questions on setting up and using the Expensify MCP in Claude Code, we've addressed several more commonly-asked questions below.
What can you do once the Expensify MCP is connected to Claude Code?
With Expensify connected, Claude Code can:
- Export and filter reports: pull submitted, approved, or reimbursed expense reports filtered by policy, date range, or employee, without exporting a CSV from the Expensify UI
- Create expenses: add new expense line items to existing reports directly from the terminal, useful when an agent needs to log charges captured in another system
- Submit and update reports: create new expense reports and change their approval status as part of a larger automated workflow
- Export card transactions: retrieve corporate card charges across domains for a billing period, useful for reconciliation against the general ledger
- Read and manage policies: query expense policies to check category and tag configurations, or update them when organizational spend rules change
- Audit policy compliance: identify individual expenses that fall outside category limits or approval thresholds before they advance in the approval chain
Why use Merge Agent Handler vs. a self-hosted Expensify MCP server?
You can build a self-hosted MCP server on top of Expensify's partner API. For a developer with a single policy and a narrow use case, the setup is manageable: obtain partner credentials, write tool schemas for the endpoints you need, and wire them to Claude Code.
The problem is that Expensify's partner API requires request signing with a partner user token and password pair, and those credentials carry broad access across your organization's policies. A self-hosted setup also offers no tool-level controls: if an agent can call export_reports, nothing prevents it from calling create_policy or update_employees unless you build those restrictions into the server yourself.
At team scale, the credential problem compounds. Expensify doesn't offer scoped API tokens, so every agent that connects shares the same partner credentials. There's no central audit trail of what was queried or exported, and no built-in way to limit a read-only reconciliation agent from reaching write endpoints.
Merge Agent Handler adds a control layer at the tool level.
You define exactly which Expensify tools are exposed, so, for example, an agent built for report exporting can never get access to policy management or employee update tools. Every tool call is also logged with the timestamp, tool name, inputs, and response metadata.
Why connect Expensify to Claude Code?
Expensify holds the operational record of your organization's spend: submitted reports, approval status, corporate card charges, and the policies governing all of it. Finance and engineering teams that need to build on that data, whether to automate reconciliation, enforce compliance, or generate stakeholder summaries, currently have to get it out via exports or direct API calls.
With the Expensify MCP connected, Claude Code can retrieve and filter expense data, create reports, and surface policy violations without leaving the terminal.
This matters most when Expensify data needs to feed a downstream action: flagging an out-of-policy charge before it reaches an approver, generating a weekly cost-center summary for the CFO, or automatically creating an expense record when a receipt lands in another system.
.png)