
Table of contents
Just for you
How to add a subscriber (and more) with the Mailchimp API


How to Add a Subscriber (and More) with the Mailchimp API
Among all email marketing automation platforms, Mailchimp is by far the most popular, with a market share of 66 percent and over 10,000 emails sent every second.
If you want to build custom features for Mailchimp or integrate it with third-party applications, plugins, and services, you can use the Mailchimp API to programmatically interact with Mailchimp. The Mailchimp API has numerous features, so you can use it to create campaigns, create and manage lists, automate workflows, and much more.
In this article, you'll learn how to use the Mailchimp API even if you've never used it before. You will see how to create a Mailchimp account, install the necessary packages and libraries to work with the API, obtain an API key, authenticate with the API, create new subscribers, update or delete existing subscribers, and manage your lists and campaigns.
Let's dive in!
Setting Up the Environment
Before you can use the Mailchimp API, you need to set up the necessary environment.
First, you need to create a Mailchimp account. Mailchimp offers multiple plans and prices depending on your needs and the number of contacts you have. It's free to use for up to 500 contacts and 1,000 monthly emails, so you can sign up for a free account for this tutorial if you don't yet have one.
The free account gives you access to more than 300 integrations, reporting and analytics, forms and landing pages, some prebuilt email templates, and email support for the first 30 days. However, only one user can use the account and you can create only one audience.

On the sign-up page, enter your email, username (Mailchimp recommends that you use your email as your username), and a password. You'll receive an email with a link to activate your account. Click on the link to take you to a page (pictured below) where you'll be asked to enter your first name, last name, business name, and optionally, your phone number. These details can be easily changed later on, so don't overthink it.
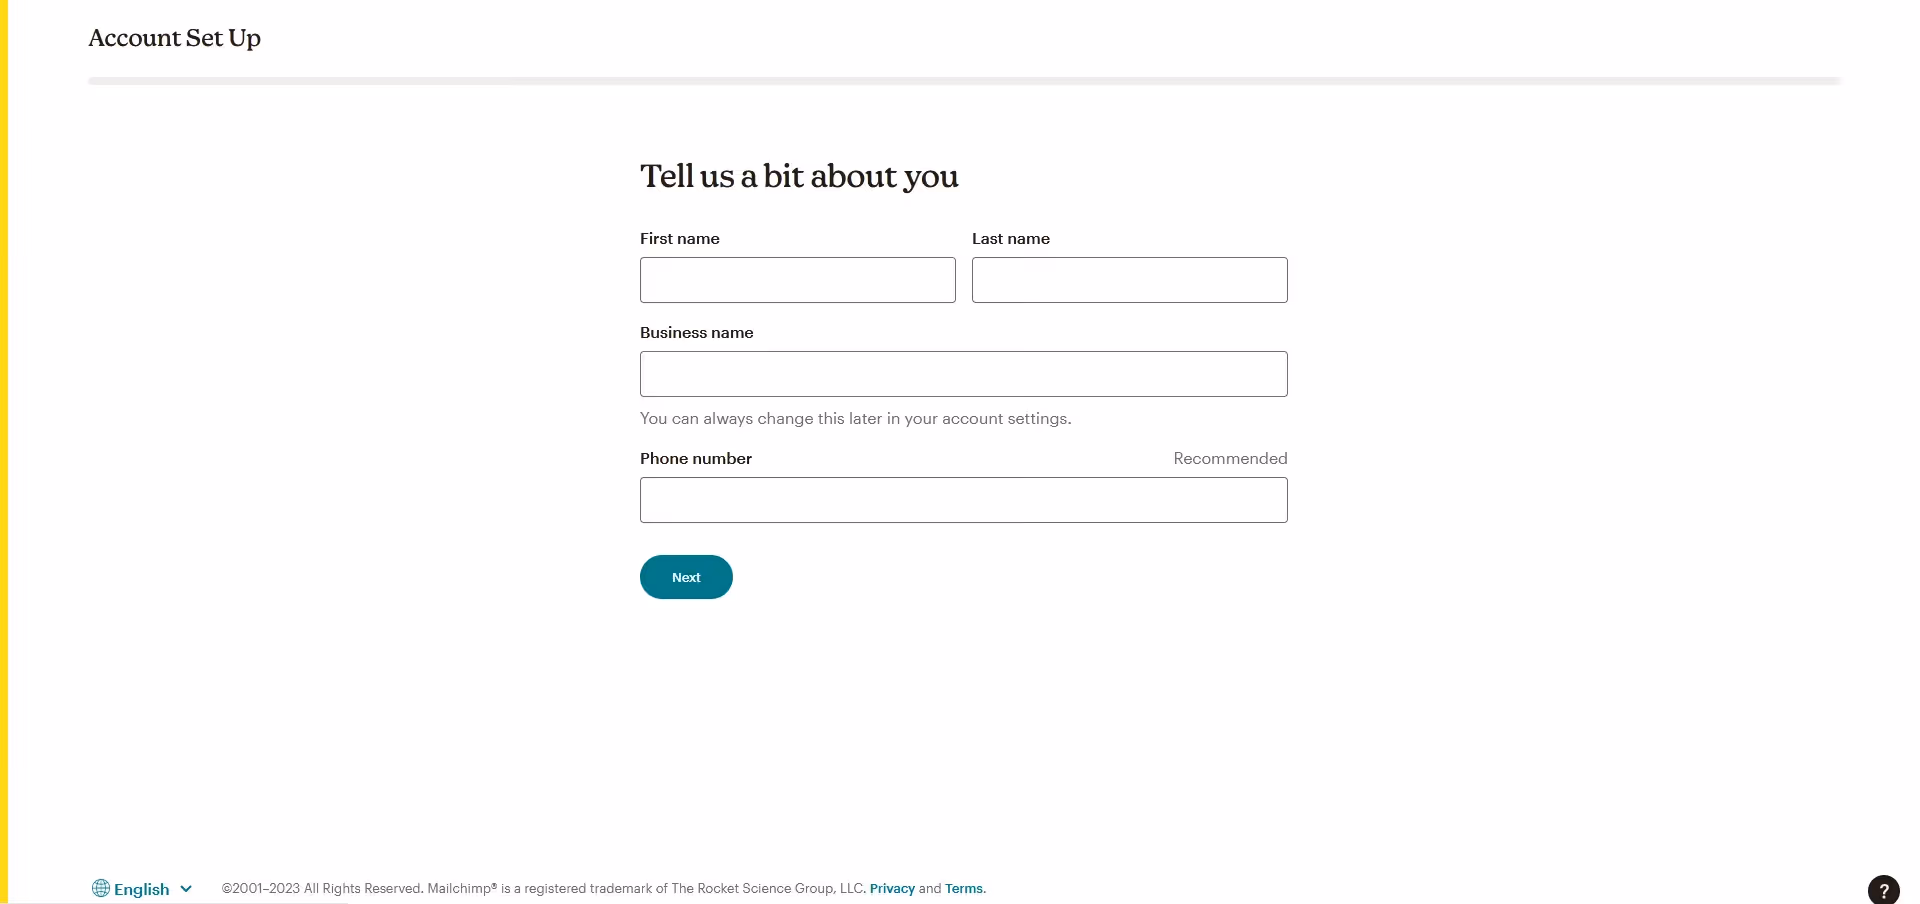
You'll also have to enter your address, city, and country as required by the US CAN-SPAM Act, which stipulates that your address must appear in the footer of every email you send, whether with Mailchimp or any other email service provider. The aim of this act is to protect users from spam. If your business doesn't have a physical address, check out some of the alternatives Mailchimp suggests.
You can skip the questions Mailchimp asks to get to know your business better. You'll be prompted to choose between staying with the free plan or upgrading to a paid plan. You can stick with the free plan for this tutorial, for which you don't have to provide any payment information.
Before you can use the Mailchimp API, you also have to install some packages and libraries. The specific ones needed, if any, depend on the programming language you use. Since this tutorial uses Python, you only need to install the <code class="blog_inline-code">mailchimp-marketing</code> client library.
Install this library using the following line:
Authentication
Once you have created a Mailchimp account, you can obtain an API key for yourself, which you'll use to authenticate your requests to the Mailchimp API.
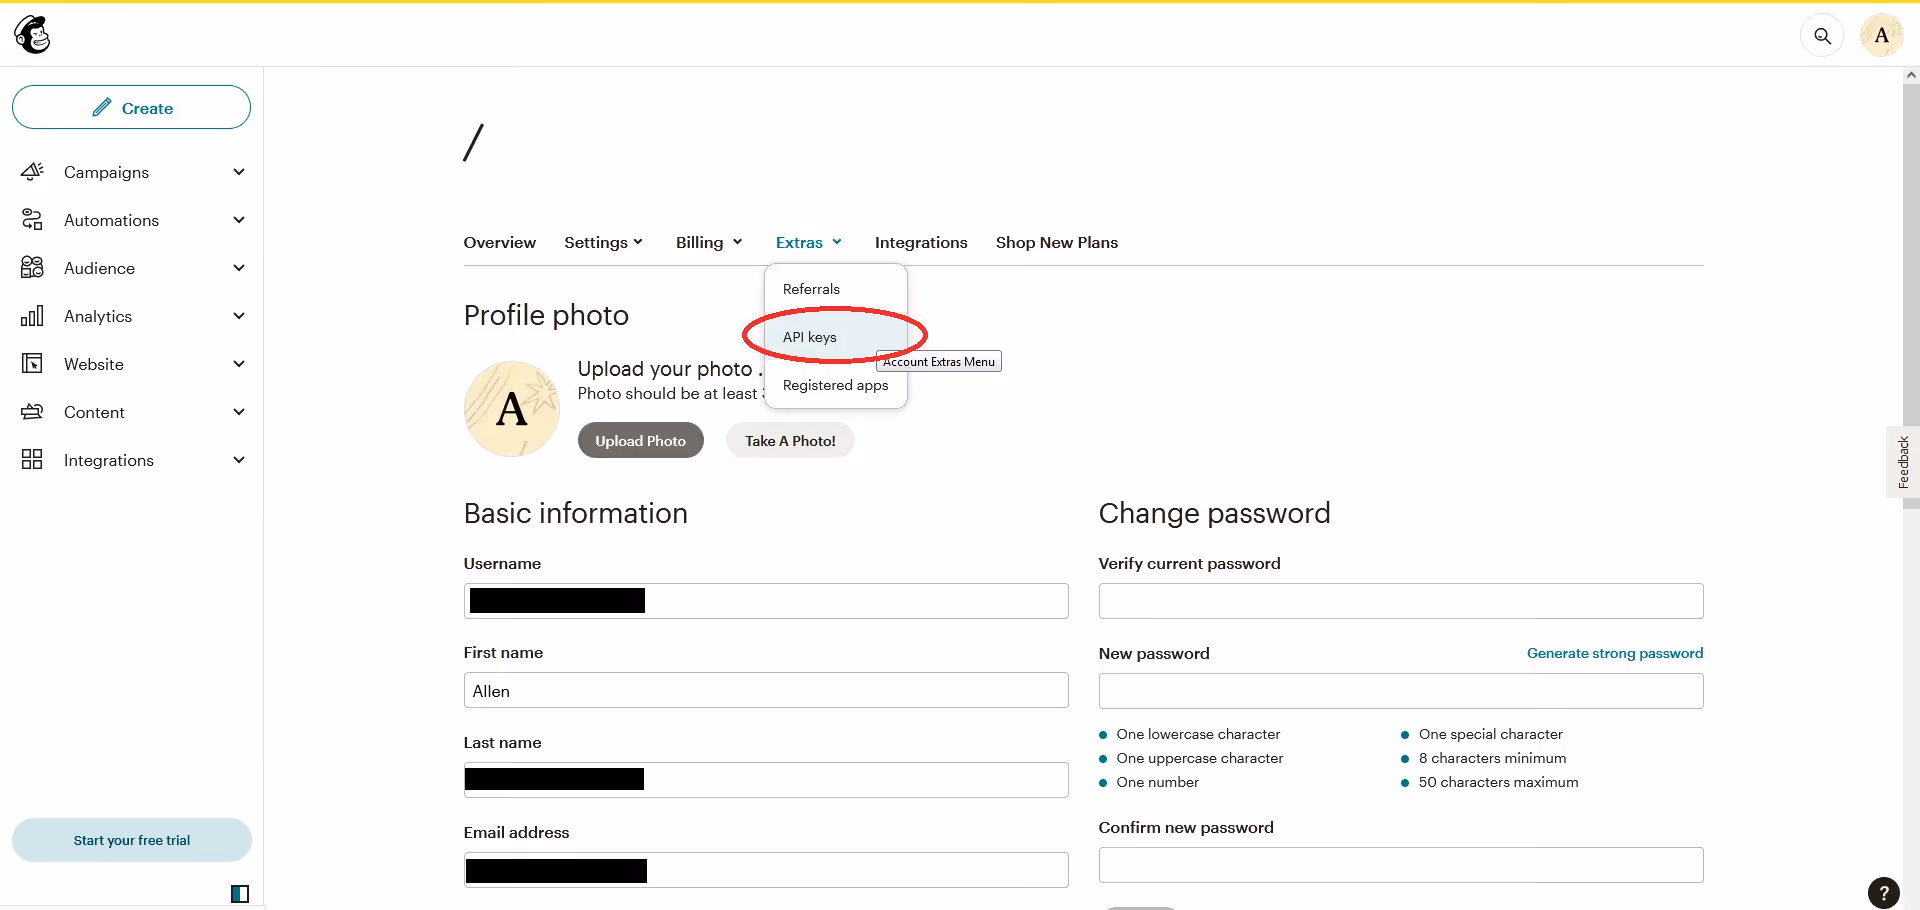
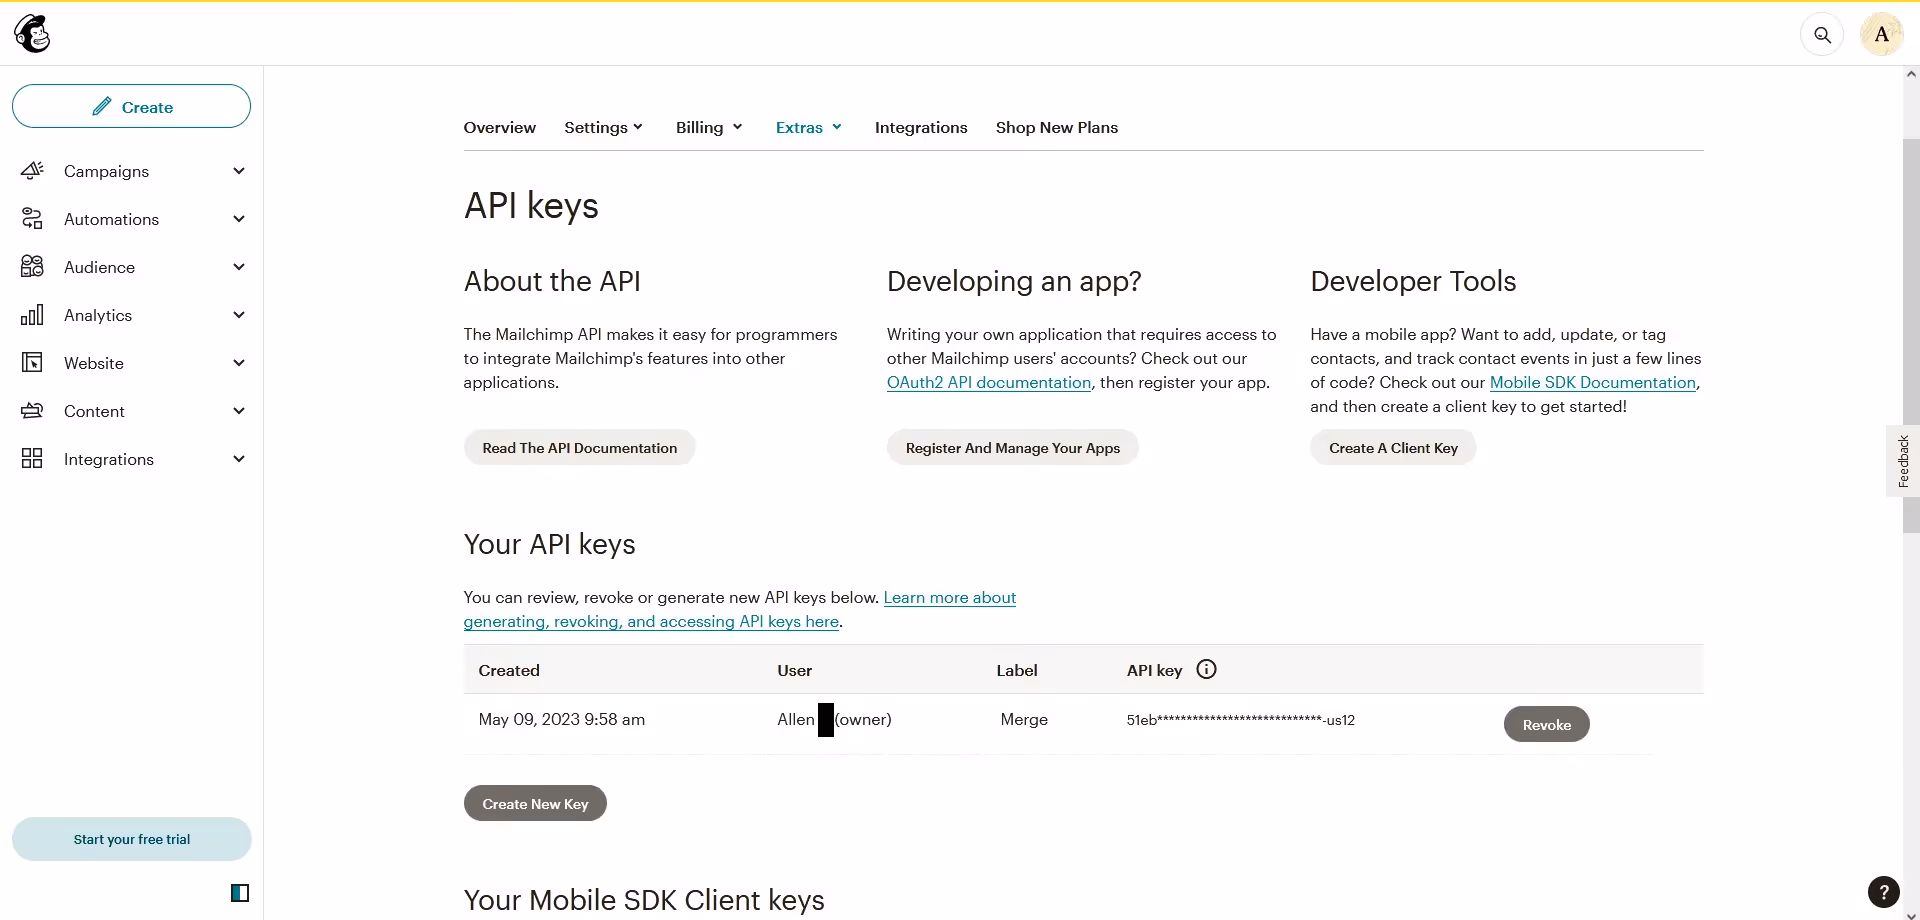
To generate an API key, you need to navigate to the API keys section of your account. Click on your profile picture on the top right of the screen and then on Profile.

Click on the drop-down menu for the Extras tab and then on API Keys.
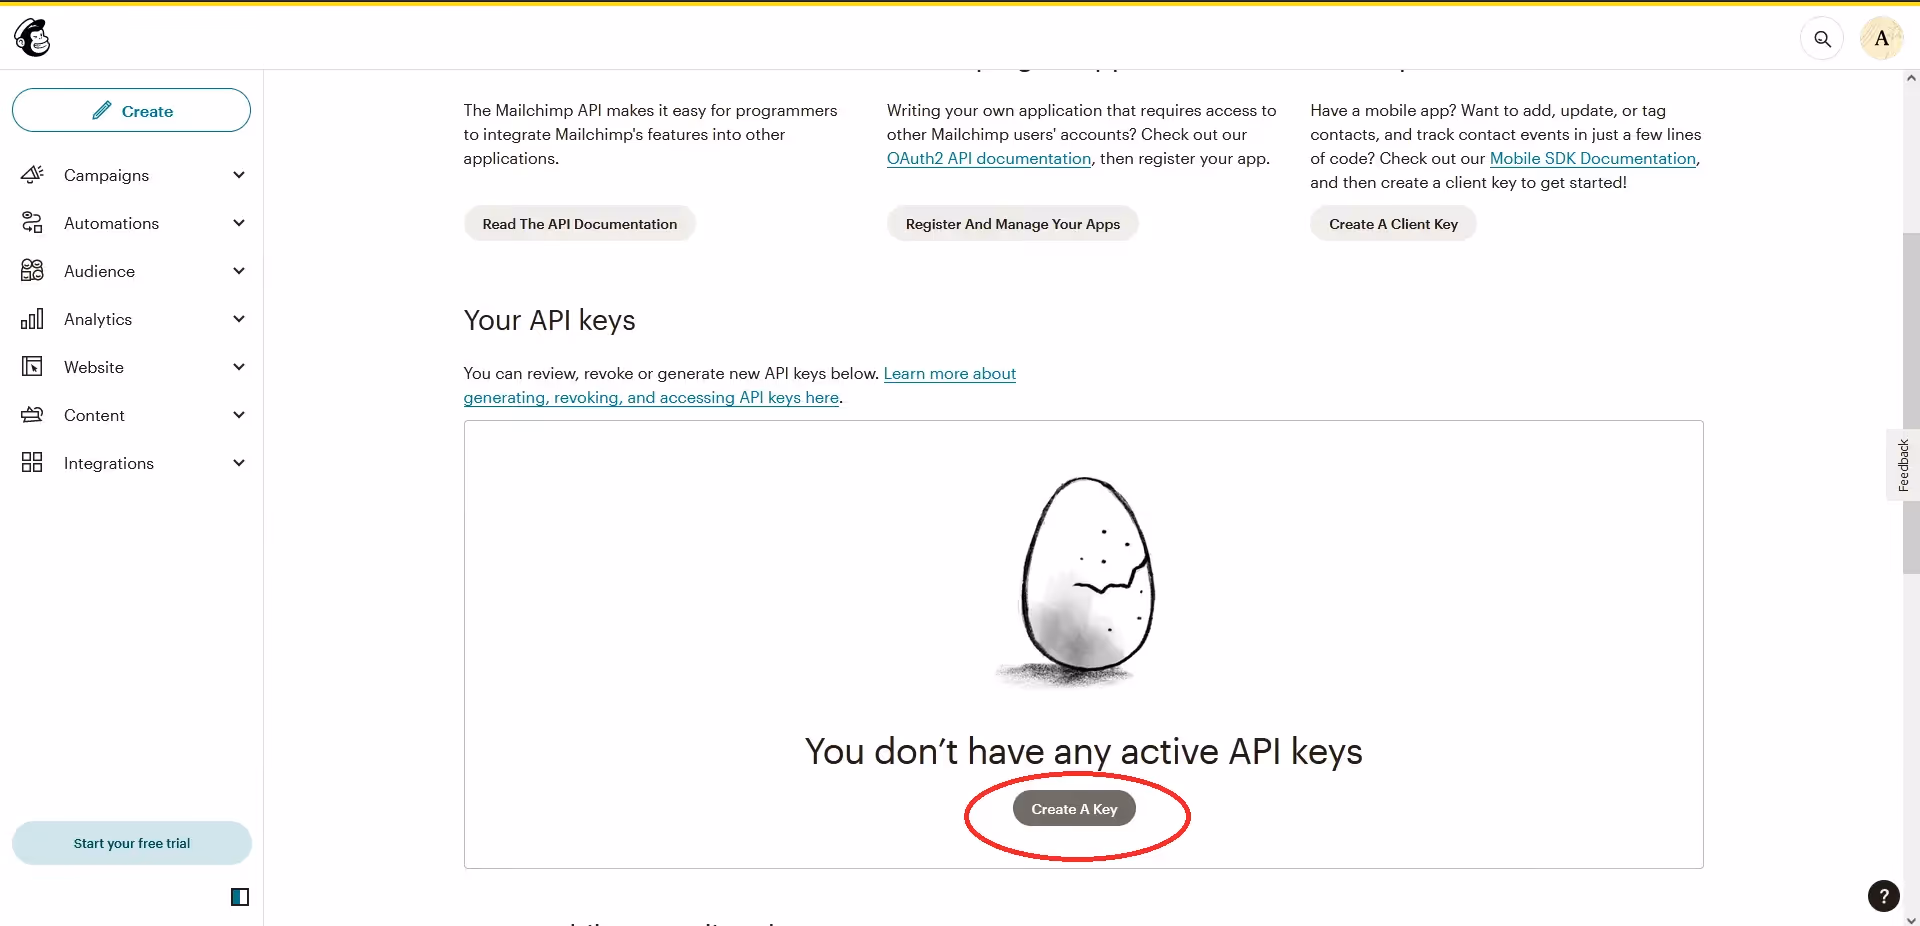
This page will show any API keys you might have. You can also generate new keys here as well as review or revoke existing ones. Since you don't have any API keys at this point, click on Create A Key.
You have to name the key before you can generate it. Always use a descriptive name so that you can remember what the key is for. Name your key for this tutorial Merge, then click on Generate Key.
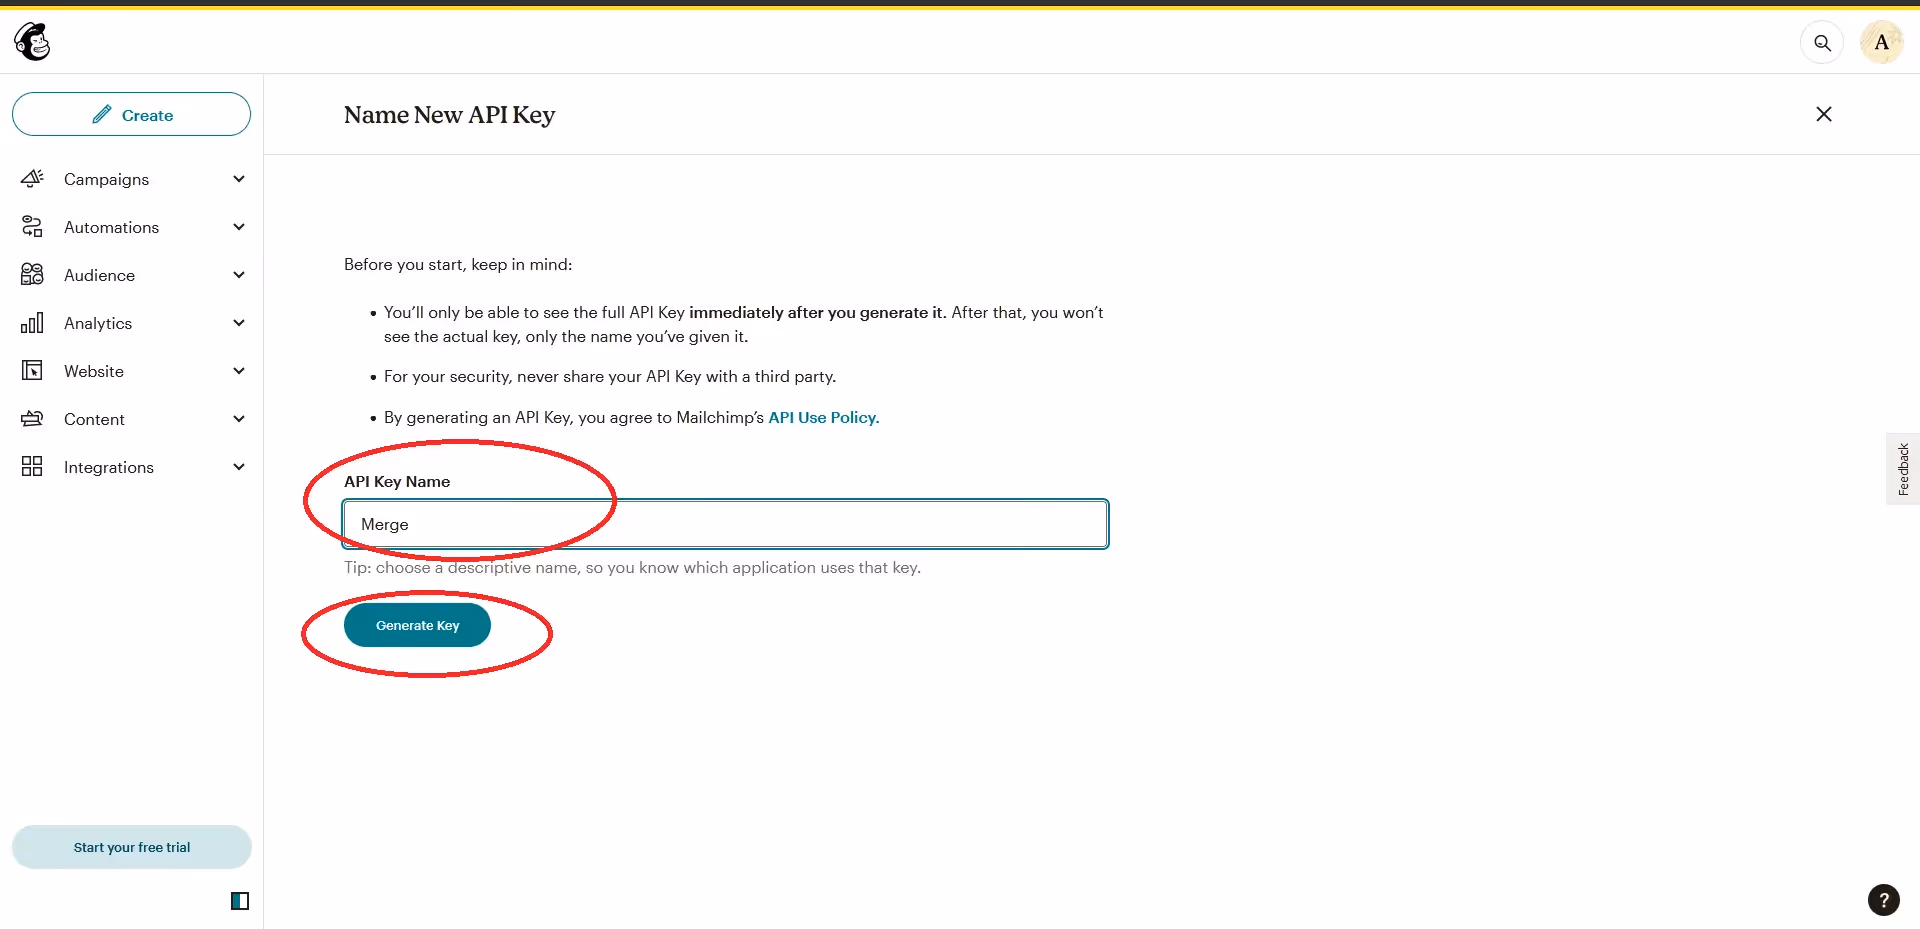
Copy and save the API key somewhere secure, as you would an important password.
Note: You won't be able to see this key again. Only its name and first four digits will be shown. If you lose the key, you'll have to generate a new one and update it everywhere the lost API key was used.

If you now check the API keys section, you'll see the key you just created. As you can see, only its name and the first four digits are visible. You can revoke the API key or create new ones if needed in the future.
Testing Your Setup
Before you start using the Mailchimp API to manage your lists and campaigns, it's a good idea to first test if you've set up everything correctly. The best way to do this with the Mailchimp API is to make a request to the ping endpoint. Doing so has no effect on your account. It only acts like a test to check whether everything's set up as it should be.
You can make a request to the ping endpoint with the following piece of code from the Mailchimp documentation:
Remember to change the <code class="blog_inline-code">api_key</code> and <code class="blog_inline-code">server</code> in this code. For the <code class="blog_inline-code">api_key</code>, copy and paste the API key that you previously generated. For the <code class="blog_inline-code">server</code>, log in to Mailchimp and look at the URL in your browser. It should look similar to this:

The part that comes before the <code class="blog_inline-code">.admin.mailchimp.com</code> is your server prefix. In the case of this tutorial, that's <code class="blog_inline-code">us12</code>, so that's what will be inputted as the value for <code class="blog_inline-code">server</code>. You'll have to input the value that you find in your browser, which may or may not be the same as the one in this tutorial, into your code.
If you've set up everything correctly and inputted the correct <code class="blog_inline-code">api_key</code> and <code class="blog_inline-code">server</code>, running the piece of code above will give you the following response:
Creating a New Subscriber
Now that everything is set up correctly, you can proceed with creating new subscribers, updating or deleting existing ones, managing your lists and campaigns, and much more. Let's start with creating new subscribers.
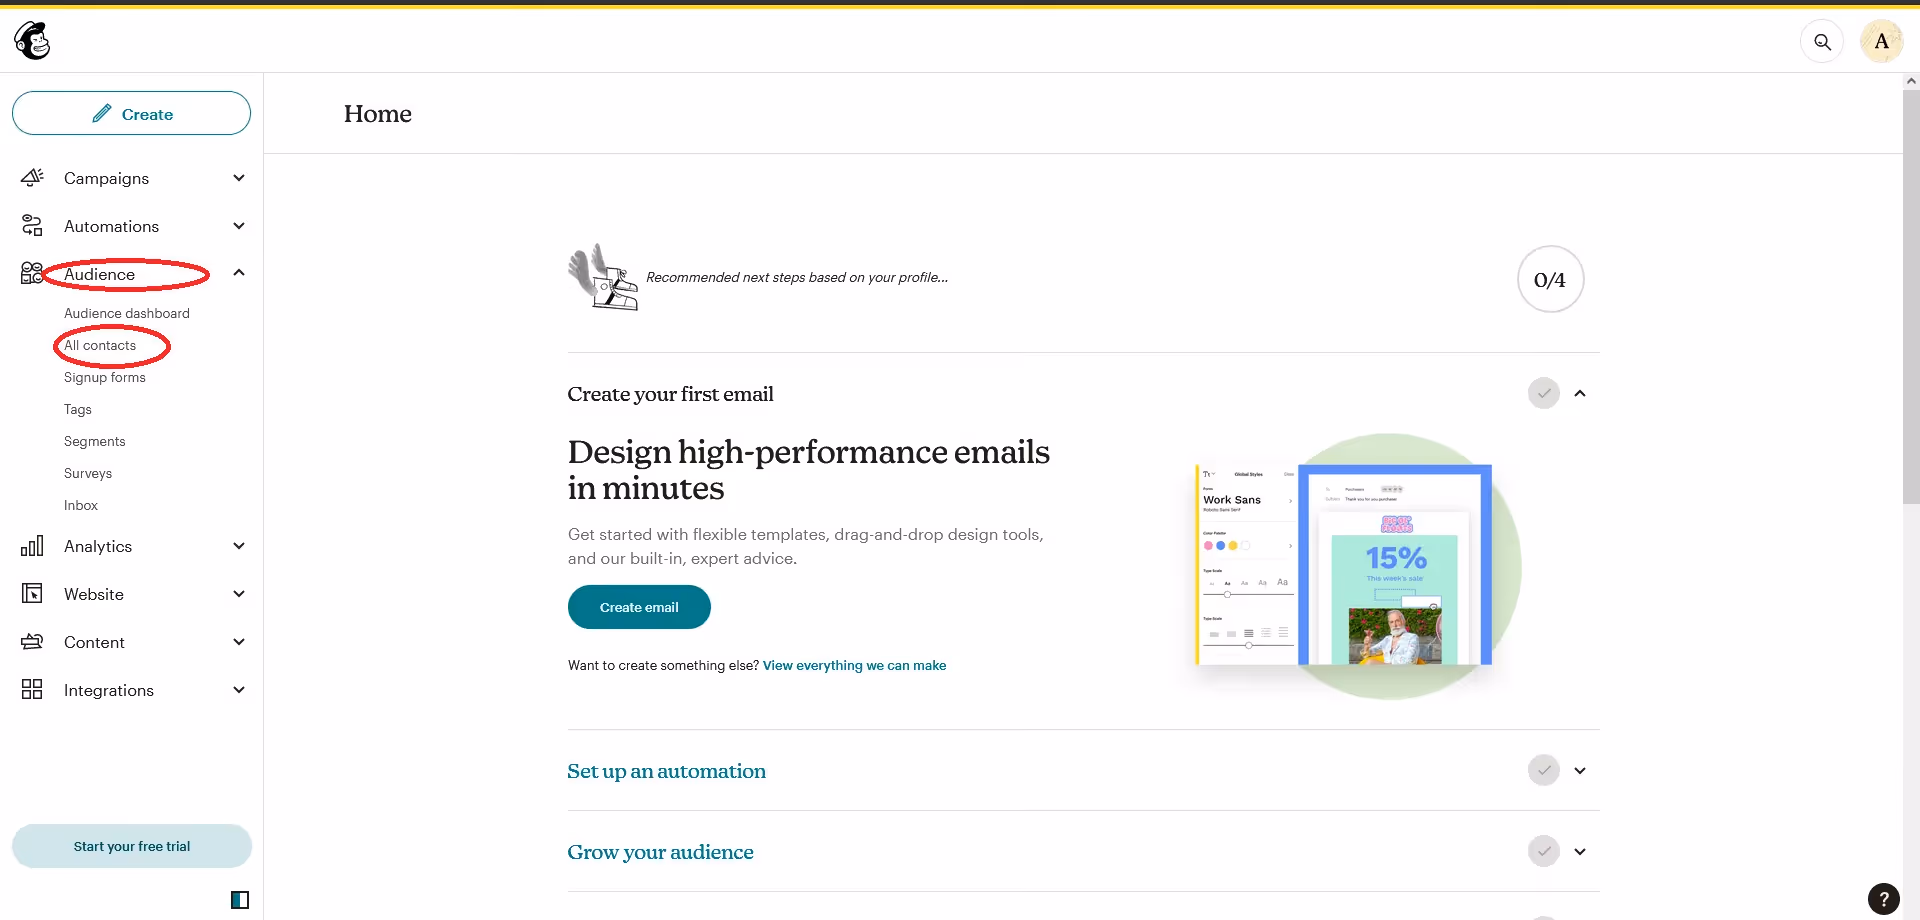
To add a subscriber, you need a list to which you can add them. Mailchimp creates a list (or an audience—the Mailchimp API uses the two terms interchangeably) by default when you create your account.
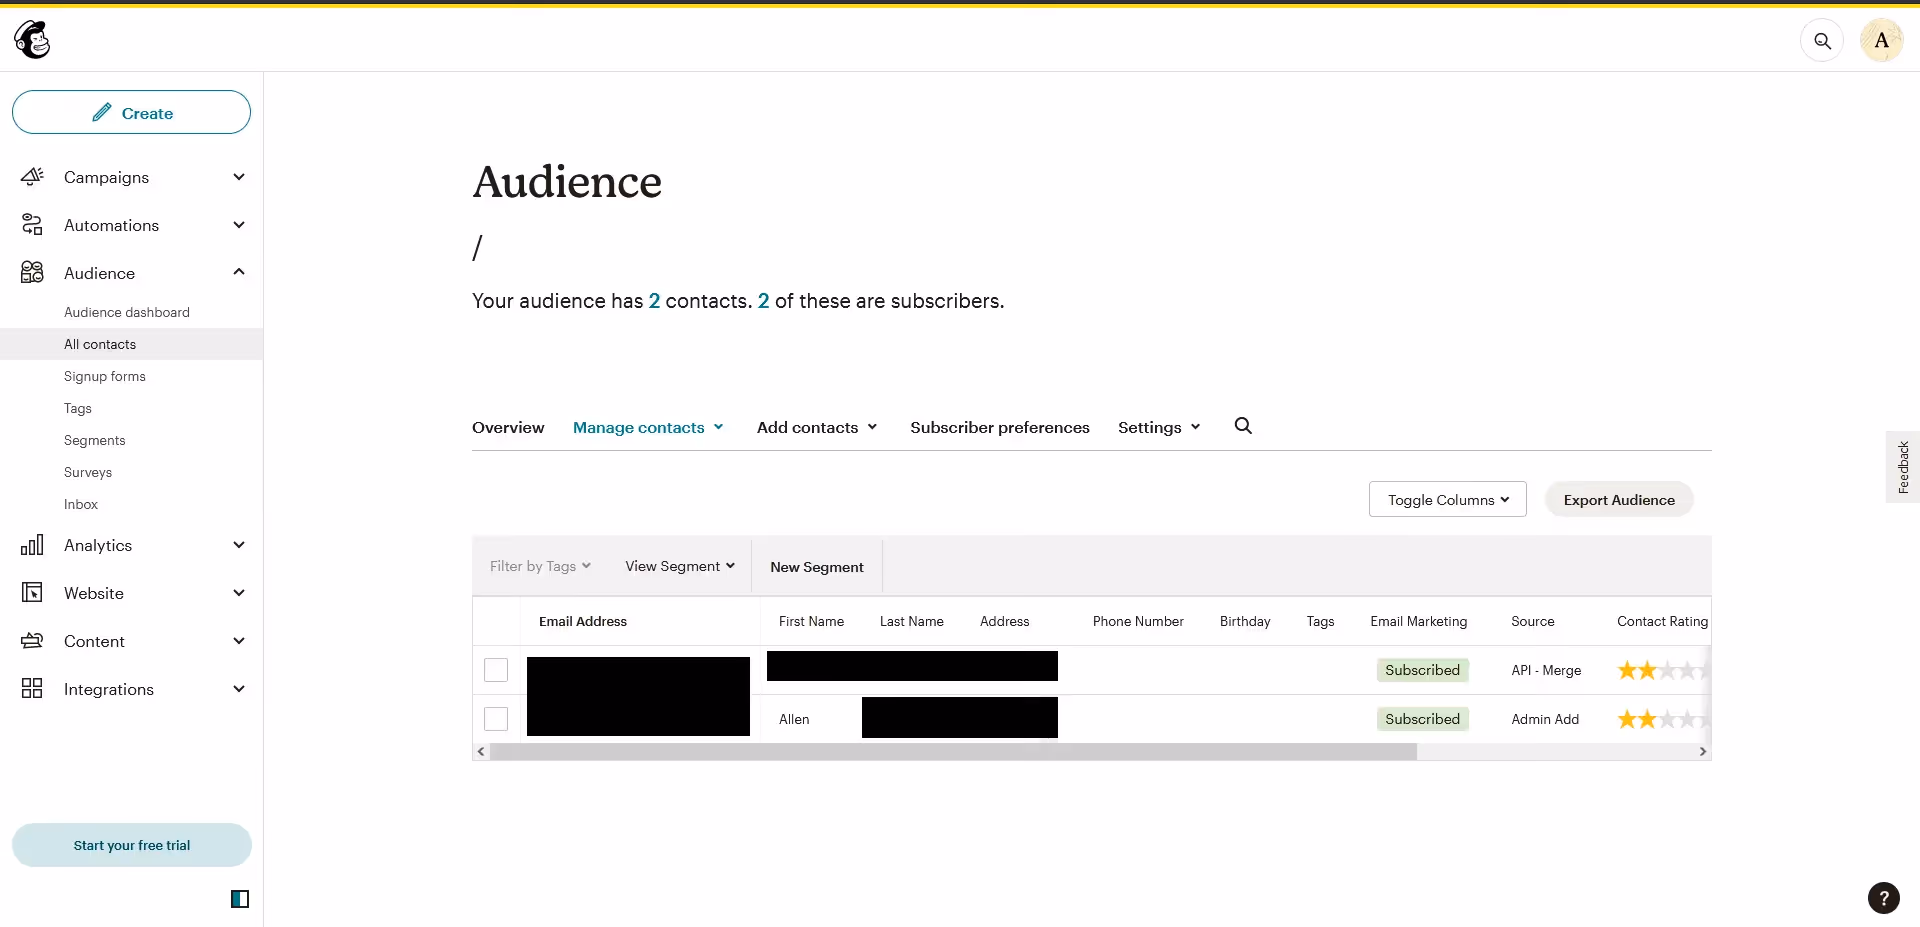
To manage this audience, you'll need its ID, so the first step is to find it. From your Dashboard, navigate to the Audience drop-down menu and then to All contacts.
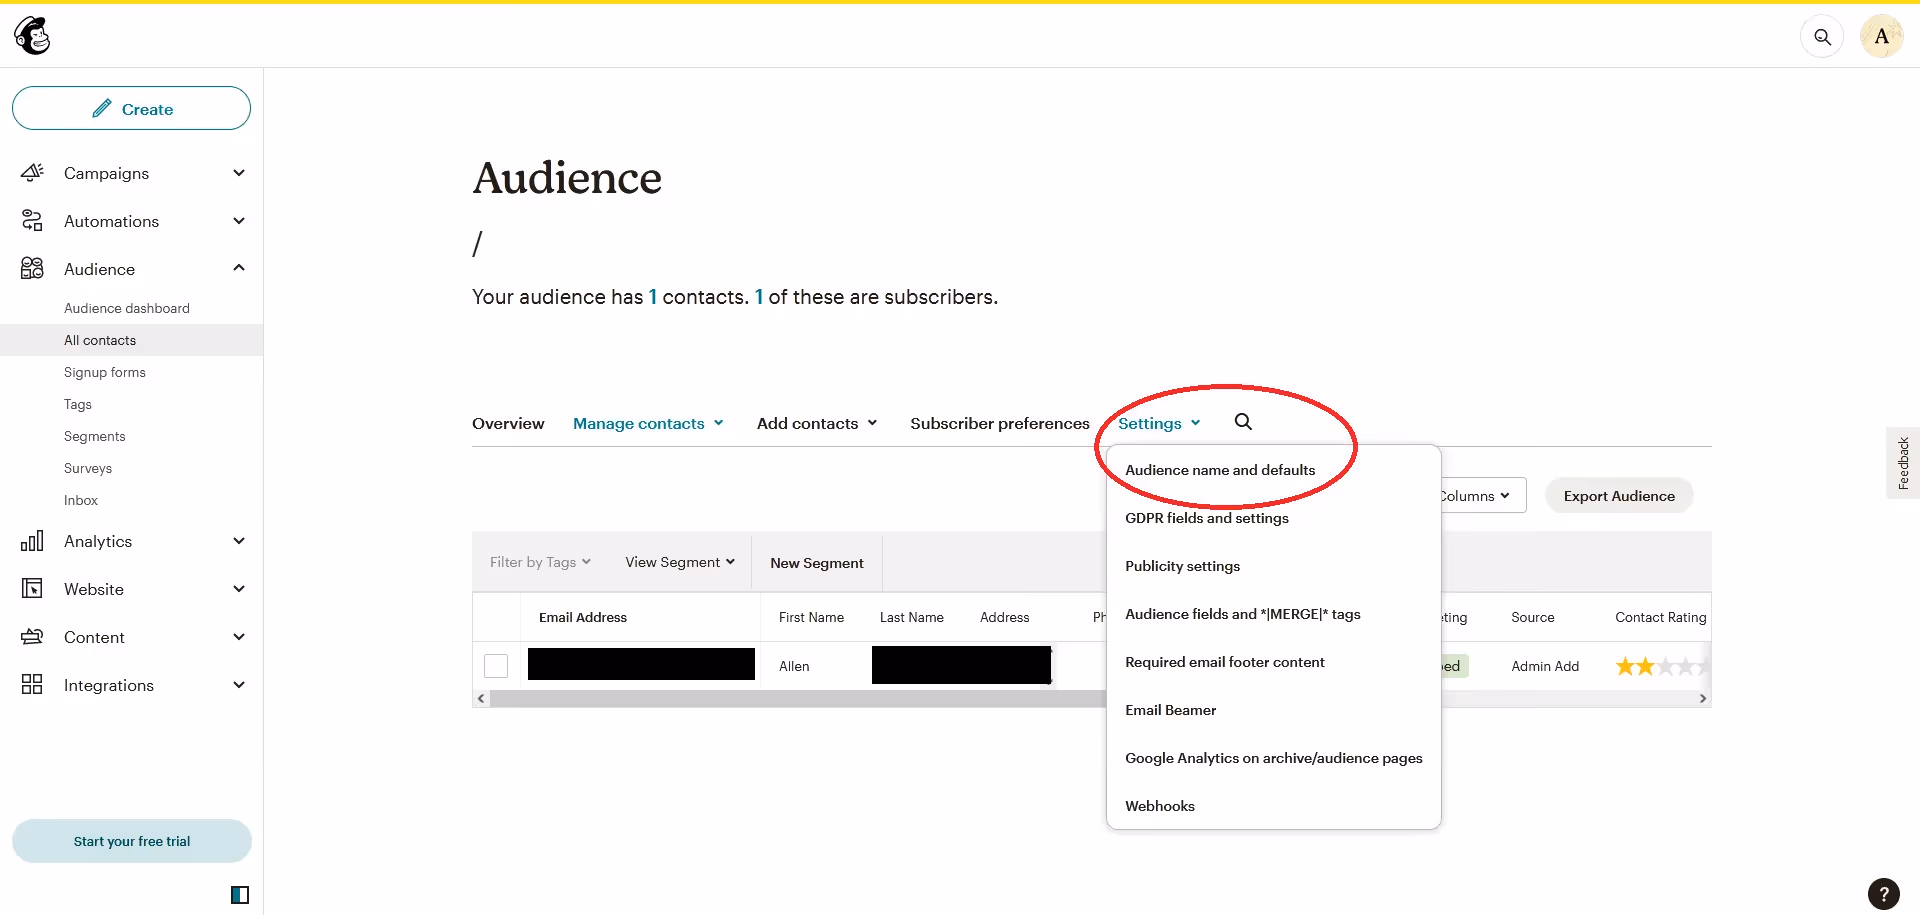
From there, go to the Settings drop-down menu and click on Audience name and defaults.
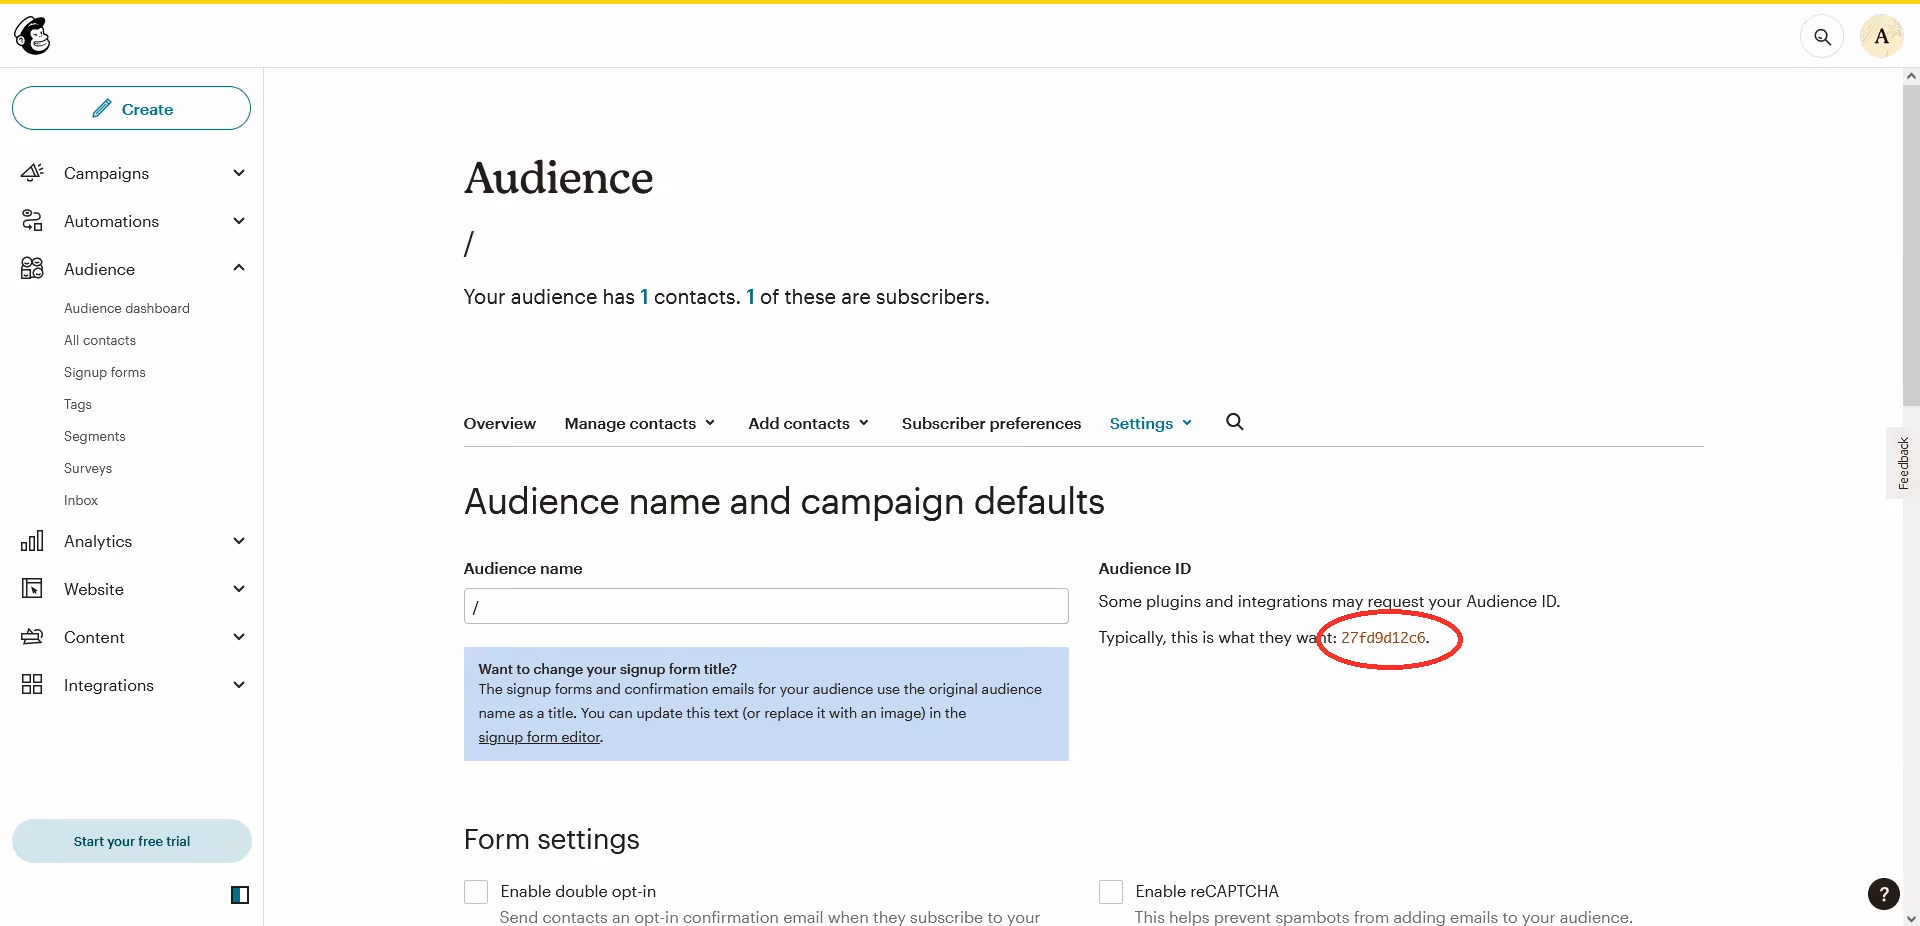
This is where you can see your Audience ID.
You can now construct a POST request that will add a subscriber to your list by running the following code that's been slightly modified from the Mailchimp API documentation:
This example uses three fields: the contact's email address, first name, and last name. You could also add other fields, such as the address, phone number, or birthday, or you could ask for no information except the email address, not even the name.
The exact piece of code above will result in an exception since the <code class="blog_inline-code">email_address</code> isn't valid. If the <code class="blog_inline-code">email_address</code> had been valid, this code would have immediately added the contact "Jane Doe" with the email address "jane.doe@example.com" to the list with "YOUR_LIST_ID".
To test the code, replace the email address with your own. You should see the new subscriber in your Audience Dashboard.
Optionally, you can change the <code class="blog_inline-code">status</code> field in the code from <code class="blog_inline-code">subscribed</code> to <code class="blog_inline-code">pending</code>. That way, the contact won't be added to the list immediately. Instead, they will get a confirmation email, and they'll only be added to the list if they confirm the subscription.
Note: Test with your own email addresses instead of random ones since you don't want to send subscription confirmation emails to random people.
Updating and Deleting Subscribers
Once you have subscribers on your list, you can update their status or even delete them. Since you already have your API key, server prefix, and list ID, unsubscribing or updating a contact from your list is quite straightforward. All it takes to unsubscribe a contact is running the following code:
To delete a subscriber from a list, all you need to input is the <code class="blog_inline-code">list_ID</code> and the <code class="blog_inline-code">member_email</code>. Any email address you input into the <code class="blog_inline-code">member_email</code> field will immediately be removed from the list, and you will see one less subscriber in your Audience Dashboard. Note, though, that the contact will stay in your audience. They will only be unsubscribed from the list.

You can update the status of a subscriber as easily as deleting them. All you need to do is change the value of the <code class="blog_inline-code">status</code> field in the code above from <code class="blog_inline-code">unsubscribed</code> to any status you want, such as <code class="blog_inline-code">subscribed</code>, <code class="blog_inline-code">pending</code>, or <code class="blog_inline-code">cleaned</code>.
Managing Lists and Campaigns
Until now, all the actions you performed are on an existing list. But you can also use the Mailchimp API to create, manage, or delete lists and campaigns.
Here's an example from the Mailchimp documentation on how to create a list with the Mailchimp API:
This code snippet may seem intimidating since many fields are required (<code class="blog_inline-code">name</code>, <code class="blog_inline-code">contact</code>, <code class="blog_inline-code">permission_reminder</code>, <code class="blog_inline-code">email_type_option</code>, and <code class="blog_inline-code">campaign_defaults</code>), but it's not as complicated as it looks:
- The <code class="blog_inline-code">name</code> is what you want to call the list.
- In <code class="blog_inline-code">contact</code>, you should input your business's contact information, which is required by anti-spam laws.
- The <code class="blog_inline-code">campaign_defaults</code> should include the default values for created campaigns, which are from name, from email, and subject for emails sent to the list, as well as the default language for the list's forms.
- The <code class="blog_inline-code">permission_reminder</code> should show the subscriber where they subscribed to your email list. (People often forget that they've subscribed to a certain email list!)
- The <code class="blog_inline-code">email_type_option</code> sets whether subscribers can choose the format of the email (if set to True) or if they'll receive HTML emails (if set to False).
Remember that you can have only one audience on the free plan, though. Since you already have the default one, you won't be able to create new ones. If you want to add a new audience with the Mailchimp API using the free plan, make sure to delete your default audience from the Audience Dashboard.
Updating a list is quite straightforward too. You simply need to change the information you want changed in the <code class="blog_inline-code">body</code> in the code above. Once the <code class="blog_inline-code">body</code> is updated, run the following piece of code, which will include your list ID:
Finally, deleting a list if you don't need it anymore is also very straightforward. All you need to know is your list ID, which you already know how to find, and then use it to run the following code:
If you run this code and then check your Audience Dashboard, you'll see that the audience with that particular list ID is not there anymore.
Finally, let's see how to add campaigns using the Mailchimp API. Again, it is quite straightforward. You just need to decide between the different types of campaigns that the Mailchimp API offers, namely regular, plaintext, absplit, rss, or variate.
Here's how to create a regular campaign:
Note that this piece of code merely creates a blank campaign. It doesn't actually send the campaign to your audience. However, it's a necessary first step. Once you've created a campaign this way, you can choose to send it to your audience or to schedule it for delivery.
Conclusion
As you've seen, it's pretty straightforward to use the Mailchimp API to add new subscribers, delete existing ones, and create and manage new lists and campaigns programmatically.
However, if your product requires you to connect not only to Mailchimp but to several marketing platforms like it, doing it all manually can be labor-intensive. Merge's Unified API lets you add numerous integrations in mere days so you can focus on your core product. Apart from being quick and straightforward to use, Merge also has extensive documentation to make your life as easy as possible.
To get started, you can sign up for the Merge Unified Marketing Automation API for free.

.jpg)
.png)
.png)

