

Table of contents


Guide to Webhooks (with Examples from Jira)


Ivan Kahl
Organizations often use multiple applications to conduct business. For example, a tech team might find that Jira works well for managing tasks, a support team prefers Zendesk to handle support tickets, and a product team likes ClickUp for planning. Each application has its strengths, so it makes sense for each team to choose what works best for them.
However, using multiple applications can lead to issues if you can't easily share data between the software packages. For example, a product team might want to stay updated on the development progress of a new product, or support needs to send issues through to the tech team.
Integrating these different applications can help overcome this issue. One effective method of integration is webhooks. Webhooks allow information to be shared between applications in real time as information changes, meaning information stays consistent and updated.
This article will teach you about webhooks and how they can help you integrate different systems efficiently. You'll also see a practical demonstration of webhooks in Jira, a popular task management application.
{{this-blog-only-cta}}
Why Webhooks
A webhook is a user-defined HTTP callback. When an event happens in one application, the application sends a notification to a URL specified by the user. This integration method allows different applications to share information in real time as information changes.
One of the benefits of webhooks is that you don't have to poll for data. Polling is when a program regularly sends requests to a server to check for new data. However, polling is inefficient as it can burden the server and use unnecessary bandwidth. Webhooks are more efficient as data is only sent when there is new data to share, reducing the load on the bandwidth and load on the server. Also, since webhooks are HTTP calls, they are compatible with many applications and programming languages.
Related: webhooks vs polling
Send Data in Real Time
Webhooks make it possible to send information from one system to another in real time.
Say you have a landing page built in WordPress. Potential clients can submit a form on the page if they want a sales representative to contact them. Webhooks allows the form submission to be sent directly to a sales system such as Salesforce. To do this, you'd configure the webhook in your form to send an HTTP request to your sales system whenever a prospective client submits the form. The HTTP request will contain the data from the form submission, which you can save in your sales system.
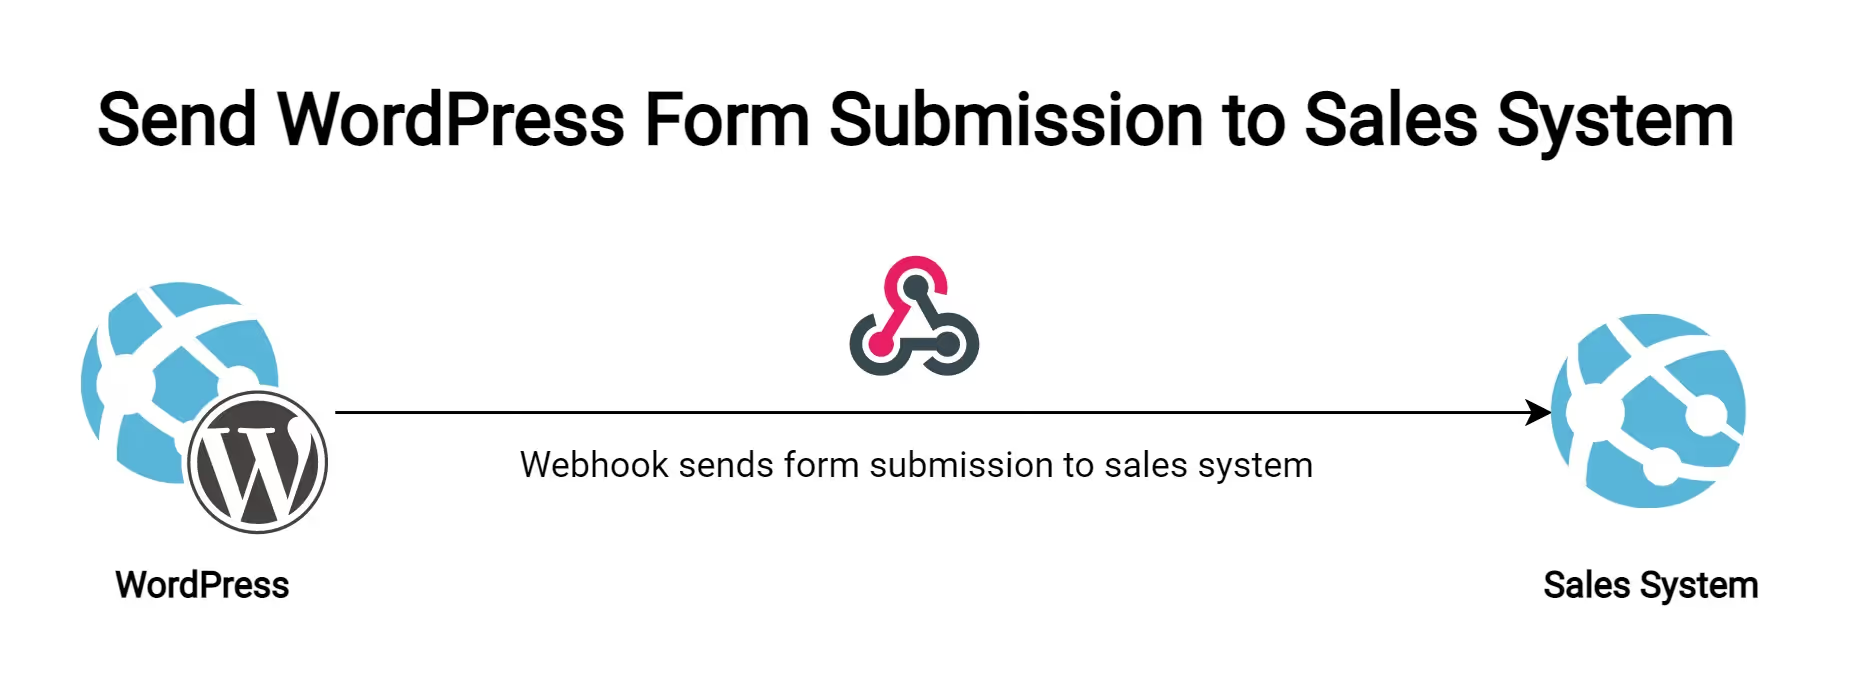
As a result, your sales team can follow up with potential clients much more rapidly. This real-time data transmission between systems can be incredibly beneficial for business workflows where timing is essential.
Send Notifications for Events
Webhooks let you send notifications via email or a messaging platform such as Slack or Teams.
Say you use a project management tool such as Jira to manage your sprints. You want to notify all project stakeholders at the beginning of a sprint which tasks the team is working on. This workflow is possible by configuring a webhook in Jira that will be executed at the start of a sprint. When the webhook is triggered, an email or instant message notification is sent to the project shareholders.
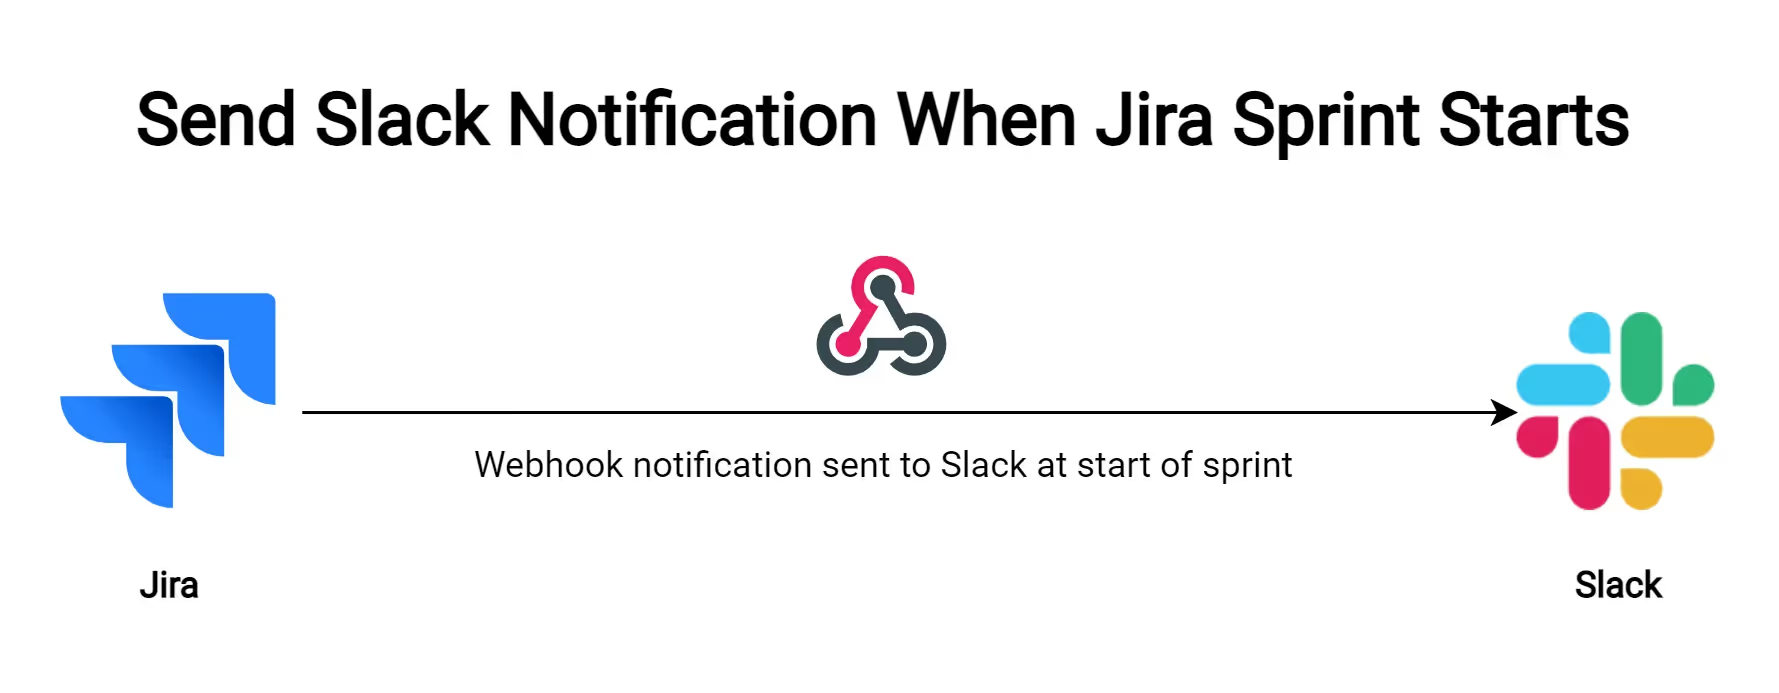
Sending custom notifications when an event occurs in systems is easy using webhooks.
Related: A guide to fetching projects from Jira (using Python)
Data Synchronization
You can also use webhooks to synchronize data between two systems in real time so that both systems maintain accurate, up-to-date data.
Say you have an invoicing system and use a payment service provider such as Stripe. First, configure a webhook in your invoicing application to send a payment request notification to your payment service. Then, set up another webhook with your payment service to notify your invoicing system when the payment request is fulfilled. These two webhooks will keep your payment service provider and invoicing application synchronized by sharing data changes with the other system as it happens.
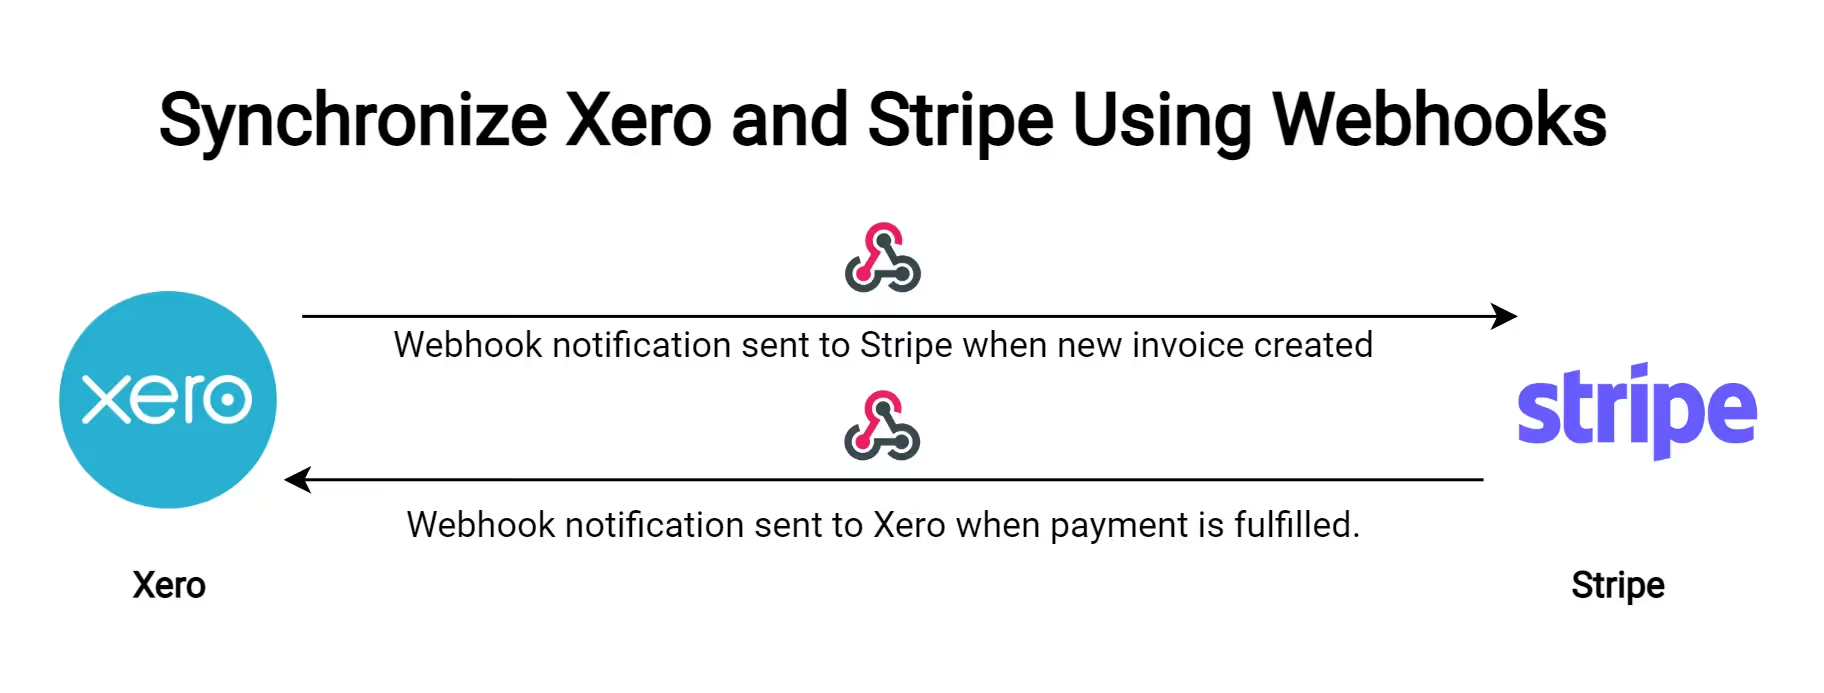
You can synchronize data between the systems in real time by configuring webhooks in both systems.
Related: REST APIs versus webhooks
How to Use Webhooks in Jira
As you've seen above, webhooks have many use cases. You'll now see a practical demonstration of webhooks in Jira.
To follow along, you'll need a Jira account. You can sign up for a free tier here. You'll also need a URL to which the Jira webhooks can send requests. This article uses Request Bin as it lets you visualize the data in a webhook request.
Register a Webhook
Before Jira can execute your webhook, you'll have to register it. When registering the webhook, you need to supply the following:
- The <code class="blog_inline-code">name</code> of the webhook in Jira lets you find it easily.
- The <code class="blog_inline-code">status</code> determines whether the webhook is enabled or not.
- The <code class="blog_inline-code">URL</code> is where the webhook should send notifications to. You can include dynamic variables in the URL, which lets you pass data about the event triggering the webhook. See the documentation for more details.
- You can optionally provide the <code class="blog_inline-code">description</code>, which lets you specify more details about the webhook.
- The <code class="blog_inline-code">events</code> will trigger the webhook. You can configure multiple events for a single webhook. More information on webhook events can be found here.
You can use the Jira Admin Console to manually configure the webhook or the REST API to configure a webhook programmatically.
Register a Webhook in the Jira Admin Console
If you are registering a custom webhook in your Jira instance, you can use the Jira Admin Console to register the webhook.
- Log in to Jira.
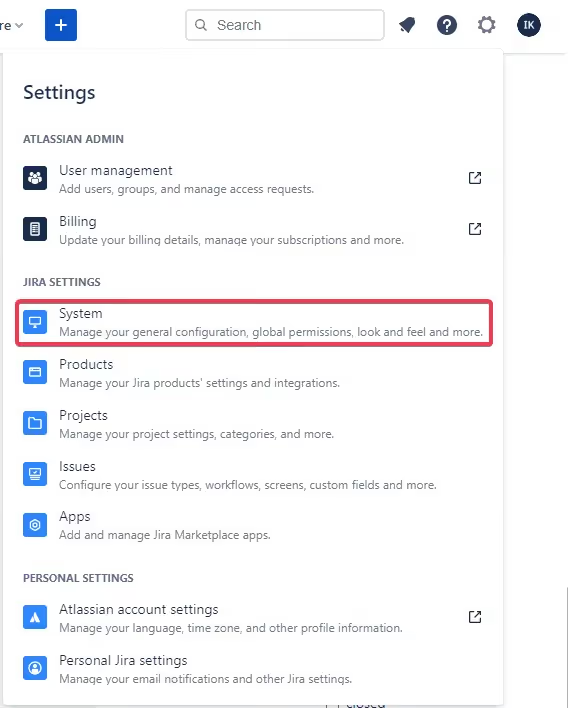
- Open the settings menu in the top right and select the System menu item in the JIRA SETTINGS section.
- In the menu on the left of the screen, scroll down and select WebHooks in the ADVANCED section.
- Click on the Create a WebHook button. Specify the Name and set the Status to Enabled. Generate a webhook URL in Request Bin (or whichever tool you're using to test webhooks) and paste it into the URL field.
- Select which one or more events should trigger the webhook.
- Click Create to finish registering your webhook.
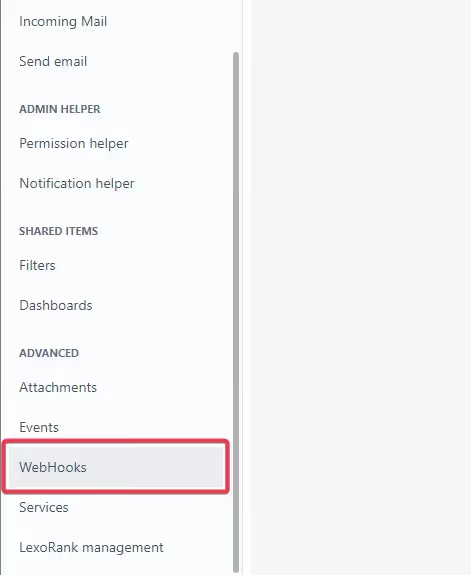
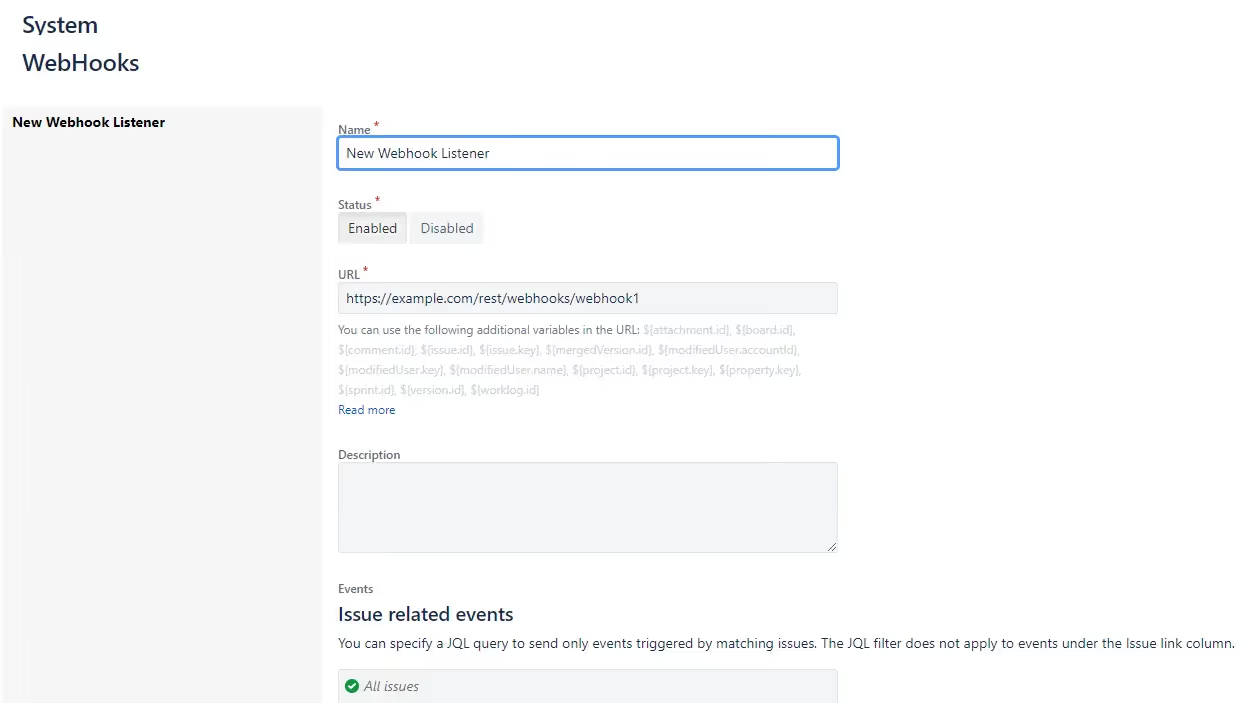
Now that you've set up the webhook in Jira, you can execute it. You can do this by performing any task in Jira that will cause one of the webhook events to trigger. In this case, the webhook will be triggered when a new task is created in Jira. Below is the request in Request Bin after a new task was created.
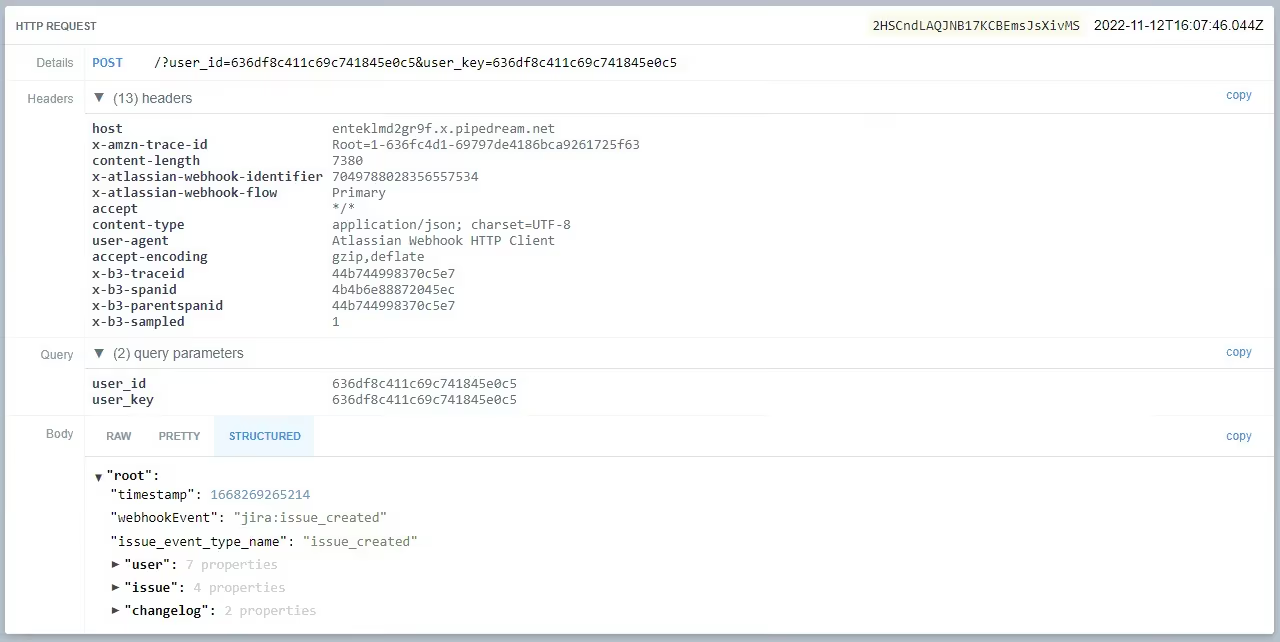
You'll see that information is sent about the <code class="blog_inline-code">user</code> and <code class="blog_inline-code">issue</code> that triggered the event, and the <code class="blog_inline-code">changelog</code> contains a list of changes made to the issue. You can read more about what information is sent by a webhook in Atlassian's documentation.
If you configured the webhook to trigger an endpoint on your application, you could process this information and update your application or send a notification in real time.
Related: How webhooks can support your integrations
Register a Webhook Using the Rest API
Instead of manually registering webhooks in the Jira Admin Console, you can use the Jira REST API to create these webhooks. This method is beneficial when developing third-party apps that need to add webhooks to Jira.
You'll need a REST client such as Postman or curl to follow along with this section.
Create an OAuth 2.0 Application
First, you'll need to create your own OAuth app in Jira to consume the REST API.
- Navigate to your Developer Console.
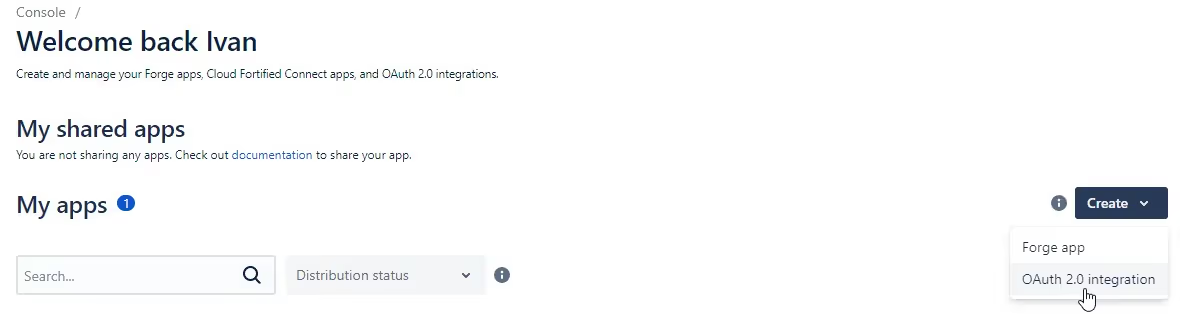
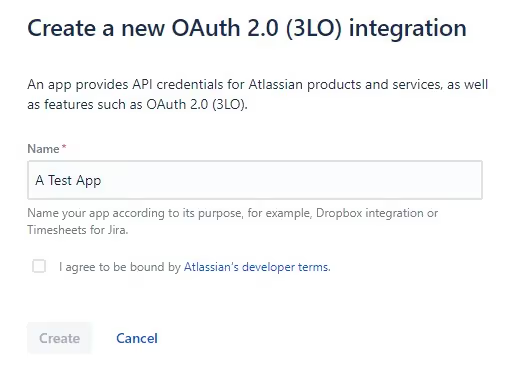
- Click on the Create button and select OAuth 2.0 integration.
- Give your application a name and click Create.
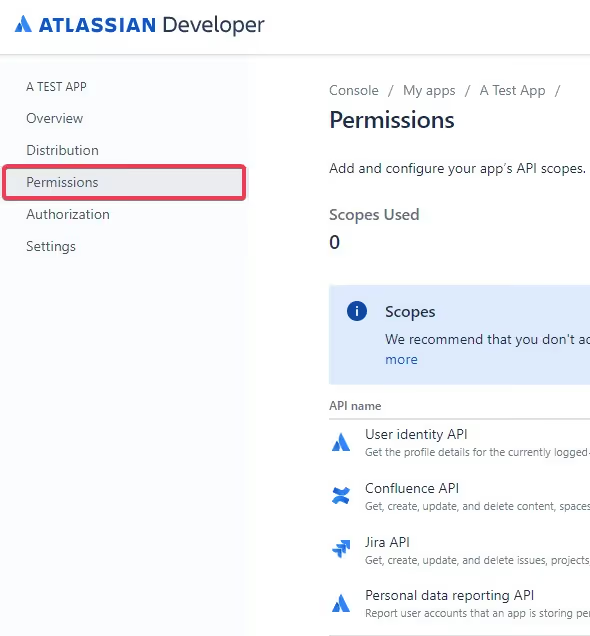
- You will need to add the <code class="blog_inline-code">read:jira-work</code> and <code class="blog_inline-code">manage:jira-webhook</code> scopes to your application. In the left menu, click on Permissions.
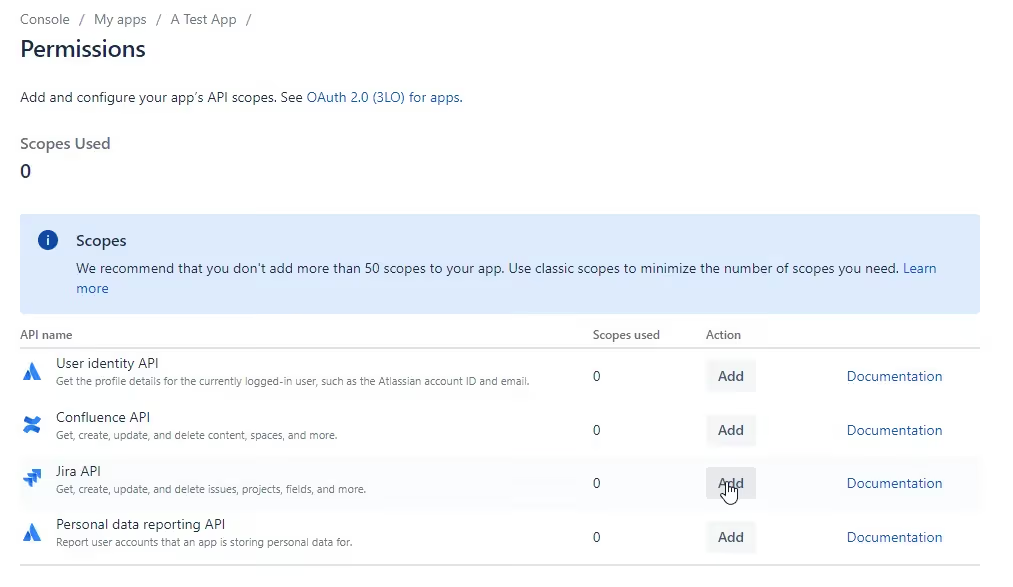
- Click on the Add button next to Jira API.
- Configure the application to have the <code class="blog_inline-code">read:jira-work</code> and <code class="blog_inline-code">manage:jira-webhook</code> scopes.
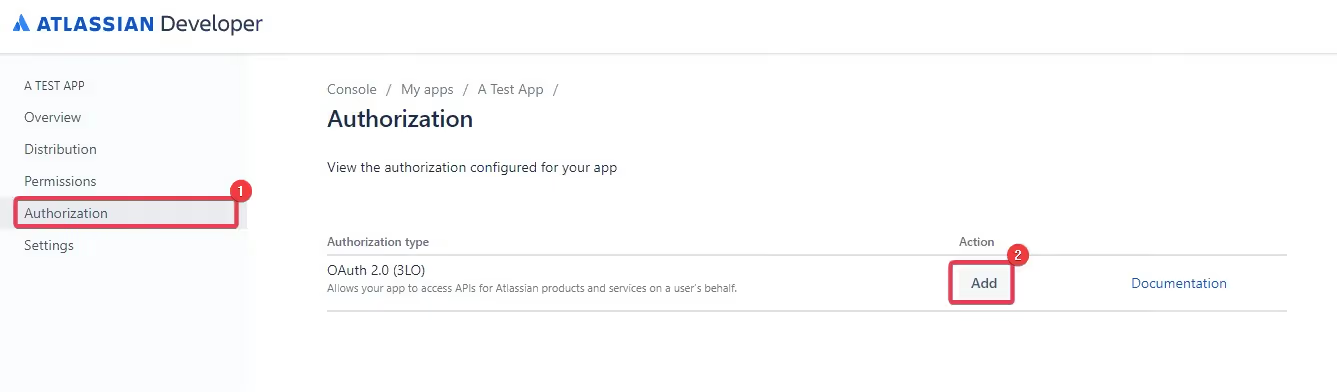
- Click on Authorization in the left menu and then Add the OAuth 2.0 (3LO) authorization type to your app.
- Configure a callback URL. If you are using Postman, refer to their authorization documentation on what to use for the callback URL. Then, click Save changes to save the changes.
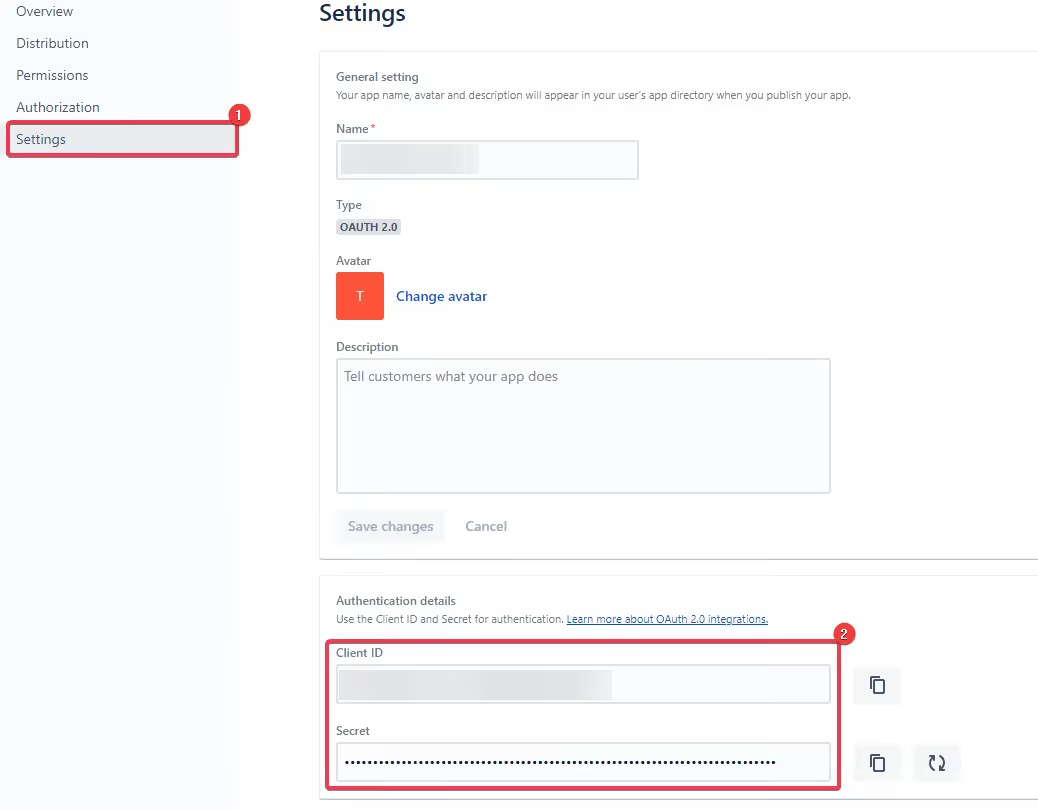
- Finally, click on Settings in the left menu, and retrieve your client ID and client secret.
- You can now use your OAuth 2.0 app in Postman to retrieve an access token for the request to create a webhook.
Retrieve an Access Token
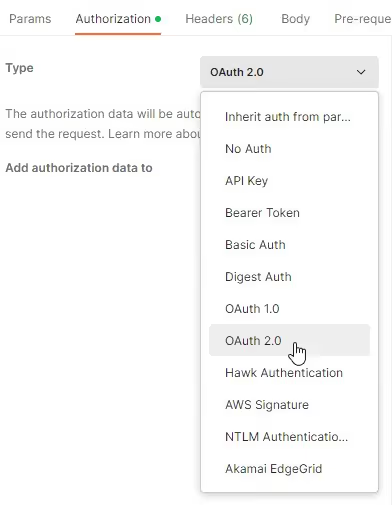
- Create a new request in Postman and select OAuth 2.0 as the Authorization Type.
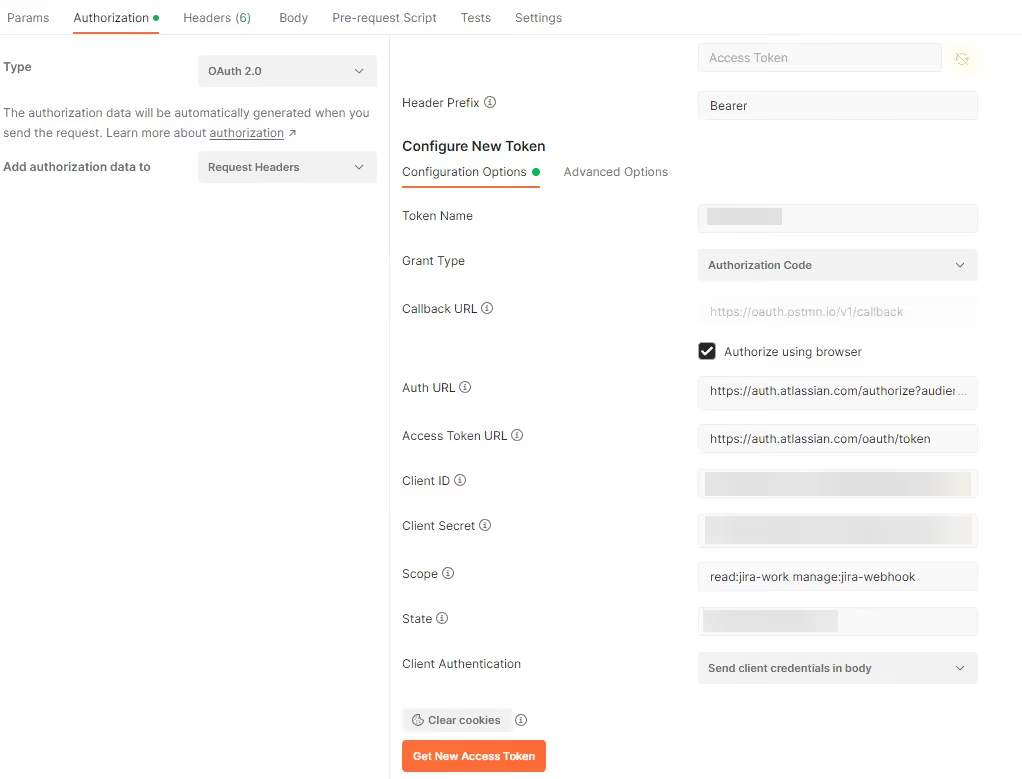
- In the Configure New Token section, populate the form as follows:
- Token Name: <code class="blog_inline-code">Jira Token</code>
- Grant Type: <code class="blog_inline-code">Authorization Code</code>
- Callback URL: <code class="blog_inline-code">https://oauth.pstmn.io/v1/callback</code> (check Authorize using browser)
- Auth URL: <code class="blog_inline-code">https://auth.atlassian.com/authorize?audience=api.atlassian.com</code>
- Access Token URL: <code class="blog_inline-code">https://auth.atlassian.com/oauth/token</code>
- Client ID: Your OAuth app's client ID
- Client Secret: Your OAuth app's client secret
- Scope: <code class="blog_inline-code">read:jira-work</code> <code class="blog_inline-code">manage:jira-webhook</code>
- State: Your own random string
- Client Authentication: Send client credentials in body
- Click on Get New Access Token and follow the prompts in your browser.
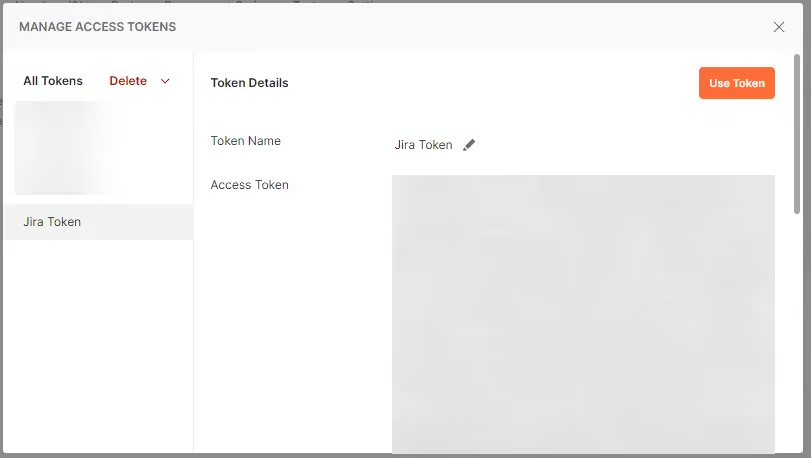
- You should see the following dialog displaying the access token. Click Use Token to add the access token to your request.
Once you've retrieved the access token, you can create a webhook using the REST API.
Create a Webhook Using the REST API
- Open your REST client and send a GET request to <code class="blog_inline-code">https://api.atlassian.com/oauth/token/accessible-resources</code> using the access token you received when authenticating with OAuth.
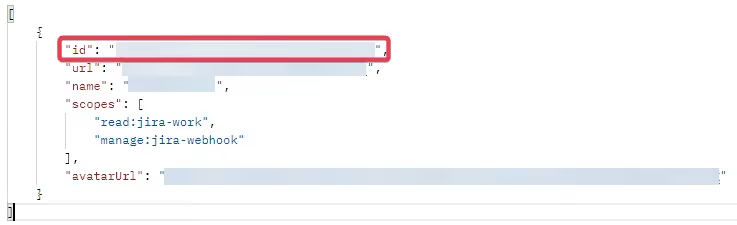
- Take note of the id property in the response.
- Create another POST request to <code class="blog_inline-code">https://api.atlassian.com/ex/jira/<ID>/rest/api/2/webhook</code> where <ID> is the value of the id property from the previous step. Then, specify the webhook details in the request body as follows:
For the url property, generate a webhook URL using your webhook testing tool—e.g., Request Bin.
You must specify a JQL filter to restrict which tasks in Jira can trigger the webhook. You can find documentation on JQL here. In this example, the webhook will fire when you create an issue in the TP project.
You must also specify one or more events that should trigger the webhook. For example, in the snippet above, the webhook will be executed when a user creates a new issue in Jira.
4. Send the request. The response object will contain an array of objects containing the IDs for the newly created webhooks in Jira that should look something like this:
You've now set up a dynamic webhook in Jira. Execute it by performing any task in Jira that will cause one of the webhook events to trigger. Similarly to the previous webhook you created in the Jira Admin Console, this webhook will be triggered when a new task is created in Jira. Create a new task in Jira and notice how the request looks in Request Bin.
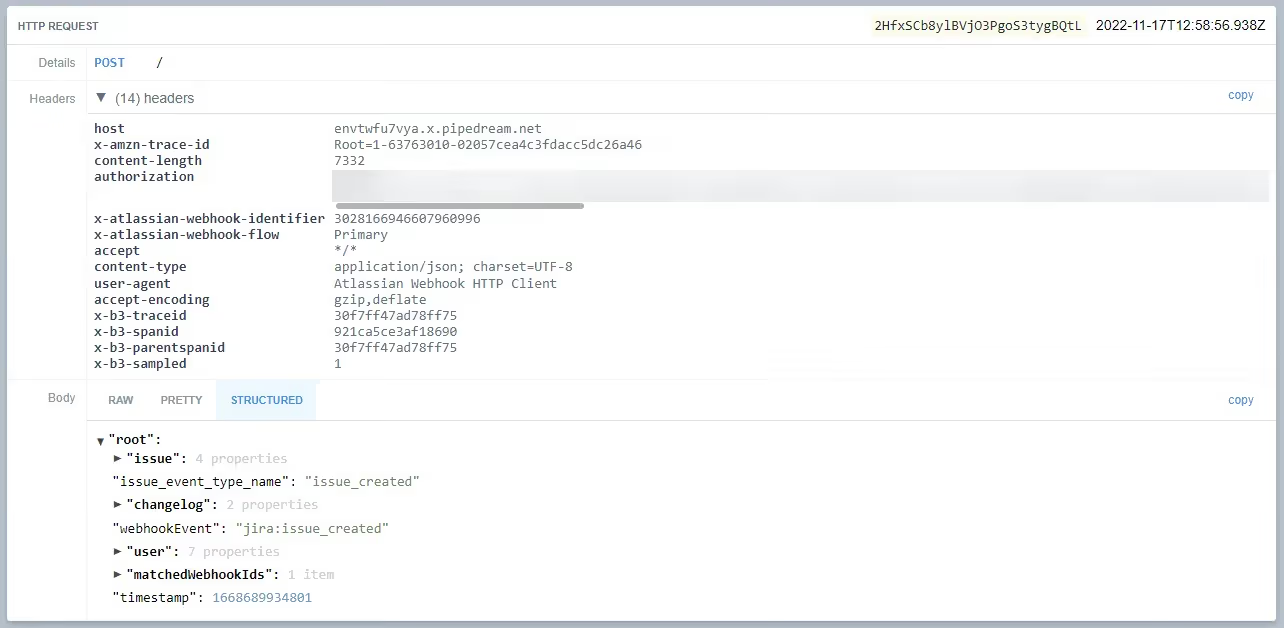
The request appears similar to the one sent from the webhook you created in the Jira Admin Console. However, notice that this webhook also includes an authorization header and a <code class="blog_inline-code">matchedWebhookIds</code> property in the body. These would be used when integrating your own application using Jira webhooks.
You can learn more about using the Jira REST API for creating webhooks in the documentation.
Related: The steps for getting comments from Jira through Python
Automating Jira Webhooks
Jira also lets you send webhook notifications in automations on your projects. These automations let you create more complex workflows for projects when an event occurs in the project.
For example, you can set up an automation that will get triggered when assigning someone to a task. You can add conditional statements in the automation that can trigger different webhooks depending on who got assigned the issue. Of course, this is just one example. There is so much more you can do.
- Log in to Jira.
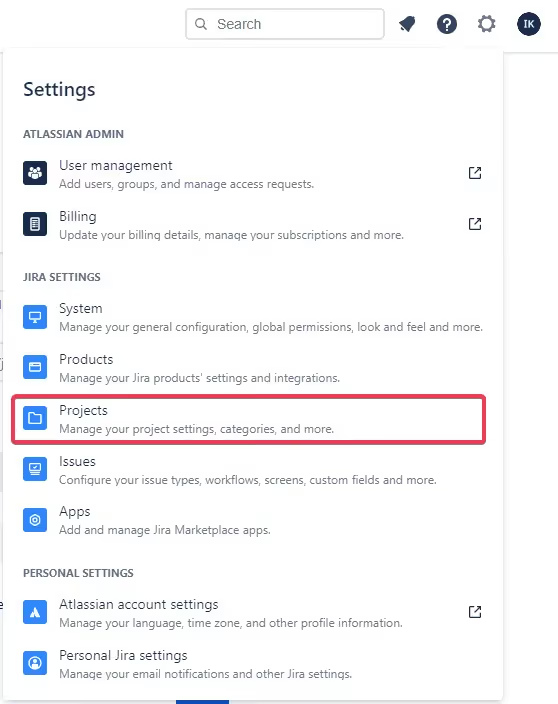
- Open the settings menu in the top right and select Projects in the Jira Settings section.
- Select the project on which you want to set up the automation.
- Select Project settings in the menu on the left of the screen and then Automation.
- Create a new automation by clicking on the Create rule button.
- Choose an event that should trigger the automation. In this case, the automation will be triggered whenever someone comments on an issue.
- You can build the automation by clicking on the Add component link on the left and adding different conditionals.
- Click on Add component to trigger a webhook in the automation. Search for the Send web request action and select it.
- Configure the action by specifying a test webhook URL in the URL field. In this demonstration, a URL is generated in Request Bin and specified in the URL field. You can also configure the headers and body for the web request. In this case, Jira will send through the issue data in the automation format. You can also configure the action to wait for a response from the webhook before continuing using the Wait for response field. Click Save to continue.
- On the screen that appears, give your automation a descriptive name and click Turn it on to save it.
- Save the action.

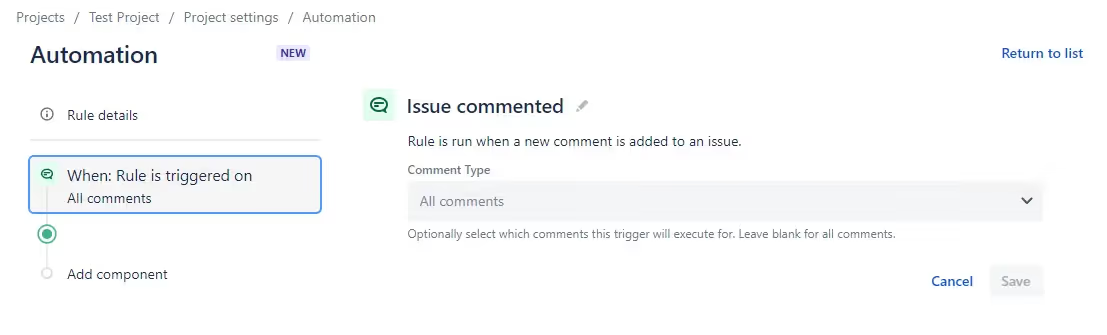
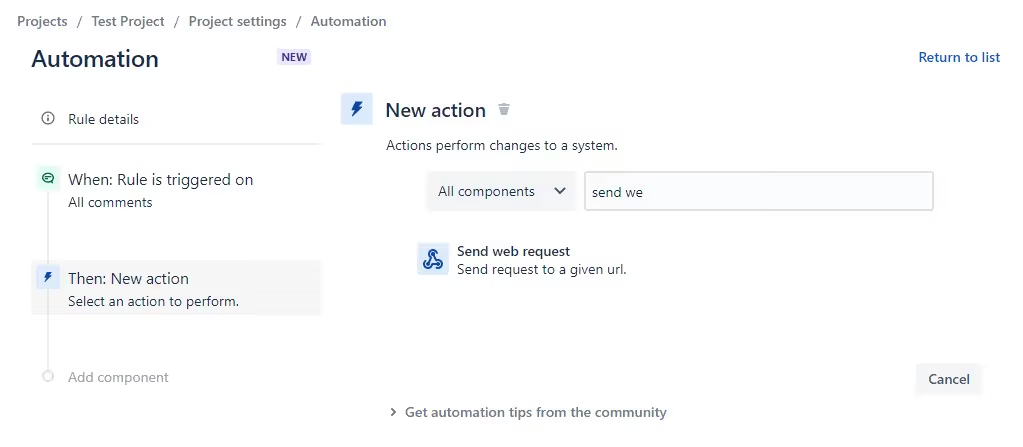
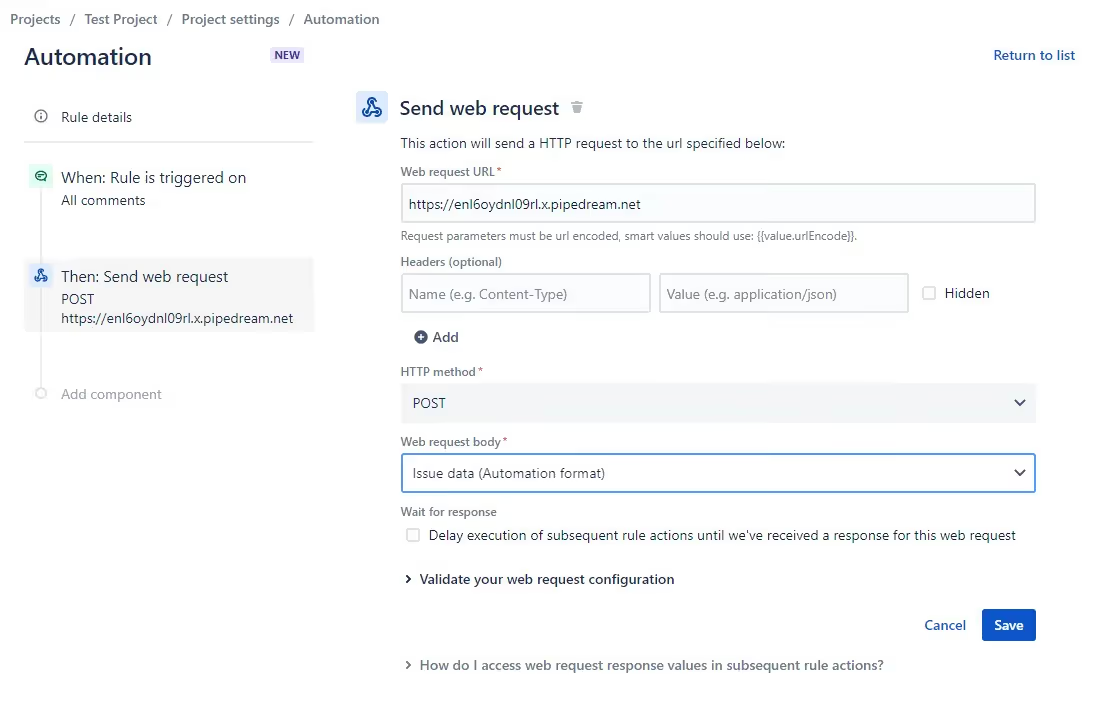
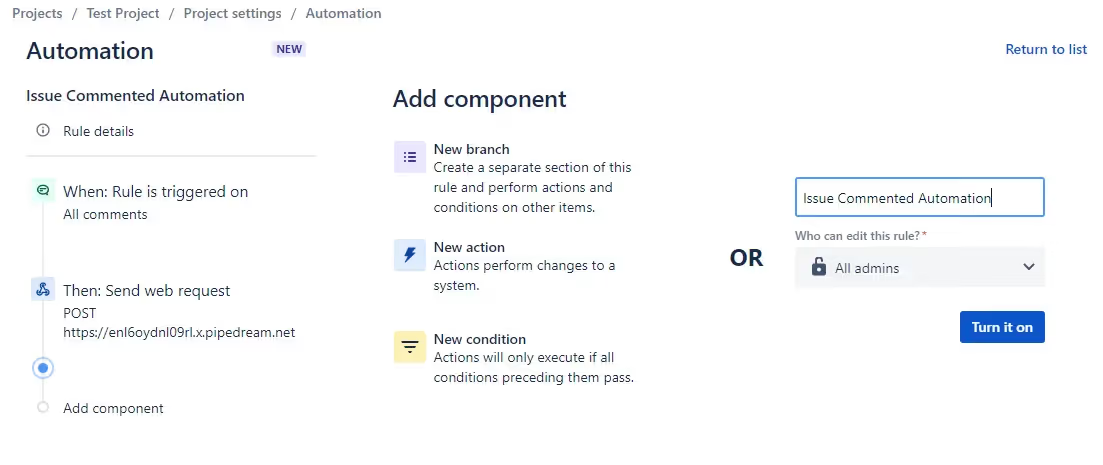
Once you've created and enabled a new automation, you can test it. The automation above is triggered whenever a user comments on a task. If you test the automation by adding a comment to any issue in your project, you'll notice that the request object is huge. However, if you drill down, you will find information on the new comment you just added.
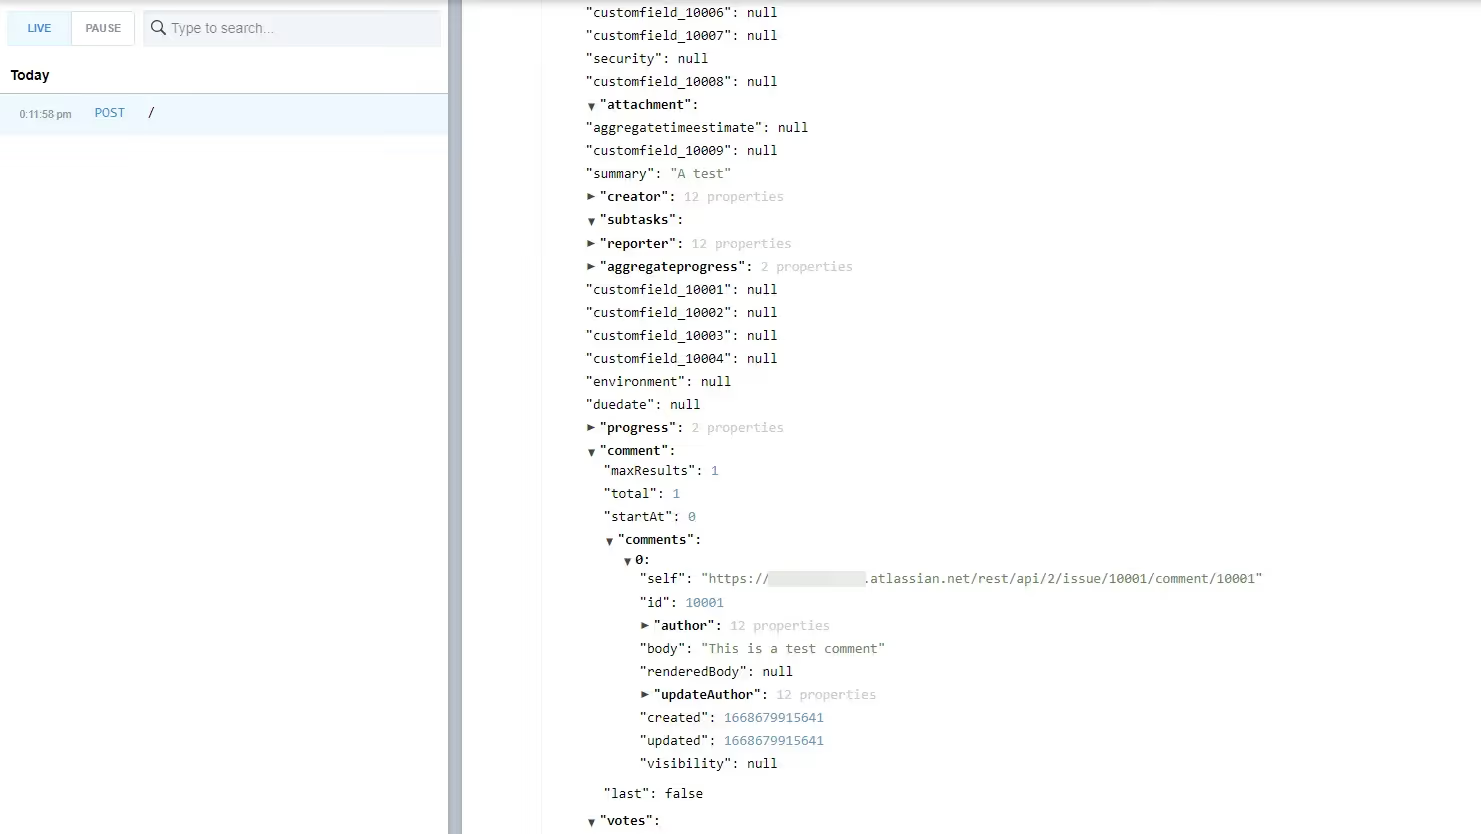
Automations let you build powerful workflows that can integrate into other applications from within the workflow.
Conclusion
In this article, you learned about what webhooks are, why they're helpful, and how to use them to send data from one application to another, send a notification when an event occurs in a system, and synchronize data between two systems. The article also demonstrated how to configure webhooks in Jira.
Webhooks in Jira let you integrate your task management system with your ticketing system, project management system, and more. You can create countless more integrations with webhooks. However, you need to write code to react to webhooks and update another application using their API.
Merge simplifies integrating different systems by offering a unified API that integrates with hundreds of HR, recruiting, ticketing, CRM, file storage, and accounting platforms. Combined with the power of webhooks, and automatic webhook creation, Merge enables your business to use the best tools for the job while seamlessly synchronizing your data.

Ivan Kahl
.png)

.png)

Integrate with 30+ ticketing tools via Merge
Learn how Merge can help you integrate your product with Jira—and dozens of other ticketing applications—through a unified API.

But Merge isn’t just a Unified
API product. Merge is an integration platform to also manage customer integrations. gradient text
But Merge isn’t just a Unified
API product. Merge is an integration platform to also manage customer integrations. gradient text
But Merge isn’t just a Unified
API product. Merge is an integration platform to also manage customer integrations. gradient text
But Merge isn’t just a Unified
API product. Merge is an integration platform to also manage customer integrations. gradient text