
Table of contents
Just for you
How to automate user provisioning with Merge's Unified API and BambooHR


Merge is a Unified API platform that consolidates APIs from different services into one unified hub. With Merge, you can seamlessly gather data from a human resource information system (HRIS), applicant tracking system (ATS), and similar platforms, all in one convenient place. This is particularly convenient for software-as-a-service (SaaS) companies, enabling them to offer multiple integrations to their customers.
Merge has a number of existing integrations with different SaaS services, including HRIS providers like Workday, , and BambooHR. These integrations unlock a multitude of use cases—with automated user provisioning being one of the most popular.
To help you automate user provisioning via Merge, we'll break down each step you need to follow and use BambooHR as an example.
What is BambooHR?
BambooHR is a comprehensive directory and ATS platform designed to simplify employee management (including prospective employees). While BambooHR offers a public API, Merge helps streamline the data on BambooHR to follow its standard API spec. The data can then be accessed using the available SDKs or the Merge Unified REST API.
Merge performs periodic syncs with BambooHR, ensuring its own database aligns with the HR platform's data. This setup enables Merge to detect any changes that occur. When such changes occur, Merge can send a webhook notification. Alternatively, the connecting application has the option to manually retrieve the updated data from Merge's synced database through the API or SDK.
Trigger user deprovisioning with the Merge Unified API and BambooHR
To help you better understand how Merge and BambooHR work together, you'll be creating a Python pipeline. This pipeline's purpose is to trigger a user deprovisioning process when BambooHR records a termination of employment.
Here's the scenario: you have a Python FastAPI application that displays daily tasks for users. When a user's employment is terminated, it's crucial to ensure they can no longer access this application. One way to achieve this is by updating the is_active flag in the user's application. Before letting the user log on, the application checks if the flag is true.
Take a look at what you need before you begin:
Prerequisites
To follow along with this tutorial, you need the following:
- A Merge account.
- A BambooHR account. You can sign up for a free trial if you don't already have an account.
- An ngrok account. You'll use this to receive webhooks from Merge. You also need to make sure ngrok is installed on your local development machine.
- Python 3 installed locally.
- A PostgreSQL database. You can use a local installation or create an instance in the cloud using a service like Neon.
Additionally, you need to clone this GitHub repo with the following command: <code class="blog_inline-code">git clone https://github.com/vicradon/merge-user-deprovisioning-demo.gitcd merge-user-deprovisioning-demo</code>
You'll run all the commands for this tutorial in the merge-user-deprovisioning-demo folder. This means that if you're using Visual Studio Code or any other IDE, you need to make sure your terminal points to this directory. For instance, if you run pwd in your terminal to view the current working directory, you should see something like this: /home/user/projects/merge-user-deprovisioning-demo
Create your virtual environment and install dependencies
Following best practices, it's recommended that you create a virtual environment for this application. To do so, you'll use the venv package that is part of the Python 3 standard library.
The following snippet contains the command for creating the virtual environment. It might not work as expected on your system if your system is pointing the python command to your Python 2.7 installation. If that's the case, make sure you replace python with python3.
Run the following command in your merge-user-deprovisioning-demo directory: <code class="blog_inline-code">python -m venv venv # replace python with python3 if necessary</code>
After the virtual environment is created, this command adds a venv directory to the merge-user-deprovisioning-demo directory.
Next, you need to source the virtual environment, which gives you access to all the installed dependencies as executables. Run the following command for your operating system (OS) to source the virtual environment: <code class="blog_inline-code">source ./venv/bin/activate # for Mac and Linuxsource ./venv/scripts/activate # for Windows using Git-Bash. .\venv\Scripts\activate.ps1 # for Windows using Powershell</code>
Install the dependencies listed in the requirements.txt file by running this command: <code class="blog_inline-code">pip install -r requirements.txt</code>
On successful implementation, your output looks like this:
Collecting alembic==1.11.3
Downloading alembic-1.11.3-py3-none-any.whl (225 kB)
━━━━━━━━━━━━━━━━━━━━━━━━━━━━━━━━━━━━━━━━ 225.4/225.4 KB 12.6 MB/s eta 0:00:00
Collecting anyio==3.7.1
Downloading anyio-3.7.1-py3-none-any.whl (80 kB)
━━━━━━━━━━━━━━━━━━━━━━━━━━━━━━━━━━━━━━━━ 80.9/80.9 KB 32.5 MB/s eta 0:00:00
...
Related: A guide to the process of integrating APIs
Connect Merge to BambooHR
In order for Merge to communicate with BambooHR, you need to set up a connection between the two platforms. You can do this by navigating to your Merge dashboard under the Linked Accounts section:
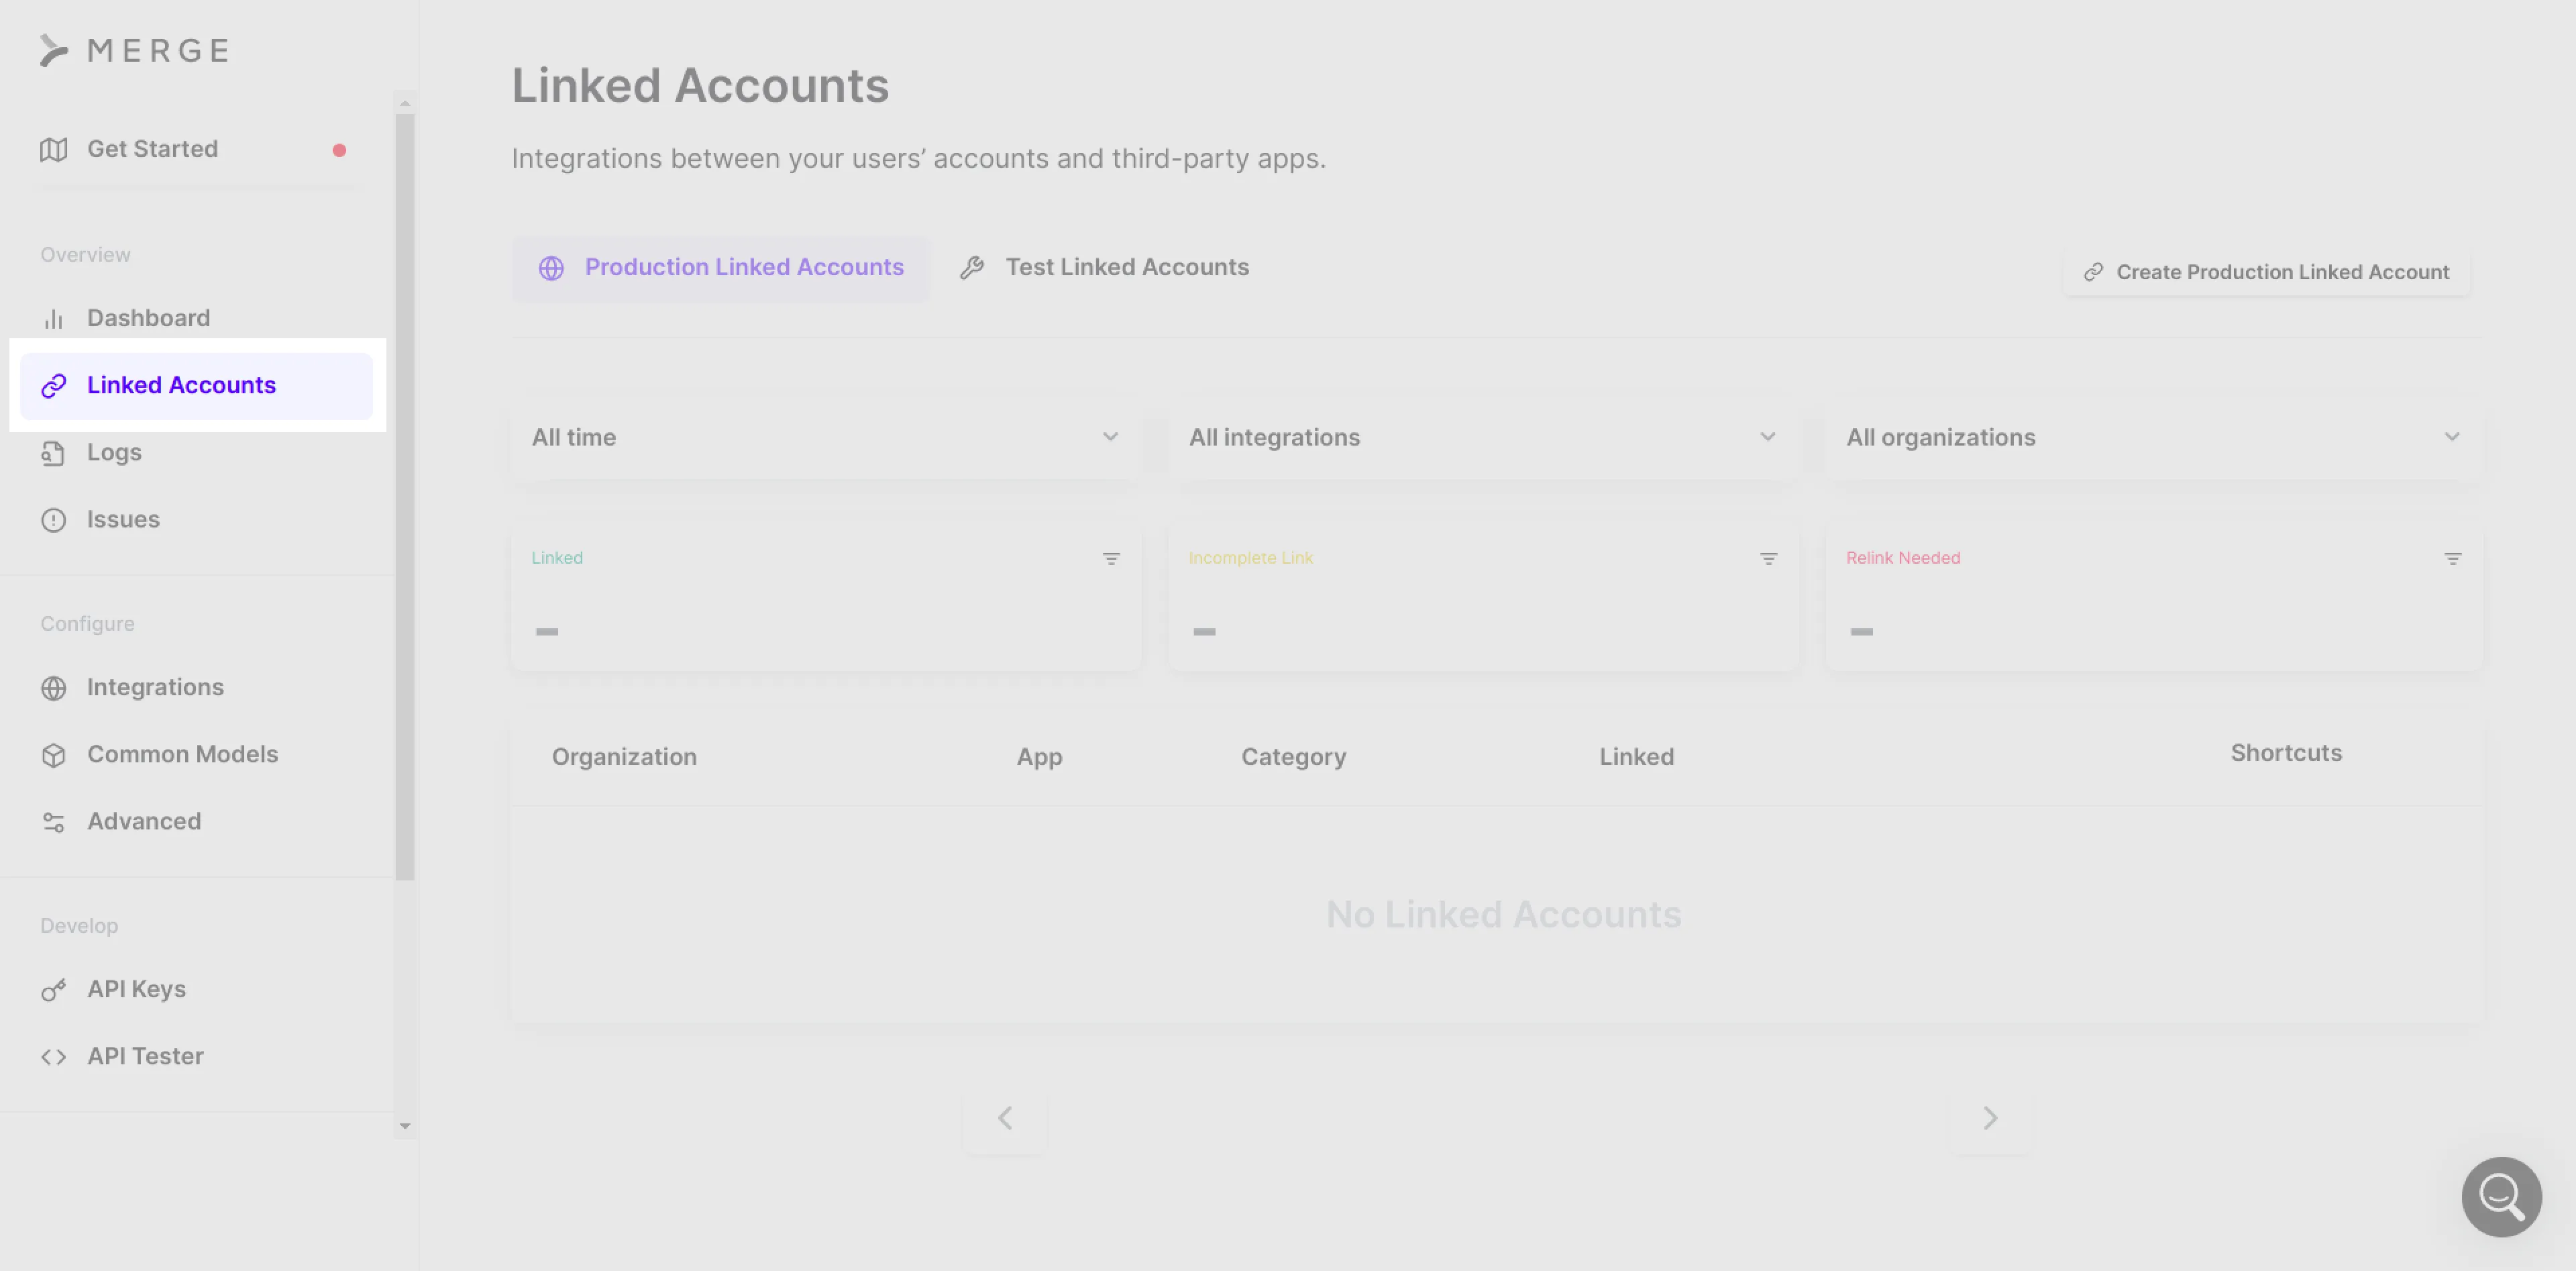
On the Linked Accounts page, you'll see two tabs: Production Linked Accounts and Test Linked Accounts. When you're developing a new feature or testing things out, you'll want to choose Test Linked Accounts. After your feature has been tested, you can then link a Production Linked Accounts. Click on the Test Linked Accounts tab to get started.
On the Test Linked Accounts page, click on Create Test Linked Account to start the setup process. You'll see a modal with six steps to complete the connection process.
Before you proceed, make sure you already have a BambooHR account because Merge uses the current authenticated session of your BambooHR account to complete the linking process:

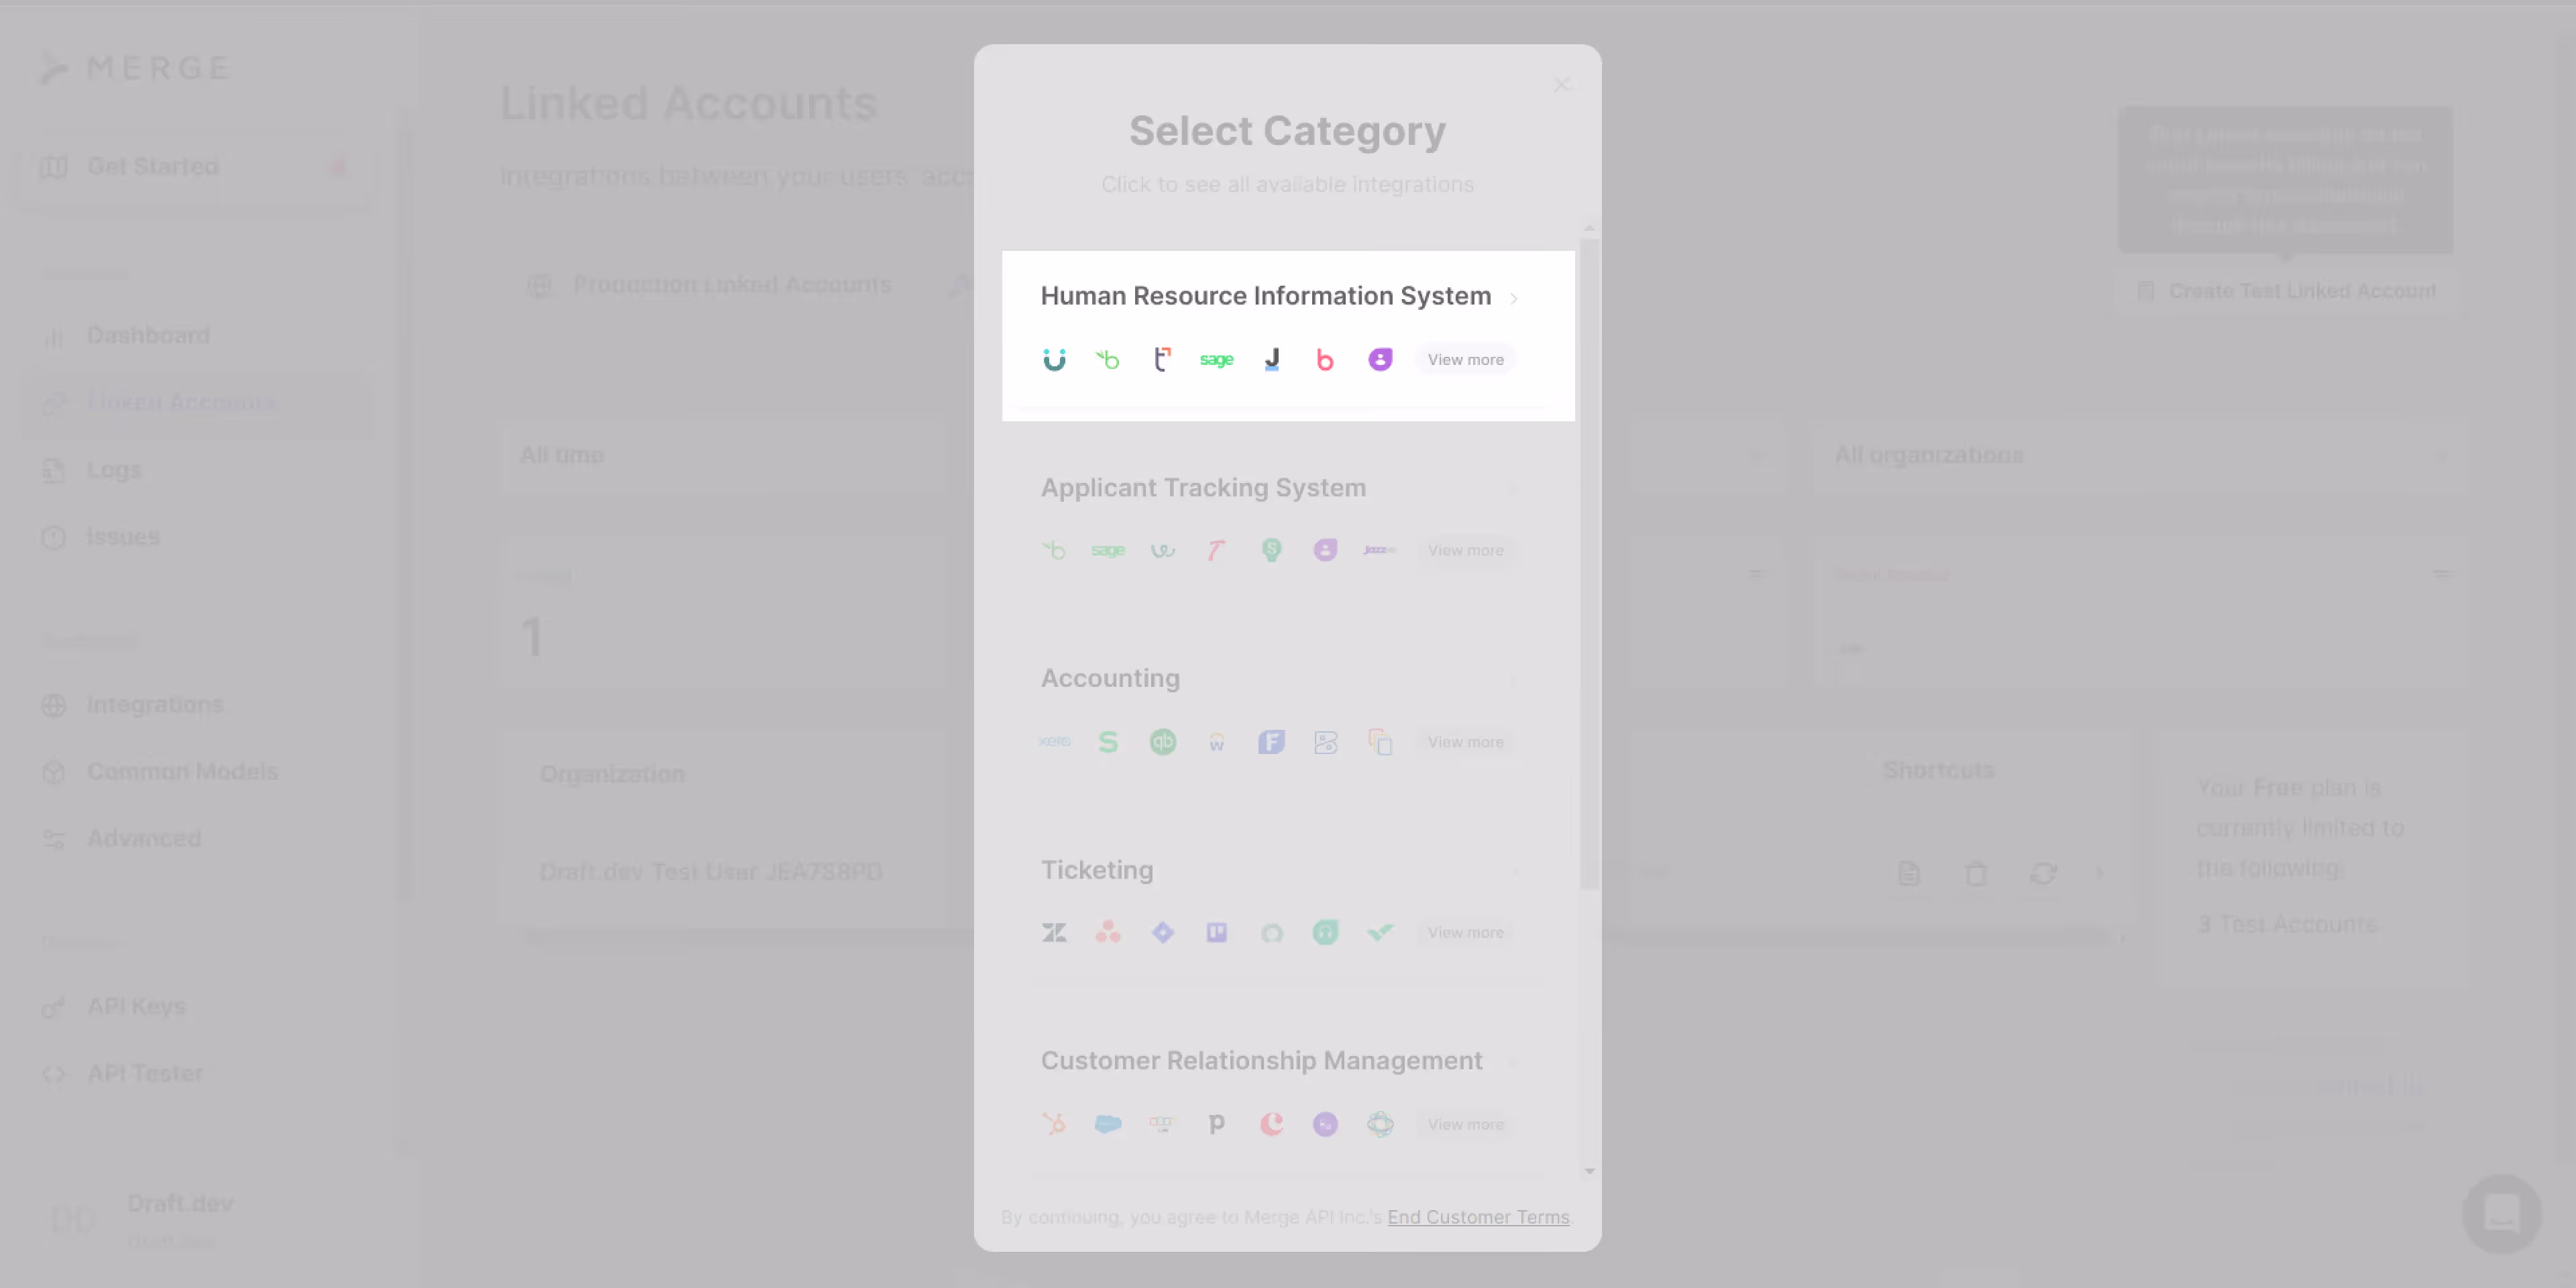
Clicking on the Create Test Linked Account button triggers a flow that takes you through the process of adding your BambooHR subdomain and authenticating it in the current browser. The first screen you'll see asks you to select a category. Since BambooHR is under the HRIS category, select Human Resource Information Systems from the list:
Next, you need to select the integration, which in this case is BambooHR.

After selecting BambooHR, you'll see a list of resources that Merge would like to access. Click on Continue to proceed:

Next, you need to choose how you want to authenticate, and there are two options: using the BambooHR website's current authenticated session or using an API key. Because it's more convenient to use the BambooHR website, go ahead and select this option:

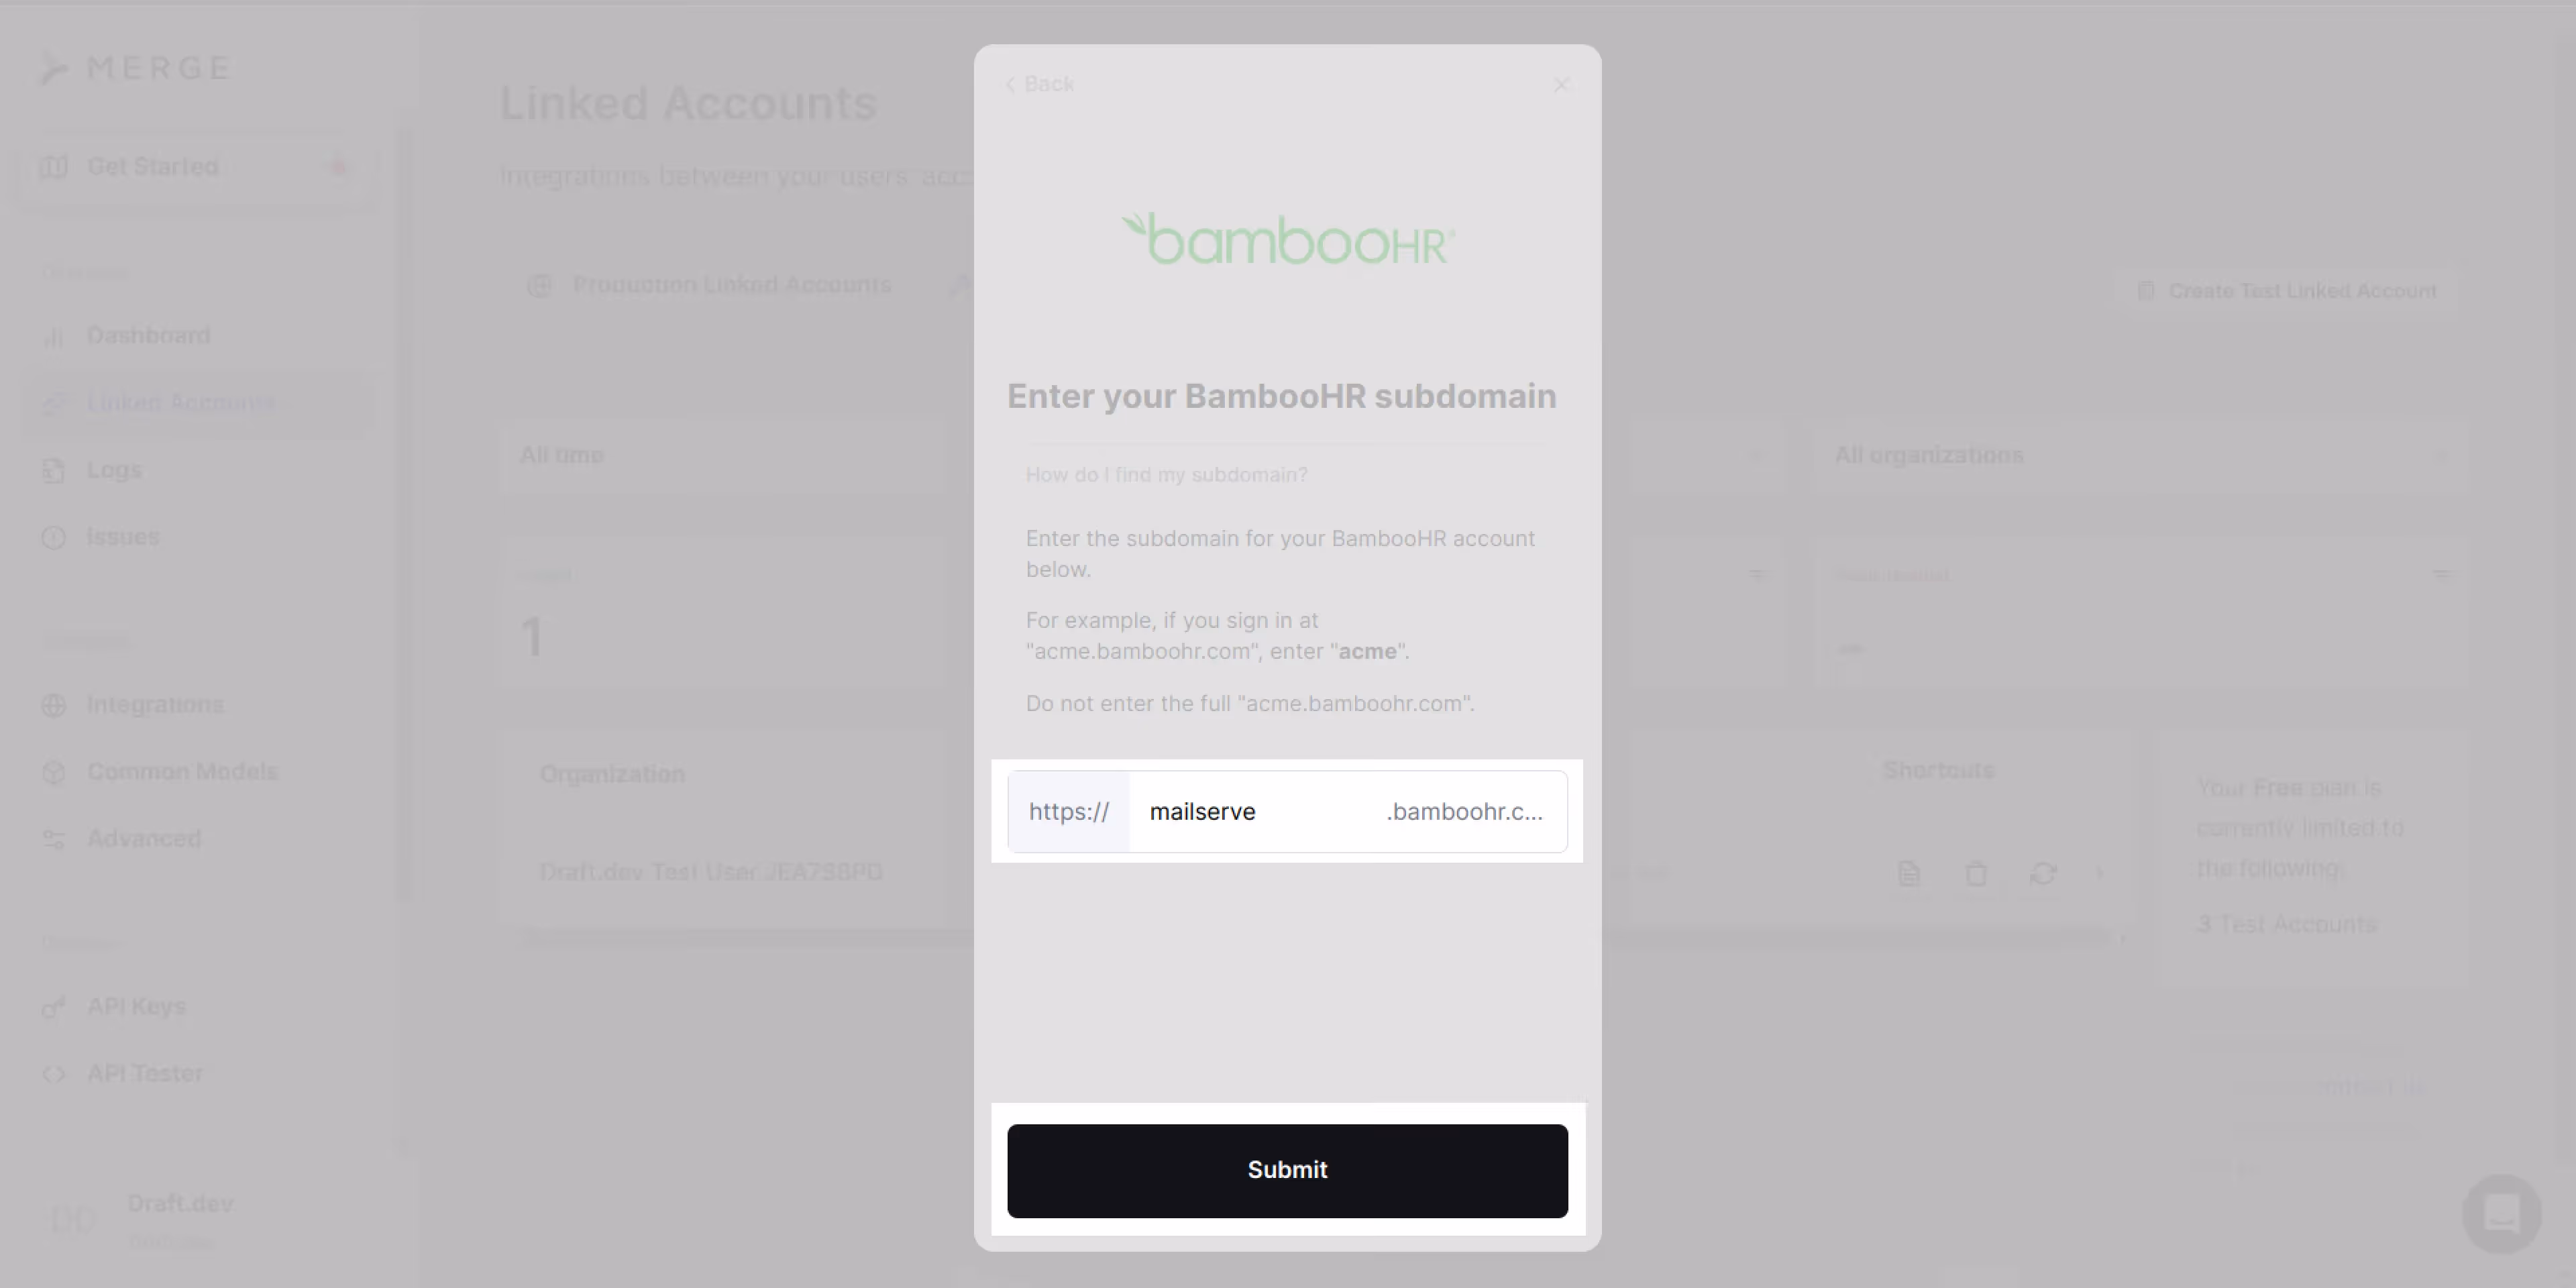
On the next screen, you need to input your domain name so that Merge can discover the API to call. You can find your BambooHR subdomain on the BambooHR website in the address bar (ie "mailserve"):

Copy the subdomain and paste it into the input box on the Merge linked account flow. Then click Submit:
Click Finish Setup to finish your setup:

Add the required API keys
Now that you've connected BambooHR to Merge, it's time to obtain the API keys you need in order to complete the Merge-BambooHR integration in your local application.
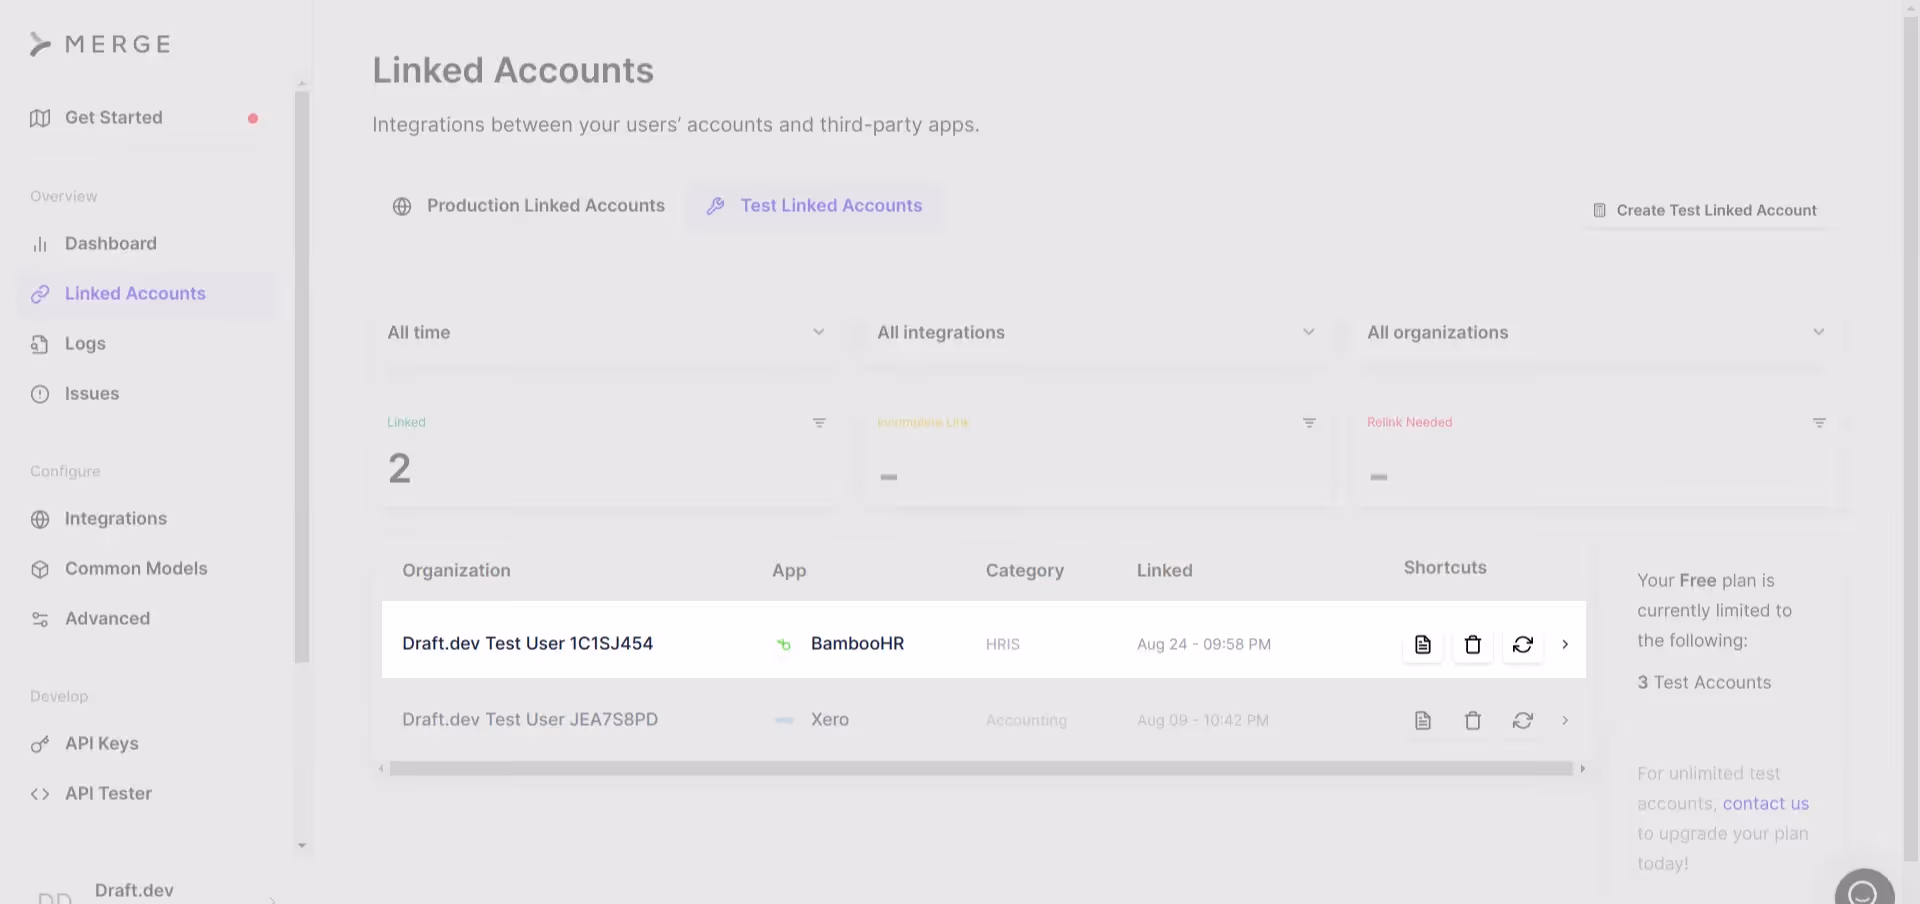
On the Test Linked Accounts page, you should see BambooHR listed as a linked account. Refresh the page if you don't see BambooHR as an option:
Navigate into this linked account by clicking on the entry; then locate the API on the right:

Next, you need to copy the API key and paste it into a .env.local file in the cloned codebase. However, you don't have this file, so you need to create it from the existing .env.example file. You can either duplicate .env.example and rename the duplicate to .env.local or run the following command: <code class="blog_inline-code">cp .env.example .env.local</code>
After creating the .env.local file, paste the account token from the BambooHR Test Linked account page to the BAMBOO_HR_ACCOUNT_TOKEN value section. Your .env.local file should look something like this:
API_KEY=BAMBOO_HR_ACCOUNT_TOKEN=u6YH27nVO-iTGlrtF5-CF9IovsA19iZIEGiyGIk2uIyY6_uOmzMEsgPOSTGRES_URL=JWT_SECRET=
Then on your Merge dashboard, click the API Keys section on the left:

You are navigated to the API Keys page. Scroll to the bottom and click on + Test Key. This brings up a form requesting a name for the API key. Give it a name (eg "Task-List-Application-Key") and click Create:
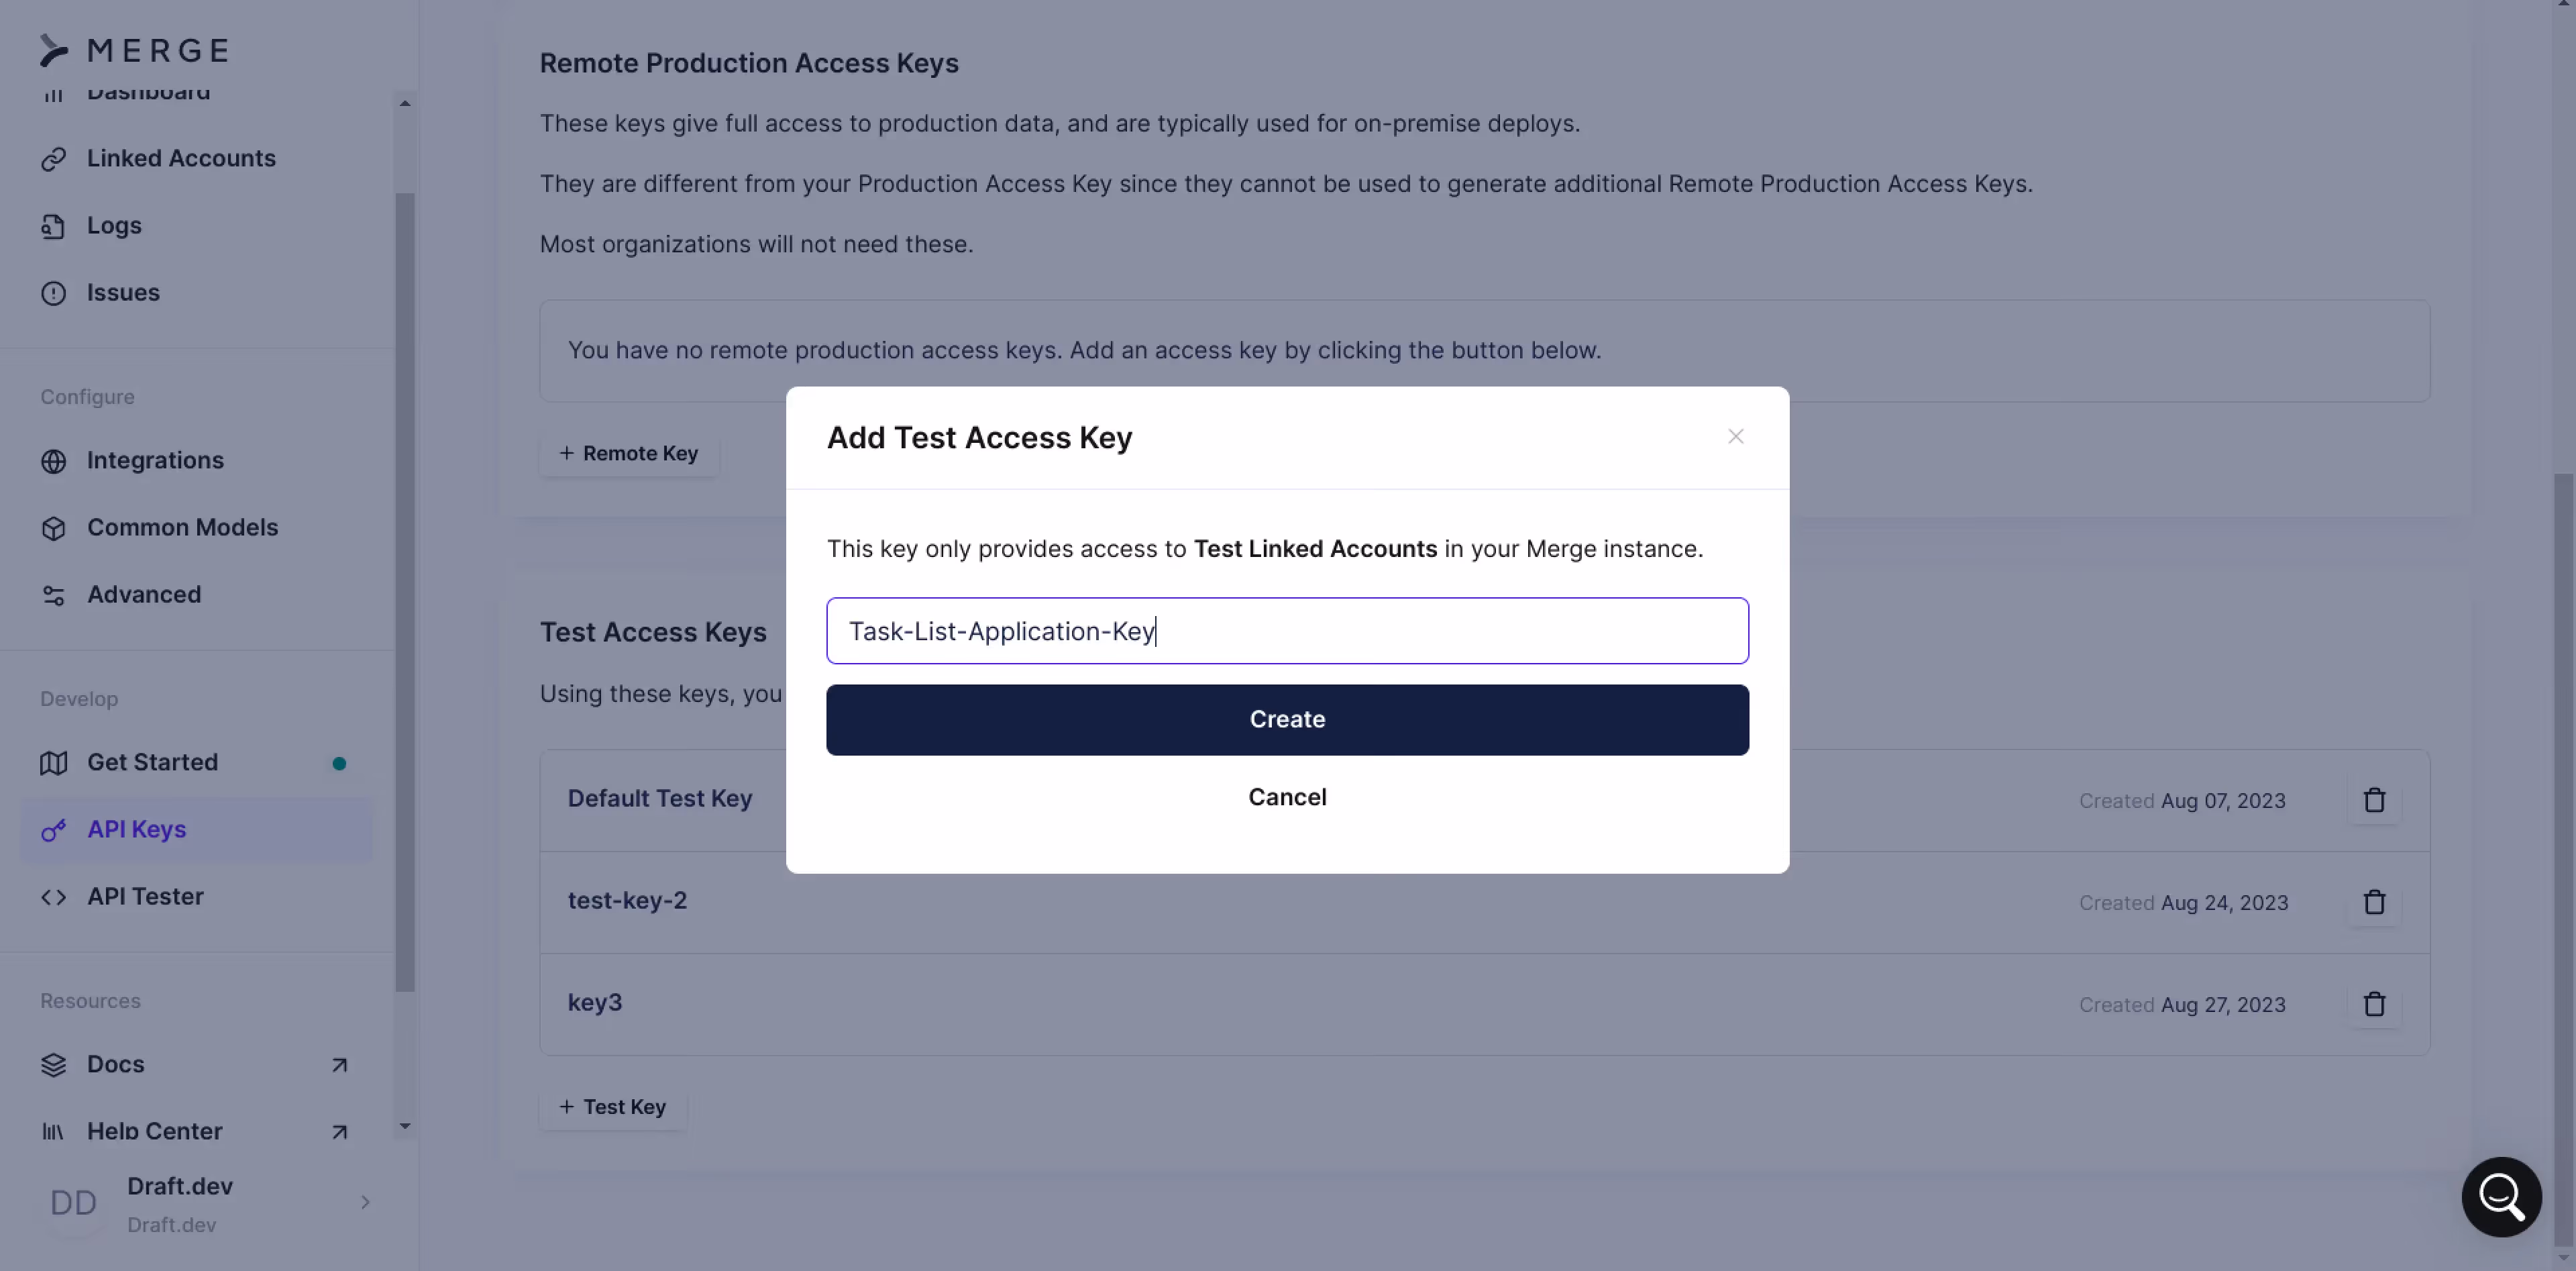
If the key creation operation worked, you'll be shown the key in a dialog like this:

Copy the key and add it as the value of the API_KEY key in your .env.local file. At this point, your file should look like this:
API_KEY=OIz7LMrljnLDtXL2mVTSXGYqW4y1OKOuyZFz4EmVb-8IqZ-KJxCy6w
BAMBOO_HR_ACCOUNT_TOKEN=u6YH27nVO-iTGlrtF5-CF9IovsA19iZIEGiyGIk2uIyY6_uOmzMEsg
POSTGRES_URL=
JWT_SECRET=
Create a settings.py file for secrets
Now that your API_KEY and BAMBOO_HR_ACCOUNT_TOKEN are set, you'll use them in the main.py and database.py files. For that reason, it makes sense to consolidate and expose them from one file. To do so, create a settings.py file in the root directory and add the following to it:
This code uses the dotenv_values from the dotenv package to load environment variables from the .env.local file and then assigns them to Python variables.
Create the PostgreSQL database and JWT secret
Now that you can access your Merge API key and BambooHR account token from the settings.py file, you need to add the PostgreSQL database URL and JSON Web Token (JWT) secret values to your .env.local file so that your application can store data and generate tokens. To add the PostgreSQL URL, create a PostgreSQL database named merge_demo and structure your URL like this: postgresql://<USERNAME>:<PASSWORD>@<HOST>/merge_demo
Paste the resulting URL in the POSTGRES_URL value field of the .env.local file.
To add the JWT secret, create a 32-bit secret in a bash shell using the following command: <code class="blog_inline-code">openssl rand -hex 32# Outputs a random hexadecimal string that should look like f0373b9d0ac8369eb0b5887e18174af17d1c075a272cc1450244294734ecee43</code>
If you don't have access to a bash shell, use this online hex generator on Replit.
After obtaining the 32-bit hex, paste it into your .env.local file as a value of the JWT_SECRET key. With every value supplied for the available keys, the file should look similar to the following:
API_KEY=W2hck--9wEP6Gb8hUl9-hF6BSDw4zpsOYnoRfjfr1syfJqORL9sgnw
BAMBOO_HR_ACCOUNT_TOKEN=u6YH27n98-iTGlrtF5-CF9IovsA19iZIEGiyGIk2uIyY6_uOmzMEsg
POSTGRES_URL=postgresql://postgres:password@127.0.0.1/merge_demo
JWT_SECRET=b3f0667ec2ff0b2adf0a0da841b31556dc662b1e9da30089e66456a553c89511
Fetch employee data updates from Merge
Merge performs periodic syncs to match up its data with data on configured integrations. Since BambooHR is integrated, Merge can fetch all employees based on when they were last modified and check which of those have been terminated based on their termination_date and employment_status properties.
After Merge performs its sync with BambooHR, you can fetch all the synced employee data using the SDK. You can achieve this by defining a function in your main.py file called fetch_updated_data and then adding the following to the function's definition:
This function uses the list method under the HRIS module of the Merge SDK. last_sync_timestamp is passed as an argument and fetches all the employees that have been modified since the last sync. You can set the sync time to whatever you need it to be; for instance, if you want to sync every twenty-four hours, you could perform a time subtraction of the current datetime and the datetime twenty-four hours ago. This timestamp is then passed to the function to get all the records that have been updated and synced to Merge within the last twenty-four hours.
Now, go to BambooHR under the employee list and terminate one or two employees. If you're working in a production environment, you might want to create dummy employee details so that you don't accidentally end a real employee's employment:

Click on one of the employees to be terminated, and you'll be taken to the employee's management page. On this page, hover over the employment status section to reveal the edit button:

Once you click the edit button, it opens a dialog with a form where you can set the employment status to Terminated:

Click Save to save your changes, and you should now see that this employee has been terminated:

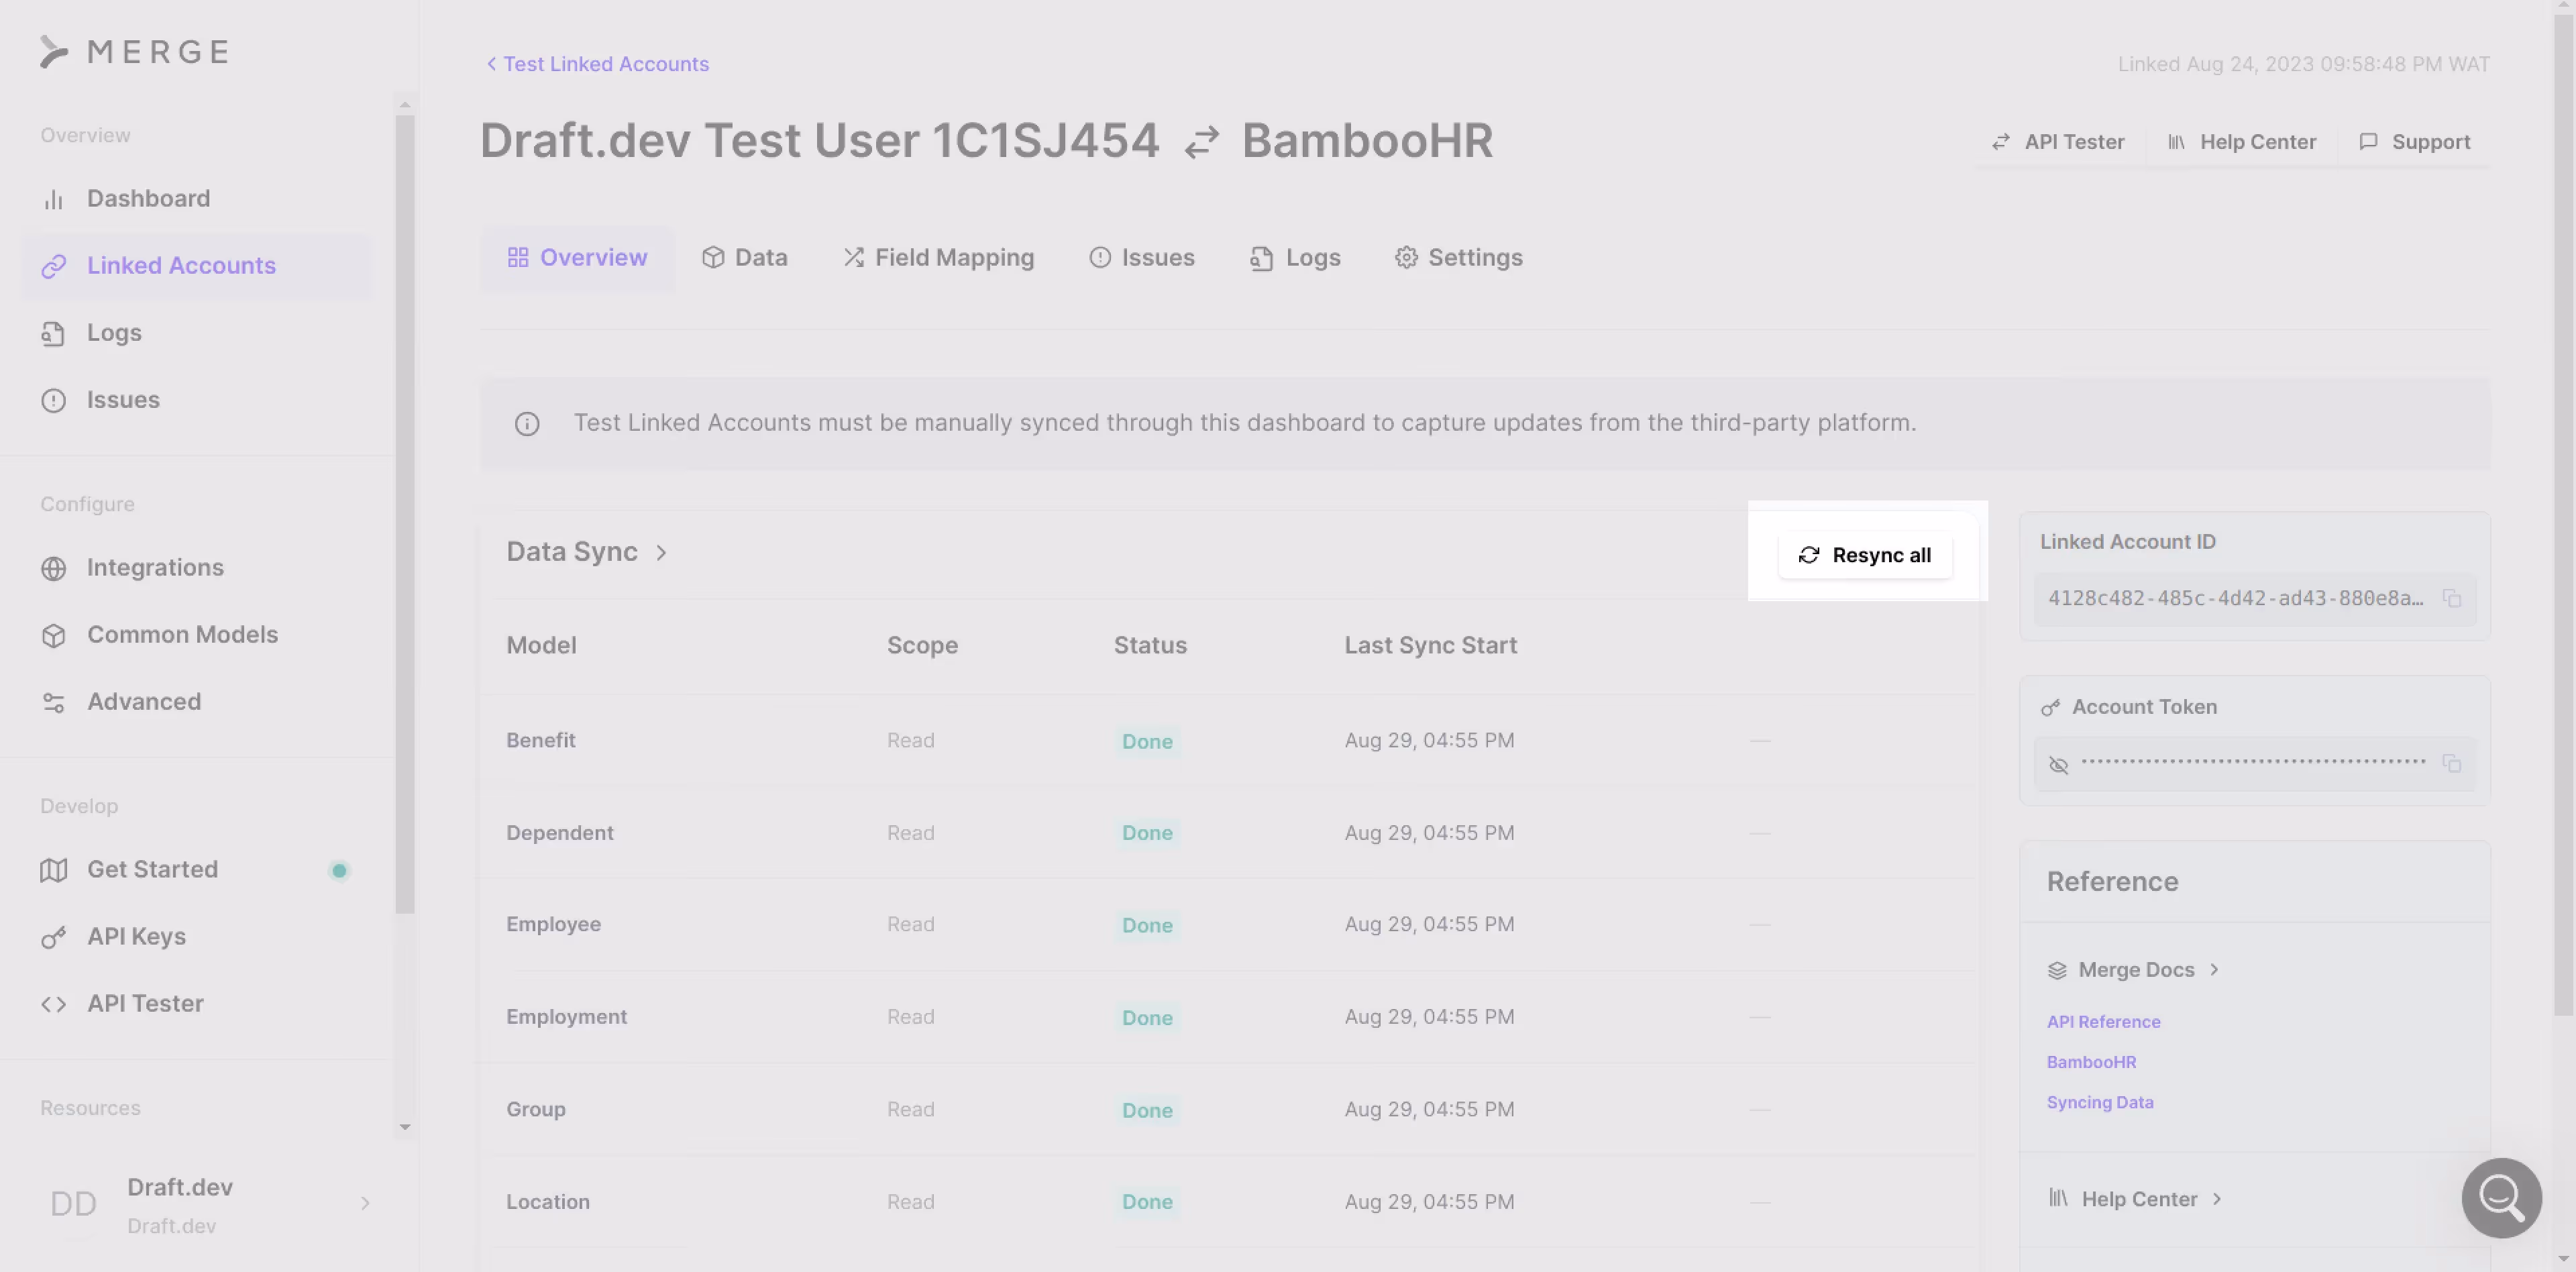
Repeat the process for the second employee; then navigate to your Merge dashboard, and under Test Linked Accounts, find and click the Resync all button:
After syncing, you should be able to fetch updated data in your application. If you want to test to make sure the sync worked, define a function (i.e. get_employee_modifications) that responds to an HTTP GET request and receives last_sync_timestamp as a query parameter:
This function uses the existing fetch_updated_data function but is connected to your application's routing stack through a GET request. That means if you make a GET request and set the required query parameter (ie last_sync_timestamp) as the current date minus one, you should get a response with the modified employees.
Before proceeding, start the application by running the following command: <code class="blog_inline-code">python main.py</code>
Make sure you run this command in a shell that has the virtual environment activated.
Next, use curl to test out the employee-modifications endpoint. In this case, the GET request looks something like this:
You should get a response that looks like this:
Sync updates at an interval
So far, you've defined a function that can fetch employees given a last timestamp. Now, you need to periodically sync data between Merge and your application.
Please note: Merge periodically syncs data between itself and the integrations you define on Production Linked Accounts. On Test Linked Accounts, you need to manually trigger the syncing on Merge.
Regardless of whether you're using a Production Linked Account or Test Linked Account, you need to define a crontab function in your application that syncs your application data with that of Merge. The simplest implementation of this functionality is a function that uses the fastapi_utils @repeat_every decorator to run the sync function at twenty-four-hour intervals. Define it by adding the following snippet to the main.py file:
This sync() function runs when the app restarts and repeats once every day. That means if downtime occurs in production and the app has to restart, this function runs again to ensure proper syncing every day.
The function uses two methods from the datetime module: datetime and timedelta. The deprovision_users function is called on the updated_data.results array. This function goes through every updated result and sets the user.is_active flag to False. Define this function by pasting the following snippet into your main.py file:
Pasting this code into your main.py file makes the deprovision_users function available, which means the sync function can run. Once it runs, it deprovisions the two users you terminated earlier. If you query your database, you should find the is_active flag set to False for both users. This prevents the terminated employees from being able to log in and fetch their tasks.
Use webhooks to fetch data
Now that you've set up syncing on your local application, you can go ahead and add webhook-based syncing. This involves setting up a webhook receiver hook that receives a POST request from Merge whenever data changes on BambooHR. The behavior of the webhook can be configured on Merge.
Before setting up webhooks, you want to expose your application to the internet via ngrok so that Merge can communicate with your local application. Log into your ngrok account and find your auth token on your account dashboard. Then run the following command to authenticate your local ngrok agent:
ngrok config add-authtoken TOKEN
After you authenticate your ngrok agent, run the following command: <code class="blog_inline-code">ngrok http 8000</code>
This command fires up ngrok and forwards port 8000 (which your FastAPI app is running at) to the internet:

Take note of the Forwarding URL as you'll use it in the next step. It should look something like this: https://a9a3-129-205-113-167.ngrok-free.app.
Now, navigate to the Merge dashboard under the Configure section in the side navigation and click on the Advanced menu item. This takes you to a page with two tabs: Link and Webhooks. Click on Webhooks > Add webhook:

This opens up a form where you can set the details of your webhook. Input the URL you obtained from ngrok as the Webhook URL:

Additionally, select the Send me instances of select data types when they're created, updated, or deleted option under the Changed Data section. Finalize the process by selecting the data type as Employee and setting the change data mode to Updated:

You can test that your webhook works by clicking the Send test POST request button to receive dummy JSON data. Finish up by clicking on Add webhook.
With the webhook added, you can go ahead and perform actions in your applications when changes are detected on Merge. All you need to add to your main.py file is the following snippet:
To test the webhook functionality, make a change in BambooHR and manually trigger a sync on Merge. The webhook is fired when any employee object modified on BambooHR is synced to Merge. Your FastAPI app then performs user deprovisioning if it detects that the employment status is INACTIVE and the termination date is less than or equal to the current date.
Conclusion
In this tutorial, you learned how to carry out an employee termination in a task-list application. While this use case is straightforward, the actual process isn't easy. You need to establish a method to periodically verify data updates and inform the task-list application of these changes. Merge plays a pivotal role in simplifying this process. It detects modifications in BambooHR and then relays updated notifications via webhooks or through a simple data sync.
Merge simplifies the process of connecting to different platforms and services, including BambooHR, Workable, Breezy, Jira, and QuickBooks. Merge allows you to focus on your business logic, removing the need to maintain integration code. Try it out for free today!


.jpg)
.png)

