Table of contents
Just for you
How to automate user deprovisioning with Merge's Unified API and Humaans


Building integrations with multiple systems is complex and time-consuming.
However, a unified API solution like Merge makes it easier to link various platforms. Merge, the leading unified API solution, offers a web-based interface that lets you develop integrations using a single data model. It allows you to sync and normalize data from multiple integrated systems and perform CRUD operations using a standardized data model.
Merge also lets you create webhooks to notify your software of events that happen on other integrated systems. This enables you to automate tasks such as user deprovisioning that can take long hours to do manually.
In this article, you'll learn more about how Merge's unified API simplifies integration development and maintenance, and you'll see how to use it to automate user deprovisioning in an HRIS system like Humaans in Python.
{{blog-cta-100+}}
How Does the Merge API Work?
Merge's unified API uses a single data model to fetch, update, and delete data from different integrations, including CRM systems, application tracking systems (ATSs), ticking systems, marketing automation systems, file storage applications, and more. Data from integrations of the same category is constantly synced and normalized, enabling you to build multiple integrations using unified objects and making it easier to reuse code.
To build an integration using Merge, you start by linking an account of a supported platform from Merge's web-based interface. Merge then syncs and normalizes in the background, making it available for access using Merge's standardized data model and a single authentication method.
Triggering User Deprovisioning with Merge's Unified API
User deprovisioning is the process of revoking access privileges and permissions for an employee who is no longer associated with an organization.
When a user is deprovisioned in the company account of an HRIS like Humaans, you can notify your internal system by sending a POST request to an endpoint that you define on your Merge dashboard. By including the Employee object, which is used across all HRIS integrations in Merge, you can program your application to carry out permission revocation or account deactivation in your internal system and other integrated systems.
Let's see what that looks like.
Prerequisites
This demonstration is in Python, so you need to have the latest Python version installed on your machine. This tutorial uses version 3.9.
You also need a Merge account and a Humaans account. You can sign up for a free Merge account. If you are not a Humaans customer, you can sign up for a free trial.
Note that this process is very similar for different HRISs, so you can adapt these steps for the HRIS of your choice.
Create a Link Between Merge and Humaans
To create a link between Merge and Humaans, you need to generate a Humaans access token from your Humaans account.
Log in to your Humaans account, open the dropdown menu next to your name at the top left corner, and click API Access Tokens:
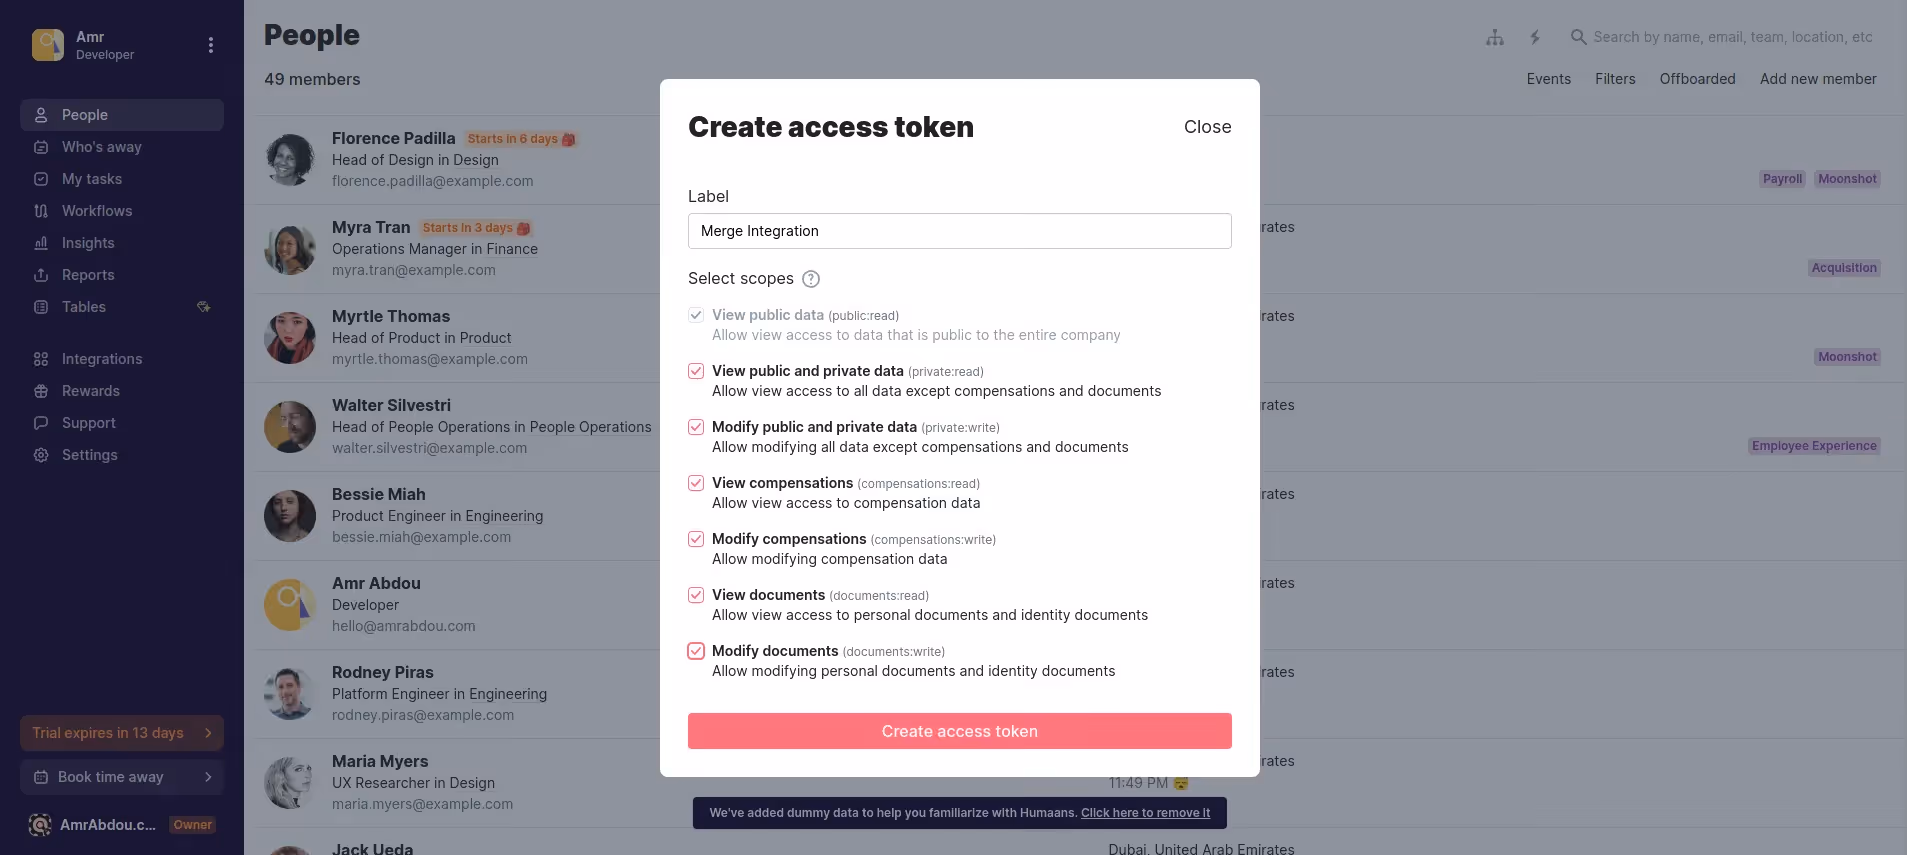
Give the access token a label in the pop-up, then click Create Access Token. Copy this token so you can use it in the next step.
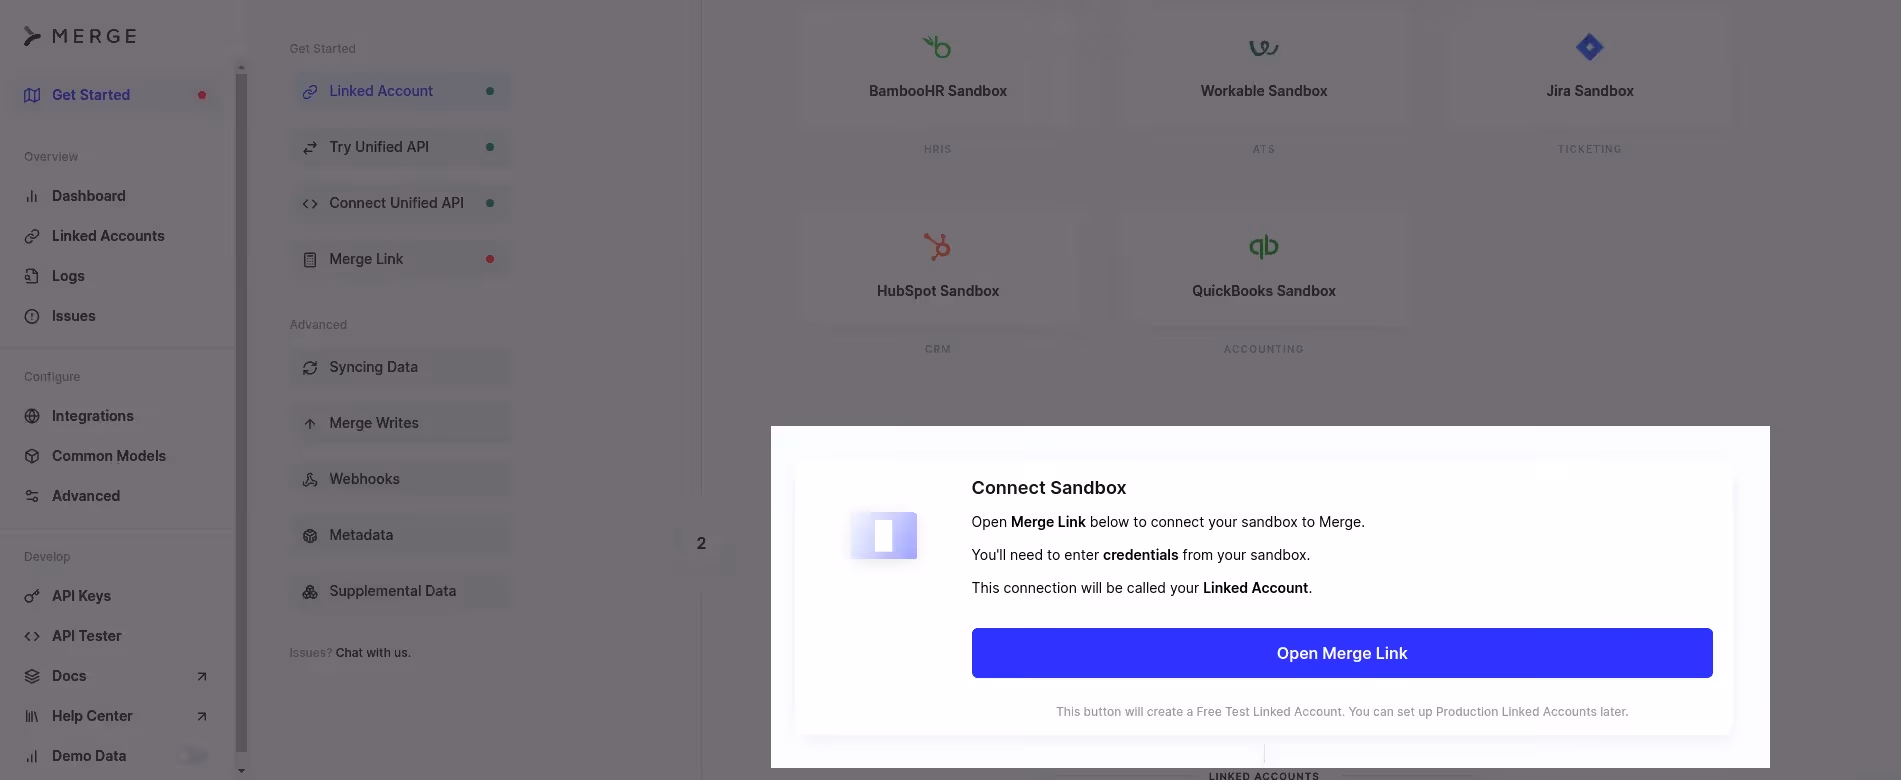
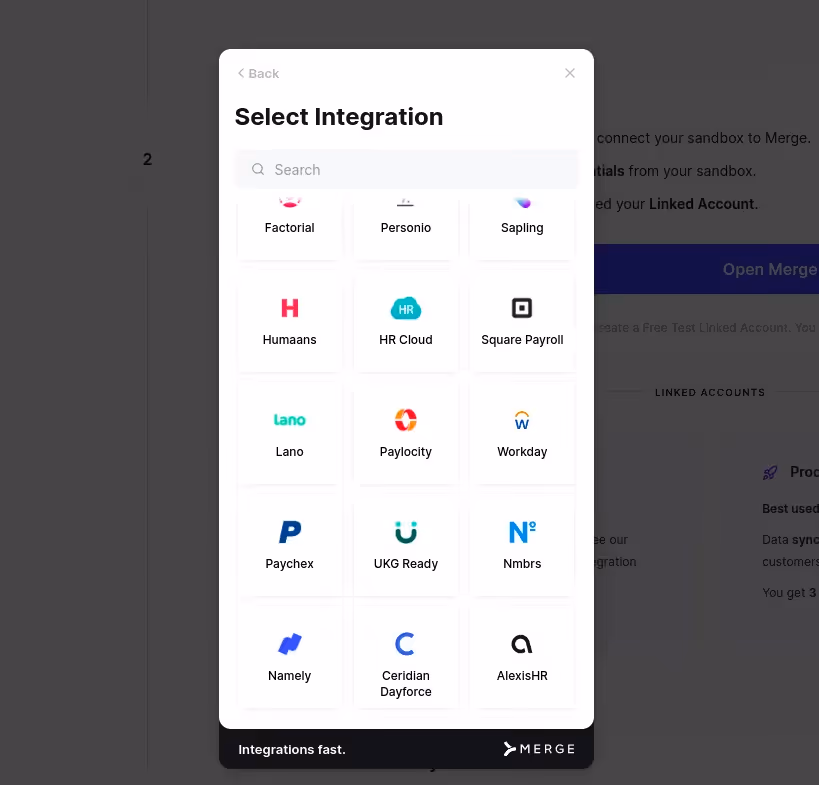
Then, navigate to your Merge dashboard, scroll down, and click Open Merge Link. A pop-up will show all the integration options available. Select Human Resources Information System and then Humaans:
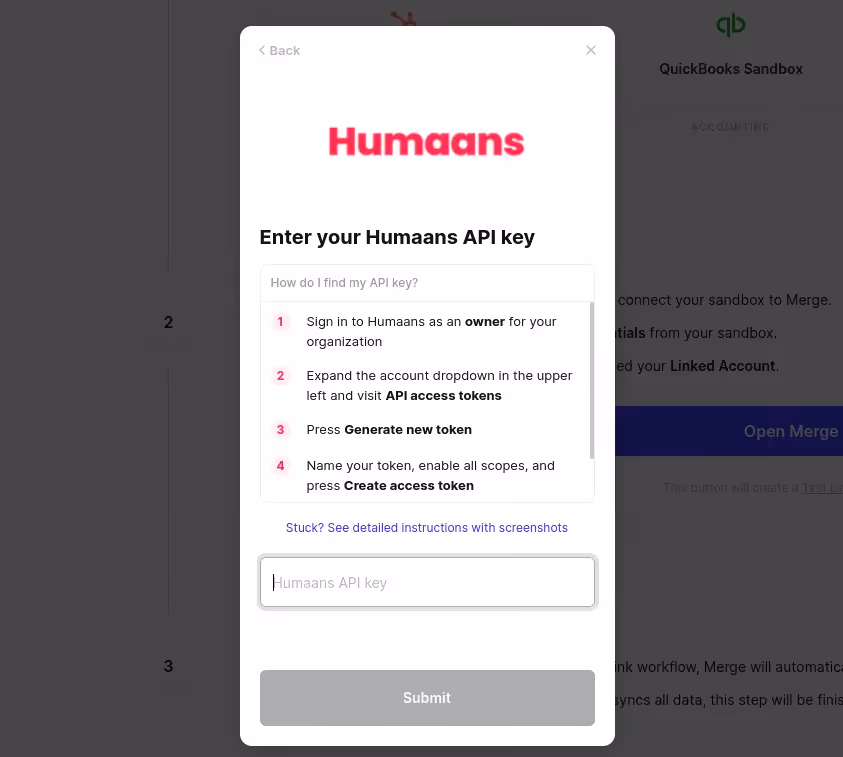
In the API key field, paste the Humaans access token and click Submit:
Merge will start syncing your data in the background. Once the syncing is done, you will get a message that confirms the link has been created.
Set Up the Development Environment
In this project, you’ll use the flask module to create a development server that makes an endpoint that’ll receive the webhook request from Merge.
First, create a new folder for this project, navigate to the folder in your terminal window, and create a virtual environment by running this command:
In the same terminal window, activate the virtual environment by running this command:
And run this command to install Flask:
Create a Python App
In the project folder, create a file named <code class="blog_inline-code">deprovisioning_webhook.py</code>and paste this code in it:
This code starts by importing three modules: `flask` to create a server and receive webhooks, `datetime` to handle and compare dates, and `json` to print the JSON response in a readable format.
It uses the <code class="blog_inline-code">`@app.route('/humaans-deprovisioning',methods=['POST'])`</code> decorator to bind the <code class="blog_inline-code">`/humaans-deprovisioning`</code> URL to the <code class="blog_inline-code">`humaansDeprovisioning()`</code> function. The <code class="blog_inline-code">`humaansDeprovisioning()`</code> function retrieves the JSON data from the request using <code class="blog_inline-code">`request.json`</code>. This JSON object will be the webhook post request received from Merge.
The function then prints the JSON data to the console. It also retrieves the current date and time and the termination date from the JSON data. It compares the termination date with the current date to determine if the employment is terminated. If it is, it prints information about the user and the termination date to the console.
Finally, the <code class="blog_inline-code"> __name__ == '__main__': </code> condition ensures that the Flask application is only run if the script is executed directly, then the <code class="blog_inline-code">app.run()</code> function is called to start the Flask development server and run the application.
Create a Webhook in Merge
Before adding a new webhook to your Merge account, you need a live URL for your local server. You can create one using ngrok. Create an ngrok account and follow their setup guide.
After installing ngrok, open a new terminal window, navigate to the project folder, and run ngrok http 5000. Copy the live URL from this terminal window.
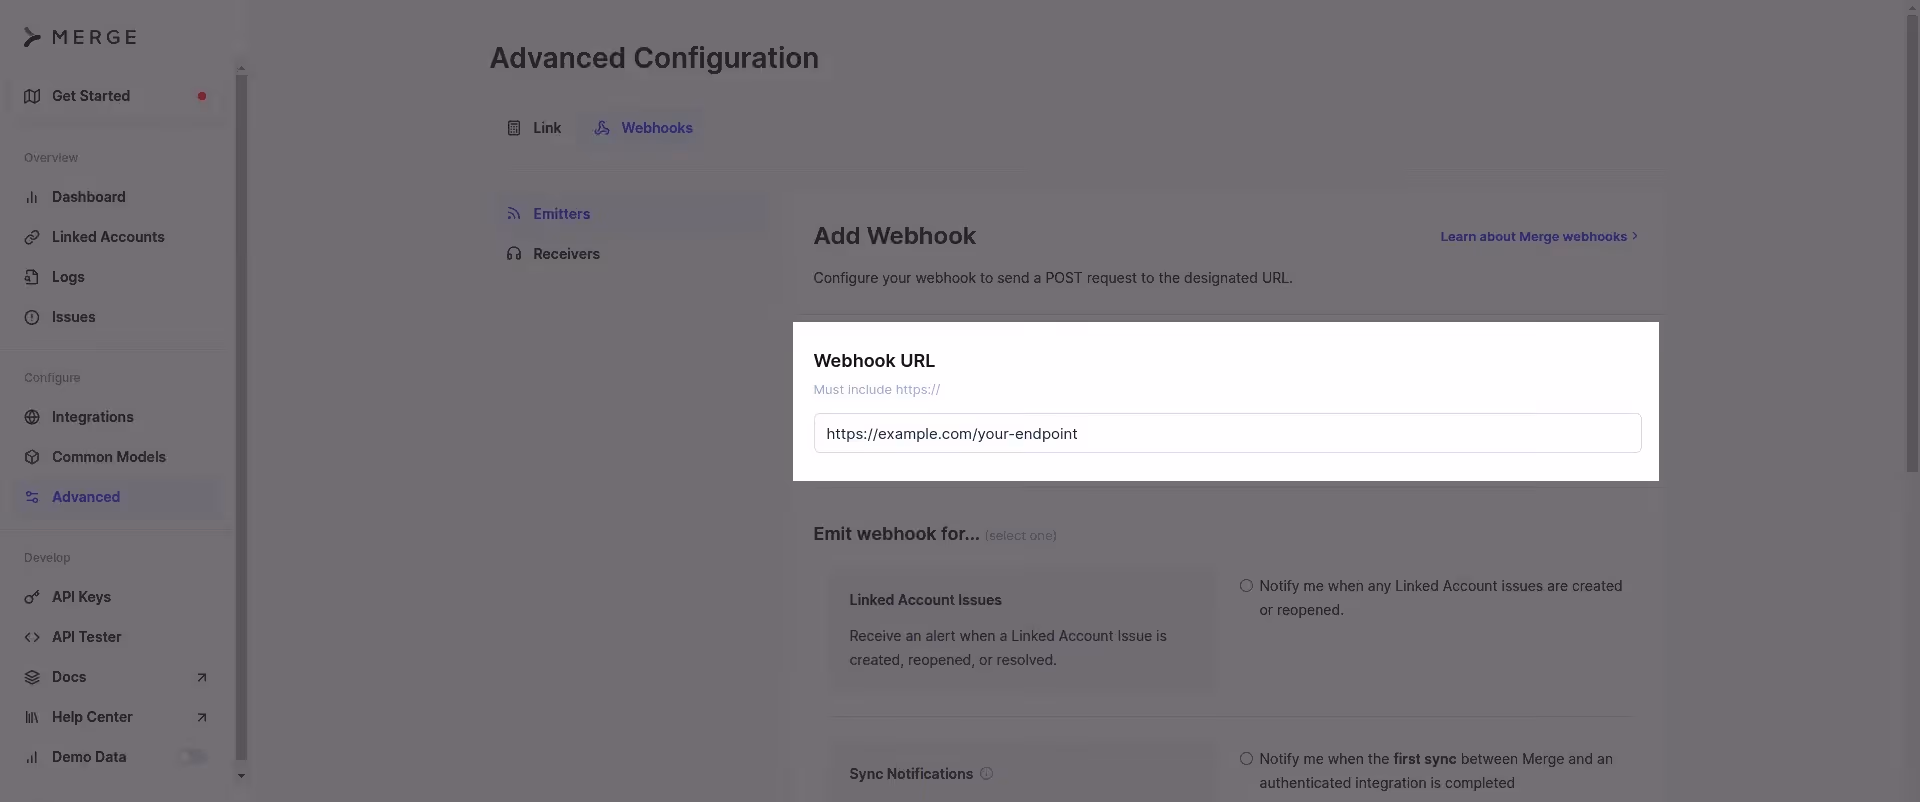
Next, navigate back to your Merge dashboard, open the Advanced page from the left sidebar menu, then click the Webhooks tab. In the webhooks page, click Add Webhook and paste the ngrok URL in the format {YOUR-NGROK-URL}/humaans-deprovisioning to the Webhook URL field:
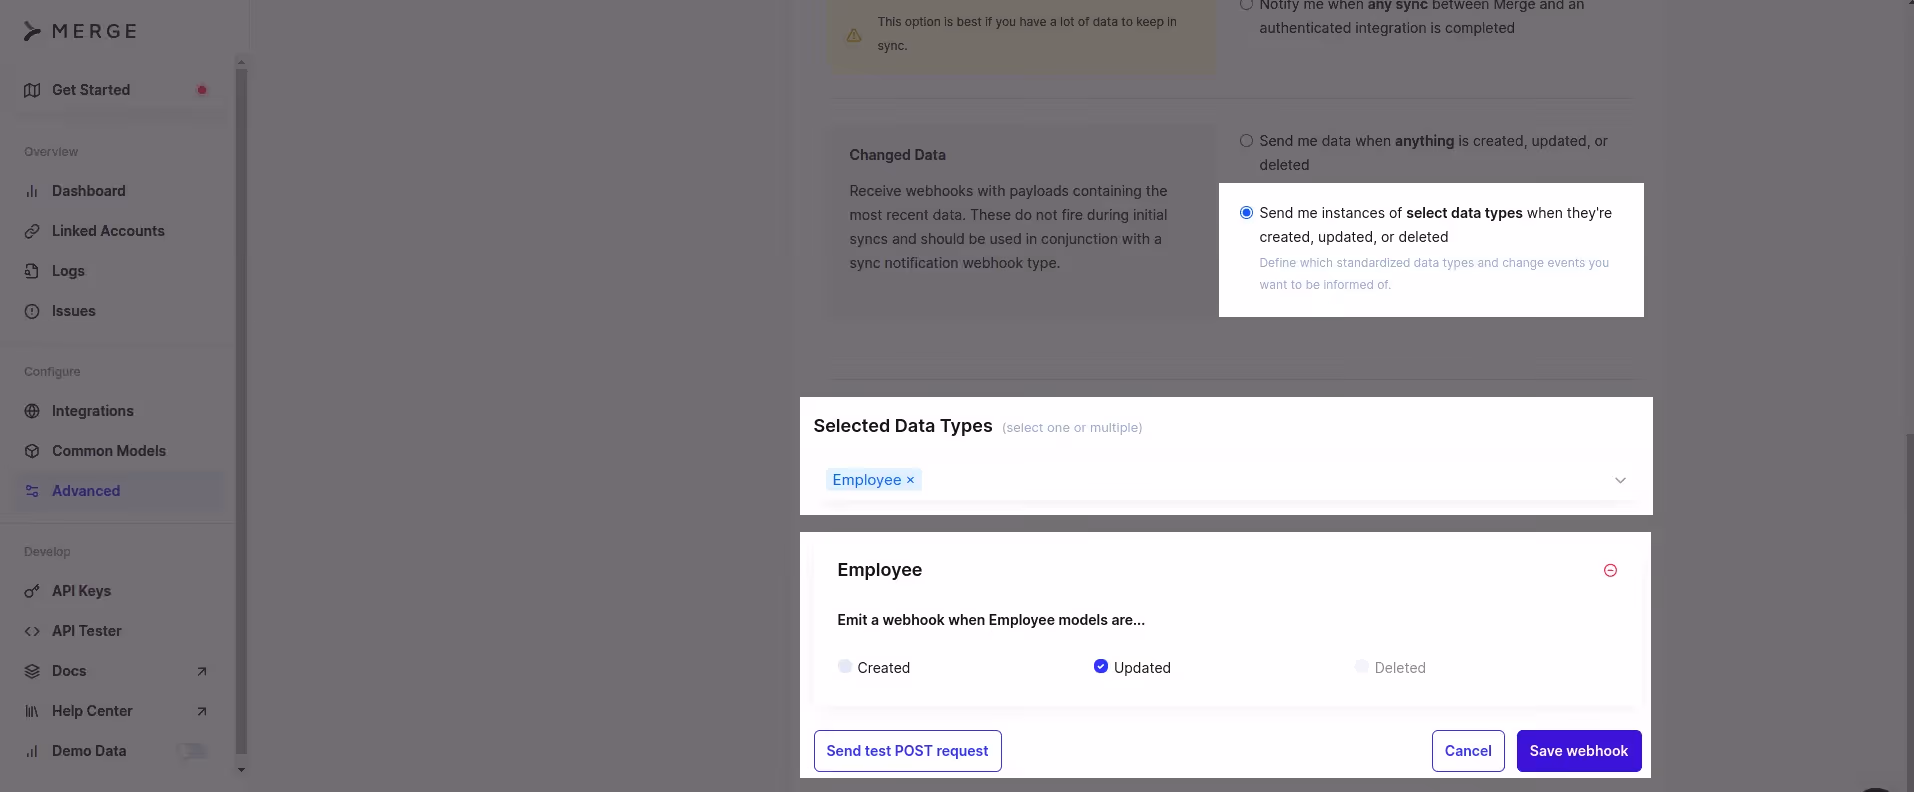
Scroll down and configure the webhook to send you a POST request when employee data is updated in any integrated HRIS platform. The settings to select are Send me instances of select data types when they're created, updated, or deleted, the Employee data under Selected Data Types, and the Updated event to emit a webhook, as in the following image:
Test the App
Before you mimic a deprovisioning event on Humaans, make sure that your ngrok URL is still live and your Python application is running.
Next, go to the Humaans dashboard and open an employee profile from the People view. From the left sidebar, click Offboarding, select an employment end date and a reason for it, then click Confirm and Schedule Offboarding.

You will not receive the update instantly because every Merge integration is synced periodically. You can speed up the process by going to the Test Linked Accounts, clicking the Humaans link page, then clicking Resync All:

After the sync is done, check the terminal window where the Python script is running. You will see the webhook post request with the updated employee data, as shown below:

Final thoughts
As you’ve seen in this article, using Merge's unified API helps you overcome many difficulties that come with such work by providing a single programming interface for more than a hundred integrations, including HRIS platforms like Humaans. You saw how to use Merge to create webhooks that alert your application to changes in HRIS users' statuses, detect deprovisioning events, and process the results.
Sign up for a free Merge account to save time building integrations and focus on building your application. And if you’d like to see the platform in action, schedule a demo with one of our integration experts.