How to GET lists with the Klaviyo API

Klaviyo is a powerful email marketing platform with features that enhance the effectiveness of emails and marketing campaigns. The Klaviyo API lets developers manipulate data in the platform programmatically to create and manage lists, send emails, and manage campaigns. It can also be integrated with third-party applications like e-commerce apps and customer relationship management (CRM) software.

In this article, you will learn how to integrate some of the Klaviyo API's most important features into your applications using Python.

Creating a Klaviyo Account and Obtaining an API Key

To get started, you need to create a Klaviyo account and obtain an API key. You'll use this key later in this tutorial to interact with your Klaviyo account.

On the Klaviyo website, click on Sign up.

Klaviyo website

Complete the required information.

Klaviyo sign-up form

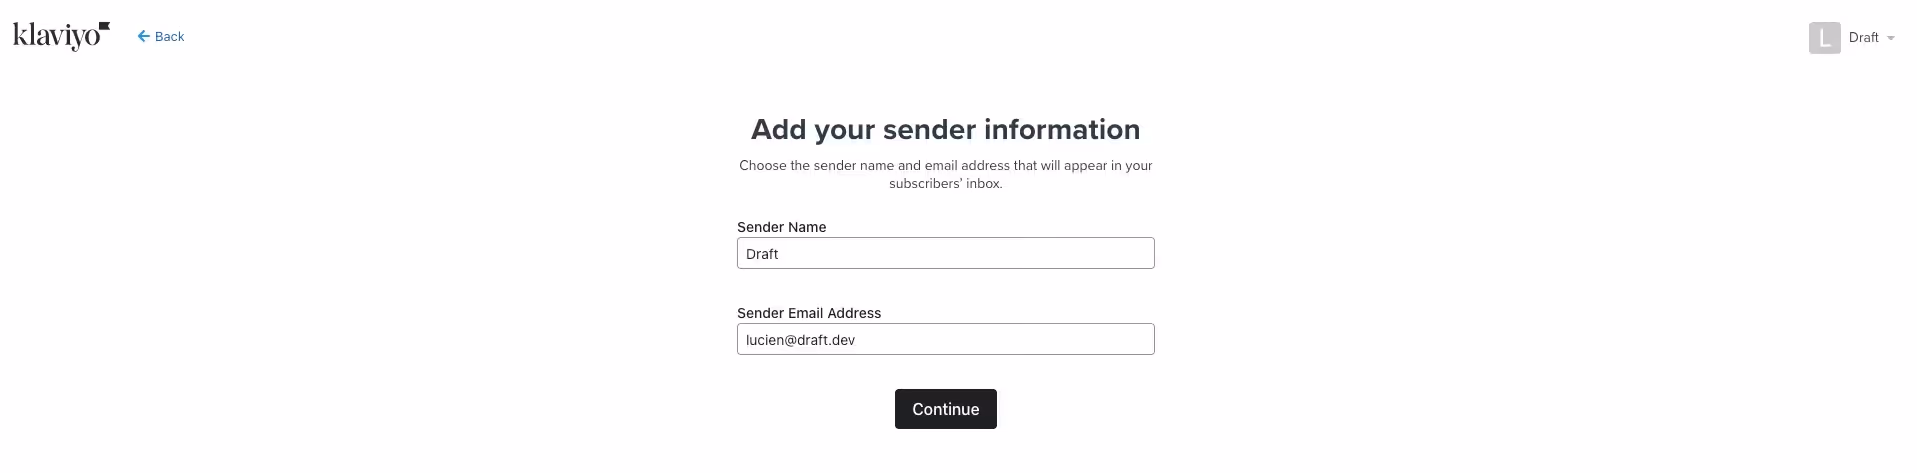
When you're asked for your sender information, you can use any name, but use your own email address.

Klaviyo sender information

When you're asked how you want to reach your audience, select Email only. SMS is not supported for all countries, and this tutorial will not use it.

Klaviyo reach your audience

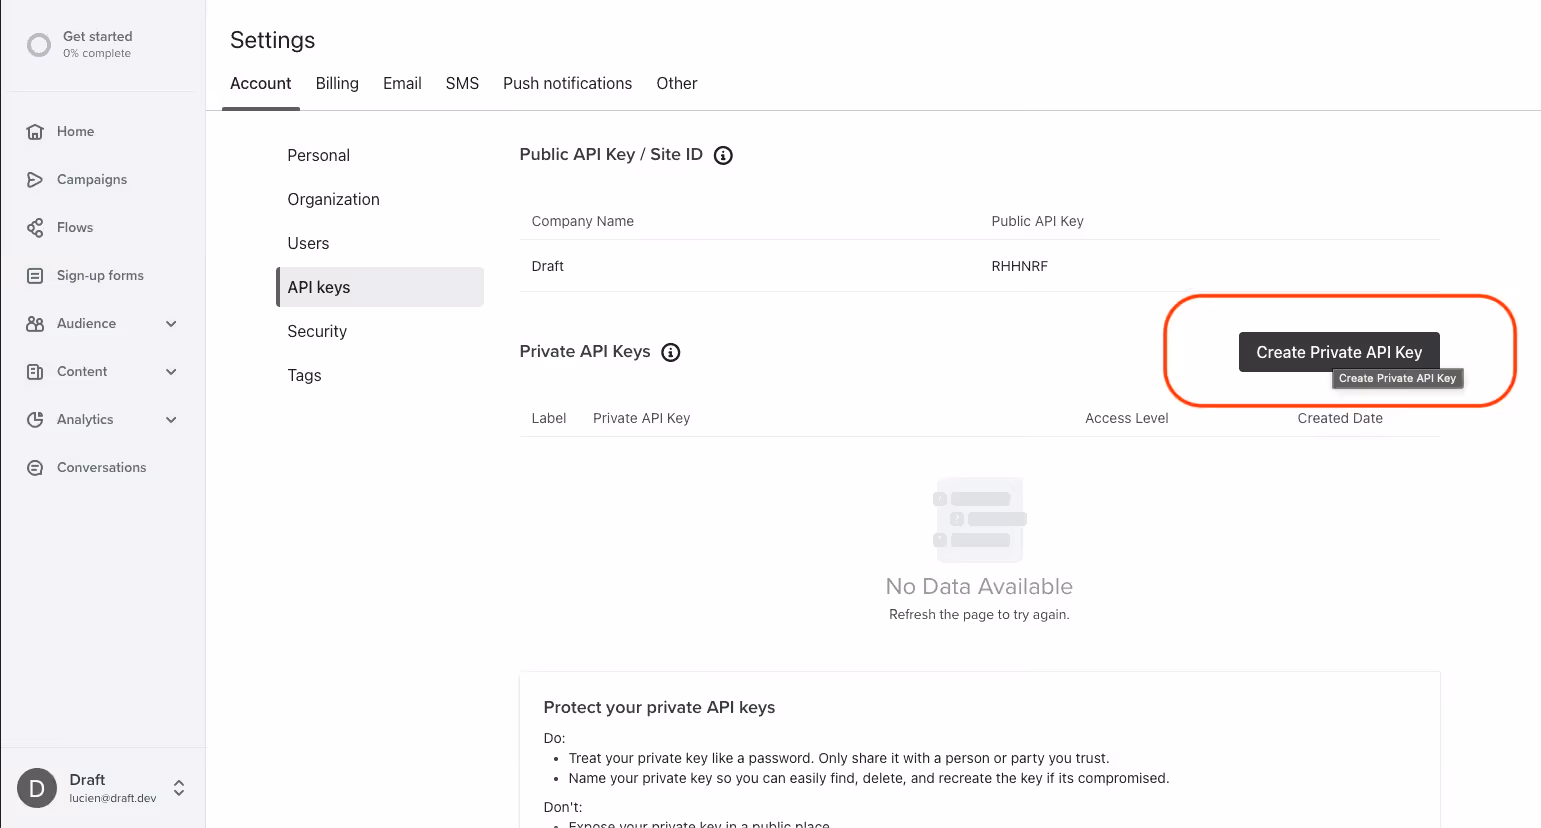
You should receive an email to confirm your email address. Click on the link provided to be redirected to the Klaviyo portal. Once you're logged in, click on the account icon in the bottom left corner and choose Settings.

Kalviyo account settings

Click on API Keys in the left sidebar menu and then Create Private API Key.

Klaviyo API keys

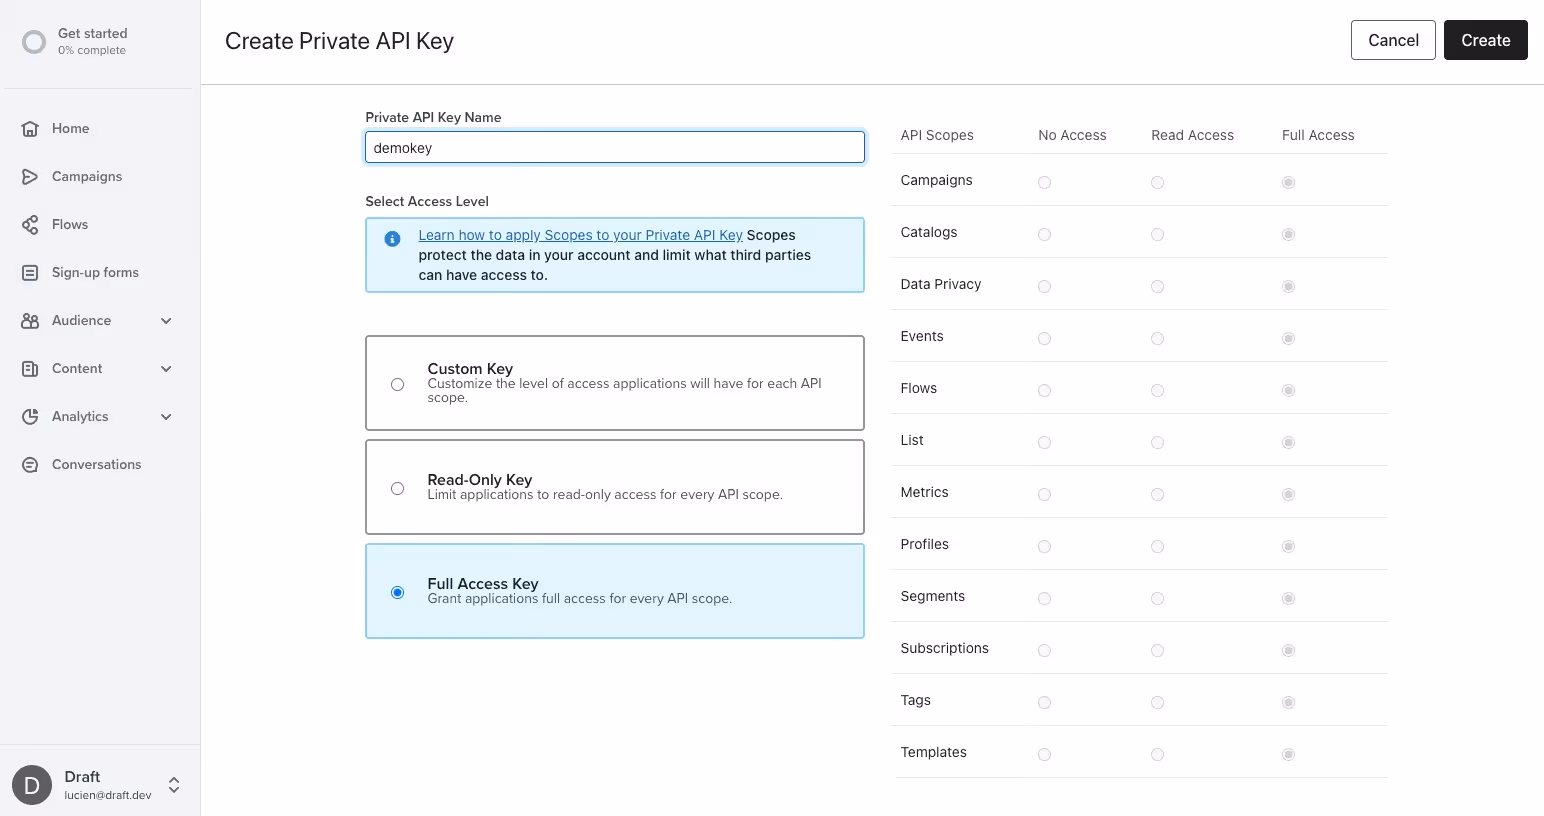
Give your API key a name, such as demokey. Select Full Access Key and click Create.

Create your Klaviyo key

Save the details of the API key as you will need to use it later in this tutorial.

Setting Up Your Environment

Next, make sure that you have the following installed on your machine:

  • Python 3: This tutorial uses version 3.11.1, but any version greater than 3.11 will work.
  • The Python package installer pip: This tutorial uses pip version 23.1.2.

Once you have these installed, open your computer's command prompt or terminal and paste in the following command to install the requests and python-dotenv libraries:

terminal
pip3 install requests
pip3 install python-dotenv

<code class="blog_inline-code">requests</code> is a Python library that simplifies making HTTP requests. It helps you interact with web services and APIs by handling the complexities of sending and receiving data.

<code class="blog_inline-code">python-dotenv</code> is a library that facilitates the management of environment variables in Python projects. It loads configuration values from a separate <code class="blog_inline-code">.env</code> file to provide a convenient way to store sensitive information like API keys and credentials outside of your code.

Great! You're now ready to start writing some Python code!

Setting Up Environment Variables

To use the Klaviyo API, you need to authenticate your requests with a private API key. You'll use the API key you created earlier here.

Open your favorite code editor or IDE and create a new environment file named .env. Then, add the following code to it:

python
API_KEY = 'your_api_key_here'
BASE_URL = "https://a.klaviyo.com/api"

Replace <code class="blog_inline-code">'your_api_key_here'</code> with the API key you got from Klaviyo.

This code defines your Klaviyo API key and adds the API route of Klaviyo as the base URL.

Getting Lists

Now that everything is set up, let's see what the Klaviyo API can do. We'll start with getting lists.

In Klaviyo, a list helps you organize and manage your email addresses for marketing purposes. Lists allow you to send personalized email campaigns to deliver relevant content to the right people. You can create lists based on criteria like demographics or engagement level to target specific segments of your audience.

Let's start by getting information about the lists in your Klaviyo account. You will send a GET request to the Klaviyo API, which will return information about your lists in JSON format.

Create a file named get_lists.py and add the following code to it:

python
import requests
from dotenv import dotenv_values

config = dotenv_values(".env")
API_KEY = config['API_KEY']
BASE_URL = config['BASE_URL']
Headers = {
    "accept": "application/json",
    "revision": "2023-05-11",
    "content-type": "application/json",
    "Authorization": "Klaviyo-API-Key "+ API_KEY
}

def get_lists():
    url = f'{BASE_URL}/lists/'
    response = requests.get(url, headers=Headers)
    
    if response.status_code == 200:
        return response.json()
    else:
        print(f'Error: {response.status_code}')
        return None

lists = get_lists()
print(lists)

This code imports the <code class="blog_inline-code">requests</code> library for making HTTP requests and the <code class="blog_inline-code">dotenv_values</code> function from the <code class="blog_inline-code">dotenv</code> library to load environment variables. It retrieves the <code class="blog_inline-code">API_KEY</code> and the <code class="blog_inline-code">BASE_URL</code> from the environment file for the Klaviyo API then sets the necessary HTTP headers. It then creates a function called <code class="blog_inline-code">get_lists()</code> to fetch lists from the API using the defined configurations. Finally, it calls the <code class="blog_inline-code">get_lists()</code> function and prints the resulting <code class="blog_inline-code">lists</code> variable.

Save your file and run it in your command prompt or terminal with this code:

terminal
python3 get_lists.py
…output…
{'data': [{'type': 'list', 'id': 'TbCEYA', 'attributes': {'name': 'Newsletter', 'created': '2023-05-10T11:02:13+00:00', 'updated': '2023-05-10T11:02:13+00:00'}, 'links': {'self': 'https://a.klaviyo.com/api/lists/TbCEYA/'}}, {'type': 'list', 'id': 'UY4yv5', 'attributes': {'name': 'Preview List', 'created': '2023-05-10T11:02:13+00:00', 'updated': '2023-05-10T11:02:13+00:00'}, 'links': {'self': 'https://a.klaviyo.com/api/lists/UY4yv5/'}}, {'type': 'list', 'id': 'XRg2y2', 'attributes': {'name': 'SMS Subscribers', 'created': '2023-05-10T11:02:16+00:00', 'updated': '2023-05-10T11:02:16+00:00'}, 'links': {'self': 'https://a.klaviyo.com/api/lists/XRg2y2/'}}], 'links': {'self': 'https://a.klaviyo.com/api/lists/', 'next': None, 'prev': None}}

If everything works correctly, you should see a list of your Klaviyo lists in JSON format. If there's an error, the program will print the error code so you can troubleshoot.

The response shows three lists: <code class="blog_inline-code">SMS Subscribers</code>, <code class="blog_inline-code">Preview List</code>, and <code class="blog_inline-code">Newsletter</code>. These are the default lists that come with your account.

To corroborate this outcome, you can check the lists in the Klaviyo portal. Go to Audience in the left navigation bar then to Lists & segments and add the filter type Lists. You should see the same three lists here.

Klaviyo lists

Managing Subscribers

Subscribers in Klaviyo are individuals who willingly provided their email addresses to receive communication from your business. Klaviyo lets you segment subscribers based on various criteria and send targeted and personalized email campaigns.Let's learn how you can manage your subscribers using the Klaviyo API, whether that's to register, update, or delete them.

Creating a New Subscriber

To create a new subscriber, create a file named create_subscriber.py and add the following code to it:

python
import requests
from dotenv import dotenv_values

config = dotenv_values(".env")
API_KEY = config['API_KEY']
BASE_URL = config['BASE_URL']

payload = {
    "data": {
        "type": "profile",
        "attributes": {
            "email": "test1@gmail.com",
            "phone_number": "+15003330001",
            "external_id": "1100111",
            "first_name": "John",
            "last_name": "Doe",
            "organization": "Draft",
            "title": "Designer",
            "location": {
                "address1": "89 E 42nd St",
                "address2": "1st floor",
                "city": "New York",
                "country": "United States",
                "region": "NY",
                "zip": "10017",
                "timezone": "America/New_York"
            }
        }
    }
}

Headers = {
    "accept": "application/json",
    "revision": "2023-05-11",
    "content-type": "application/json",
    "Authorization": "Klaviyo-API-Key "+ API_KEY
}

def create_subscriber():
    url = f'{BASE_URL}/profiles'
    
    response = requests.post(url, json=payload, headers=Headers)

    if response.status_code == 201:
        return response.json()
    else:
        print(f'Error: {response.status_code}')
        return None

new_subscriber = create_subscriber()
print(new_subscriber)

This code imports the <code class="blog_inline-code">requests</code> library and loads environment variables using <code class="blog_inline-code">dotenv_values</code>, and it defines the <code class="blog_inline-code">API_KEY</code> and <code class="blog_inline-code">BASE_URL</code> from the loaded configuration. It then creates a payload and headers for creating a new subscriber. Finally, it sends a <code class="blog_inline-code">POST</code> request to the Klaviyo API using the defined URL, payload, and headers, and it prints the JSON response.

Save your file and run it in your command prompt or terminal with this code:

terminal
python3 create_subscriber.py
…output…
{'data': {'type': 'profile', 'id': '01H086E5GP325TB3WNHSTYQK3T', 'attributes': {'email': 'test1@gmail.com', 'phone_number': '+15003330001', 'external_id': '1100111', 'anonymous_id': None, 'first_name': 'John', 'last_name': 'Doe', 'organization': 'Draft', 'title': 'Designer', 'image': None, 'created': '2023-05-12T14:39:31.359996+00:00', 'updated': '2023-05-12T14:39:31.360034+00:00', 'last_event_date': None, 'location': {'address1': '89 E 42nd St', 'address2': '1st floor', 'city': 'New York', 'country': 'United States', 'latitude': None, 'longitude': None, 'region': 'NY', 'zip': '10017', 'timezone': 'America/New_York'}, 'properties': {}, 'subscriptions': None}, 'links': {'self': 'https://a.klaviyo.com/api/profiles/01H086E5GP325TB3WNHSTYQK3T/'}, 'relationships': {'lists': {'links': {'self': 'https://a.klaviyo.com/api/profiles/01H086E5GP325TB3WNHSTYQK3T/relationships/lists/', 'related': 'https://a.klaviyo.com/api/profiles/01H086E5GP325TB3WNHSTYQK3T/lists/'}}, 'segments': {'links': {'self': 'https://a.klaviyo.com/api/profiles/01H086E5GP325TB3WNHSTYQK3T/relationships/segments/', 'related': 'https://a.klaviyo.com/api/profiles/01H086E5GP325TB3WNHSTYQK3T/segments/'}}}}}

If everything works correctly, you should see the new subscriber's information in JSON format. If there's an error, the program will print the error code so you can troubleshoot.

Adding a Subscriber to a List

Next, let's add the subscriber you just created to the Newsletter list.

Create a file named add_subscriber_to_list.py and add the following code to it:

python
import requests
from dotenv import dotenv_values

config = dotenv_values(".env")
API_KEY = config['API_KEY']
BASE_URL = config['BASE_URL']
Headers = {
    "accept": "application/json",
    "revision": "2023-05-11",
    "content-type": "application/json",
    "Authorization": "Klaviyo-API-Key "+ API_KEY
}


def add_subscriber_to_list(subscriber_id, list_id):
    url = f'{BASE_URL}/lists/{list_id}/relationships/profiles/'
    payload = {
        "data": [
            {
                "type": "profile",
                "id": subscriber_id
            }
        ]}
    response = requests.post(url, json=payload, headers=Headers)

    if response.status_code == 204:
        print("Subscriber added successfully")
    else:
        print(f'Error: {response.status_code}')
        return None

add_subscriber_to_list('your_subscriber_id', 'your_list_id')

The code defines a function called <code class="blog_inline-code">add_subscriber_to_list()</code> that sends a <code class="blog_inline-code">POST</code> request to the Klaviyo API to add a subscriber to a specified list using the subscriber ID and list ID provided. If the request is successful (status code 204), it prints a success message; otherwise, it prints an error message. Finally, the function <code class="blog_inline-code">add_subscriber_to_list()</code> is called with the relevant subscriber and list IDs.

Note: Replace <code class="blog_inline-code">'your_subscriber_id'</code> and <code class="blog_inline-code">'your_list_id'</code> with the ones you have. You can get this information from the output of the previous steps. In the outputs shown earlier in this tutorial, the ID of the newly created subscriber was <code class="blog_inline-code">01H086E5GP325TB3WNHSTYQK3T</code> and the newsletter list ID was <code class="blog_inline-code">TbCEYA</code>. However, your values will differ.

Save your file and run it in your command prompt or terminal by using this code:

terminal
python3 add_subscriber_to_list.py
…output…
Subscriber added successfully

If your script runs successfully, you should get an output of <code class="blog_inline-code">Subscriber added successfully</code>.

Updating and Deleting Subscribers

To update a subscriber's details or remove them from a list using the Klaviyo API, you can use <code class="blog_inline-code">PATCH</code> and <code class="blog_inline-code">DELETE</code> requests, respectively.

Create a new Python file named update_remove_subscribers.py and add the following code to it:

python
import requests
from dotenv import dotenv_values

config = dotenv_values(".env")
API_KEY = config['API_KEY']
BASE_URL = config['BASE_URL']

Headers = {
    "accept": "application/json",
    "revision": "2023-05-11",
    "content-type": "application/json",
    "Authorization": "Klaviyo-API-Key "+ API_KEY
}

def update_subscriber(list_id, subscriber_id, properties):
    url = f'{BASE_URL}/profiles/{subscriber_id}'

    payload = {
        "data": {
            "type": "profile",
            "id": subscriber_id,
            "attributes": properties
        }
    }
    
    response = requests.patch(url, json=payload, headers=Headers)
    print(response.json())
    if response.status_code == 200:
        return response.json()
    else:
        print(f'Error: {response.status_code}')
        return None


def remove_subscriber_from_list(list_id, subscriber_id):
    url = f'{BASE_URL}/lists/{list_id}/relationships/profiles/'

    payload = {
        "data": [
        {
            "type": "profile",
            "id": subscriber_id
        }
    ]}
    response = requests.delete(url, json=payload, headers=Headers)

    if response.status_code == 204:
        print('Subscriber removed successfully')
    else:
        print(f'Error: {response.status_code}')

updated_subscriber = update_subscriber('your_list_id_here', 'your_subscriber_id_here', {'email': 'test@gmail.com'})
remove_subscriber_from_list('your_list_id_here', 'your_subscriber_id_here')

To update subscriber properties, this code uses the <code class="blog_inline-code">update_subscriber()</code> function that takes as input parameters the list ID, subscriber ID, and desired properties. This function sends a <code class="blog_inline-code">PATCH</code> request to the Klaviyo API and returns the updated subscriber, if successful.

To remove a subscriber from a list, it calls the <code class="blog_inline-code">remove_subscriber_from_list()</code> function with the list ID and subscriber ID as arguments. This function sends a <code class="blog_inline-code">DELETE</code> request to the API, and if successful, it prints a success message.

For simplicity, this code updates a subscriber and then deletes it. However, you can use it differently by deleting and updating different subscribers.

Note: As you did previously, replace <code class="blog_inline-code">'your_list_id_here'</code> and <code class="blog_inline-code">'your_subscriber_id_here'</code> with the appropriate IDs.

Save your file and run it in your command prompt or terminal using this code:

terminal
python3 update_remove_subscribers.py
…output…
{'data': {'type': 'profile', 'id': '01H086E5GP325TB3WNHSTYQK3T', 'attributes': {'email': 'test2@gmail.com', 'phone_number': '+15003330001', 'external_id': '1100111', 'anonymous_id': None, 'first_name': 'John', 'last_name': 'Doe', 'organization': 'Draft', 'title': 'Designer', 'image': None, 'created': '2023-05-12T14:39:31+00:00', 'updated': '2023-05-12T15:42:46+00:00', 'last_event_date': None, 'location': {'address1': '89 E 42nd St', 'address2': '1st floor', 'city': 'New York', 'country': 'United States', 'latitude': None, 'longitude': None, 'region': 'NY', 'zip': '10017', 'timezone': 'America/New_York'}, 'properties': {}, 'subscriptions': None}, 'links': {'self': 'https://a.klaviyo.com/api/profiles/01H086E5GP325TB3WNHSTYQK3T/'}, 'relationships': {'lists': {'links': {'self': 'https://a.klaviyo.com/api/profiles/01H086E5GP325TB3WNHSTYQK3T/relationships/lists/', 'related': 'https://a.klaviyo.com/api/profiles/01H086E5GP325TB3WNHSTYQK3T/lists/'}}, 'segments': {'links': {'self': 'https://a.klaviyo.com/api/profiles/01H086E5GP325TB3WNHSTYQK3T/relationships/segments/', 'related': 'https://a.klaviyo.com/api/profiles/01H086E5GP325TB3WNHSTYQK3T/segments/'}}}}}
Subscriber removed successfully

If everything works correctly, you should see the updated subscriber's information and a message confirming the deletion. If there's an error, the program will print the error code so you can troubleshoot.

Managing Campaigns

Campaigns in Klaviyo allow you to customize and personalize content for specific subscriber groups so that you can effectively engage your audience, nurture relationships, and drive conversions.

Let's learn how to manage campaigns using the Klaviyo API. You'll see how to retrieve information about campaigns and how to create, update, and delete them.

Start by creating a Python file named campaigns.py. Add the following code to it:

python
import requests
from dotenv import dotenv_values

config = dotenv_values(".env")
API_KEY = config['API_KEY']
BASE_URL = config['BASE_URL']
Headers = {
    "accept": "application/json",
    "revision": "2023-05-11",
    "content-type": "application/json",
    "Authorization": "Klaviyo-API-Key "+ API_KEY
}


def get_campaigns():
    url = f'{BASE_URL}/campaigns'
    response = requests.get(url, headers=Headers)

    if response.status_code == 200:
        return response.json()
    else:
        print(f'Error: {response.status_code}')
        return None

def create_campaign(name, list_id):
    url = f'{BASE_URL}/campaigns'
    payload = {"data": {
            "type": "campaign",
            "attributes": {
                "name": name,
                "channel": "email",
                 "audiences": {
                    "included": [list_id],
                    "excluded": []
                },
                "tracking_options": {"utm_params": [
                        {
                            "name": "utm_medium",
                            "value": "campaign"
                        }
                    ]}
            }
        }}
    response = requests.post(url, json=payload, headers=Headers)
    print(response.json())
    if response.status_code == 201:
        return response.json()
    else:
        print(f'Error: {response.status_code}')
        return None

def update_campaign(campaign_id, data):
    url = f'{BASE_URL}/campaigns/{campaign_id}'
    response = requests.patch(url, json=data, headers=Headers)

    if response.status_code == 200:
        return response.json()
    else:
        print(response.json())
        print(f'Error: {response.status_code}')
        return None

def delete_campaign(campaign_id):
    url = f'{BASE_URL}/campaigns/{campaign_id}'
    response = requests.delete(url, headers=Headers)

    if response.status_code == 204:
        print('Campaign deleted successfully')
    else:
        print(response.json())
        print(f'Error: {response.status_code}')


print("## Getting all campaigns ###")
campaigns = get_campaigns()
print(campaigns)
print("## End of -- Getting all campaigns ###")

print("## Creating a new campaign ###")
new_campaign = create_campaign('Test Random Campaign', 'your_list_id_here')
print(new_campaign)
print("## End of -- Creating a new campaign ###")

print("## Updating a campaigns ###")
updatedCampaign = {
"data": 
{"type": "campaign",
    "attributes": {
        "name": "My new campaign"
    },
    "id": 'your_campaign_id_here'
}}
updated_campaign = update_campaign('your_campaign_id_here', updatedCampaign)
print(updated_campaign)
print("## End ot -- Updating a campaigns ###")

print("## Deleteing a campaigns ###")
delete_campaign('your_campaign_id_here')
print("## End of -- Deleteing a campaigns ###")

The code provides functions to perform various operations on campaigns: <code class="blog_inline-code">get_campaigns()</code> retrieves campaign lists, <code class="blog_inline-code">create_campaign(name, list_id)</code> creates new campaigns, <code class="blog_inline-code">update_campaign(campaign_id, data)</code> updates existing campaigns, and <code class="blog_inline-code">delete_campaign(campaign_id)</code> deletes campaigns.

For simplicity, the code combines all operations related to a campaign. You get all campaigns, create a new one, update it, and then delete it. You can use and apply these actions on different campaigns, though, if you wish to.

Note: Replace <code class="blog_inline-code">your_list_id_here</code> and <code class="blog_inline-code">'your_campaign_id_here</code> with the appropriate IDs.

Save your file and run it in your command prompt or terminal by using this code:

python3 campaigns.py
… output…
terminal
python3 campaigns.py
… output…
{'data': [{'type': 'campaign', 'id': '01H08NN1CHZK55D6SE39FADDBP', 'attributes': {'name': 'My new campaign', 'status': 'Draft', 'archived': False, 'channel': 'email', 'audiences': {'included': ['TbCEYA'], 'excluded': []}, 'send_options': {'use_smart_sending': True, 'ignore_unsubscribes': False}, 'message': '01H08NN1CZGXFSYXAMAT5FBWRF', 'tracking_options': {'is_tracking_opens': True, 'is_tracking_clicks': True, 'is_add_utm': False, 'utm_params': [{'name': 'utm_medium', 'value': 'campaign'}]}, 'send_strategy': {'method': 'immediate', 'options_static': None, 'options_throttled': None, 'options_sto': None}, 'created_at': '2023-05-12T19:05:25.145253+00:00', 'scheduled_at': None, 'updated_at': '2023-05-12T19:06:59.938822+00:00', 'send_time': None}, 'links': {'self': 'https://a.klaviyo.com/api/campaigns/01H08NN1CHZK55D6SE39FADDBP/'}}, {'type': 'campaign', 'id': '01H08CJB12CVHMJNCS8HK3B77G', 'attributes': {'name': 'Test Campaign', 'status': 'Draft', 'archived': False, 'channel': 'email', 'audiences': {'included': ['TbCEYA'], 'excluded': []}, 'send_options': {'use_smart_sending': True, 'ignore_unsubscribes': False}, 'message': '01H08CJB1FQXJJ932S9DFRJW1H', 'tracking_options': {'is_tracking_opens': True, 'is_tracking_clicks': True, 'is_add_utm': False, 'utm_params': [{'name': 'utm_medium', 'value': 'campaign'}]}, 'send_strategy': {'method': 'immediate', 'options_static': None, 'options_throttled': None, 'options_sto': None}, 'created_at': '2023-05-12T16:26:39.531167+00:00', 'scheduled_at': None, 'updated_at': '2023-05-12T16:26:39.650477+00:00', 'send_time': None}, 'links': {'self': 'https://a.klaviyo.com/api/campaigns/01H08CJB12CVHMJNCS8HK3B77G/'}}, {'type': 'campaign', 'id': '01H08CHZK0Y9TQRGRNPQ6AH204', 'attributes': {'name': 'Test Campaign', 'status': 'Draft', 'archived': False, 'channel': 'email', 'audiences': {'included': ['TbCEYA'], 'excluded': []}, 'send_options': {'use_smart_sending': True, 'ignore_unsubscribes': False}, 'message': '01H08CHZKBEJJV5YMYY5HQKKM7', 'tracking_options': {'is_tracking_opens': True, 'is_tracking_clicks': True, 'is_add_utm': False, 'utm_params': [{'name': 'utm_medium', 'value': 'campaign'}]}, 'send_strategy': {'method': 'immediate', 'options_static': None, 'options_throttled': None, 'options_sto': None}, 'created_at': '2023-05-12T16:26:27.813370+00:00', 'scheduled_at': None, 'updated_at': '2023-05-12T16:26:27.939111+00:00', 'send_time': None}, 'links': {'self': 'https://a.klaviyo.com/api/campaigns/01H08CHZK0Y9TQRGRNPQ6AH204/'}}, {'type': 'campaign', 'id': '01H08CGJYW0ER5D4TVW9KES0TB', 'attributes': {'name': 'Test Campaign', 'status': 'Draft', 'archived': False, 'channel': 'email', 'audiences': {'included': ['TbCEYA'], 'excluded': []}, 'send_options': {'use_smart_sending': True, 'ignore_unsubscribes': False}, 'message': '01H08CGJZ44J7TFQA1BF0W9Z6E', 'tracking_options': {'is_tracking_opens': True, 'is_tracking_clicks': True, 'is_add_utm': False, 'utm_params': [{'name': 'utm_medium', 'value': 'campaign'}]}, 'send_strategy': {'method': 'immediate', 'options_static': None, 'options_throttled': None, 'options_sto': None}, 'created_at': '2023-05-12T16:25:42.113336+00:00', 'scheduled_at': None, 'updated_at': '2023-05-12T16:25:42.254261+00:00', 'send_time': None}, 'links': {'self': 'https://a.klaviyo.com/api/campaigns/01H08CGJYW0ER5D4TVW9KES0TB/'}}, {'type': 'campaign', 'id': '01H08CEX45SZZ4RMBYAB8KSSPM', 'attributes': {'name': 'Test Campaign', 'status': 'Draft', 'archived': False, 'channel': 'email', 'audiences': {'included': ['TbCEYA'], 'excluded': []}, 'send_options': {'use_smart_sending': True, 'ignore_unsubscribes': False}, 'message': '01H08CEX4FZZKG47MNZ27V4TJ0', 'tracking_options': {'is_tracking_opens': True, 'is_tracking_clicks': True, 'is_add_utm': False, 'utm_params': [{'name': 'utm_medium', 'value': 'campaign'}]}, 'send_strategy': {'method': 'immediate', 'options_static': None, 'options_throttled': None, 'options_sto': None}, 'created_at': '2023-05-12T16:24:46.987858+00:00', 'scheduled_at': None, 'updated_at': '2023-05-12T16:24:47.117751+00:00', 'send_time': None}, 'links': {'self': 'https://a.klaviyo.com/api/campaigns/01H08CEX45SZZ4RMBYAB8KSSPM/'}}, {'type': 'campaign', 'id': '01H08CCBWA2GBWTWYXHTCP3A90', 'attributes': {'name': 'Test Campaign', 'status': 'Draft', 'archived': False, 'channel': 'email', 'audiences': {'included': ['TbCEYA'], 'excluded': []}, 'send_options': {'use_smart_sending': True, 'ignore_unsubscribes': False}, 'message': '01H08CCBWJEFK23DCR191F27A4', 'tracking_options': {'is_tracking_opens': True, 'is_tracking_clicks': True, 'is_add_utm': False, 'utm_params': [{'name': 'utm_medium', 'value': 'campaign'}]}, 'send_strategy': {'method': 'immediate', 'options_static': None, 'options_throttled': None, 'options_sto': None}, 'created_at': '2023-05-12T16:23:23.790918+00:00', 'scheduled_at': None, 'updated_at': '2023-05-12T16:23:23.923110+00:00', 'send_time': None}, 'links': {'self': 'https://a.klaviyo.com/api/campaigns/01H08CCBWA2GBWTWYXHTCP3A90/'}}], 'links': {'self': 'https://a.klaviyo.com/api/campaigns', 'next': None, 'prev': None}}
## End of -- Getting all campaigns ###
## Creating a new campaign ###
{'data': {'type': 'campaign', 'id': '01H08NZ8K8TC4KQJQFNFH7F6AS', 'attributes': {'name': 'Test Random Campaign', 'status': 'Draft', 'archived': False, 'channel': 'email', 'audiences': {'included': ['TbCEYA'], 'excluded': []}, 'send_options': {'use_smart_sending': True, 'ignore_unsubscribes': False}, 'message': '01H08NZ8KN6QSW4YWWXQYZC83Y', 'tracking_options': {'is_tracking_opens': True, 'is_tracking_clicks': True, 'is_add_utm': False, 'utm_params': [{'name': 'utm_medium', 'value': 'campaign'}]}, 'send_strategy': {'method': 'immediate', 'options_static': None, 'options_throttled': None, 'options_sto': None}, 'created_at': '2023-05-12T19:11:00.209051+00:00', 'scheduled_at': None, 'updated_at': '2023-05-12T19:11:00.318202+00:00', 'send_time': None}, 'links': {'self': 'https://a.klaviyo.com/api/campaigns/01H08NZ8K8TC4KQJQFNFH7F6AS/'}}}
## End of -- Creating a new campaign ###
## Updating a campaigns ###
{'data': {'type': 'campaign', 'id': '01H08NN1CHZK55D6SE39FADDBP', 'attributes': {'name': 'My new campaign', 'status': 'Draft', 'archived': False, 'channel': 'email', 'audiences': {'included': ['TbCEYA'], 'excluded': []}, 'send_options': {'use_smart_sending': True, 'ignore_unsubscribes': False}, 'message': '01H08NN1CZGXFSYXAMAT5FBWRF', 'tracking_options': {'is_tracking_opens': True, 'is_tracking_clicks': True, 'is_add_utm': False, 'utm_params': [{'name': 'utm_medium', 'value': 'campaign'}]}, 'send_strategy': {'method': 'immediate', 'options_static': None, 'options_throttled': None, 'options_sto': None}, 'created_at': '2023-05-12T19:05:25.145253+00:00', 'scheduled_at': None, 'updated_at': '2023-05-12T19:06:59.938822+00:00', 'send_time': None}, 'links': {'self': 'https://a.klaviyo.com/api/campaigns/01H08NN1CHZK55D6SE39FADDBP/'}}}
## End ot -- Updating a campaigns ###
## Deleteing a campaigns ###
Campaign deleted successfully
## End of -- Deleting a campaigns ###

If everything works correctly and you used the same campaign throughout, you should see a list of your campaigns, a newly created campaign, that the campaign has been updated, and a message confirming the deletion of the campaign. If there's an error, the program will print the error code so you can troubleshoot.

Conclusion

Congratulations! You now know how to use the Klaviyo API with Python to manage lists, subscribers, and campaigns. To learn more about the Klaviyo API, check out its documentation.

You can find the code for this tutorial in this GitHub repository.

As you've seen, interacting with the Klaviyo API isn't too difficult. However, if this is just one of several email marketing tools you need to integrate with, you might want to check out the Merge Marketing Automation API.

This unified API provides an easy way to integrate with several marketing tools such as Mailchimp, HubSpot, Podium, MessageBird, Klaviyo and more. With Merge.dev, you can focus on building great products rather than worrying about the details of integrations. You can sign up to try it out for free.