
Table of contents
Just for you
How to integrate with the BambooHR API using JavaScript


Application programming interfaces (APIs) are the building blocks of modern software, allowing different applications to communicate with each other. And if you're learning JavaScript, you've probably come across the term API integration, which refers to the process of linking one application to another via their APIs.
To help you understand how API integration works, this tutorial will show you how to integrate with an API in JavaScript, focusing on the BambooHR Applicant Tracking System (ATS) API.
How to perform API integration in JavaScript with BambooHR
In this tutorial, you'll learn how to integrate your React application with BambooHR APIs to access HR-related data. You'll set up a React project, create pages to display and create candidate data, and even explore the underlying network calls. By the end, you'll have a working app that interacts with the BambooHR API.
Prerequisites
Before getting started, make sure you have the following installed:
- Node.js and npm: Make sure these are downloaded and installed on your machine.
- A text editor: You can use any text editor; however, Visual Studio Code is recommended for its robust JavaScript and React support.
Once Node.js is set up, it's time to create a new React project. To do so, execute the following commands in your terminal: <code class="blog_inline-code">npx create-react-app bamboohr-appcd bamboohr-app</code>
This creates a new React application and navigates you into the project folder.
Next, you need to install a package to manage HTTP requests. You'll use Axios and Material UI as the UI components. To install these libraries and their dependencies, open your terminal or shell and run the following:
Related: The steps for connecting a BambooHR MCP to Claude Code
Explore the BambooHR API documentation
Before writing any code, it's crucial that you understand the API you're working with. For BambooHR, you'll find extensive documentation on their official website. The two types of APIs you'll focus on are as follows:
- Data Access API for retrieving candidates'/applicants' data.
- Data Manipulation API for creating new candidates/applicants.
Each of these APIs has specific endpoints you'll call from your app. For this tutorial, you'll use the following:
- Data Access API endpoint: /v1/applicant_tracking/applications/jobs
- Data Manipulation API endpoint: /v1/applicant_tracking/applications
Generate your BambooHR API Key
BambooHR offers several types of authentication, such as API key–based and OAuth. For simplicity, API key–based authentication is used here.
To generate your BambooHR key, start by signing up for a free BambooHR demo account:
Once you're logged into your account, click on your profile icon and select API Keys:

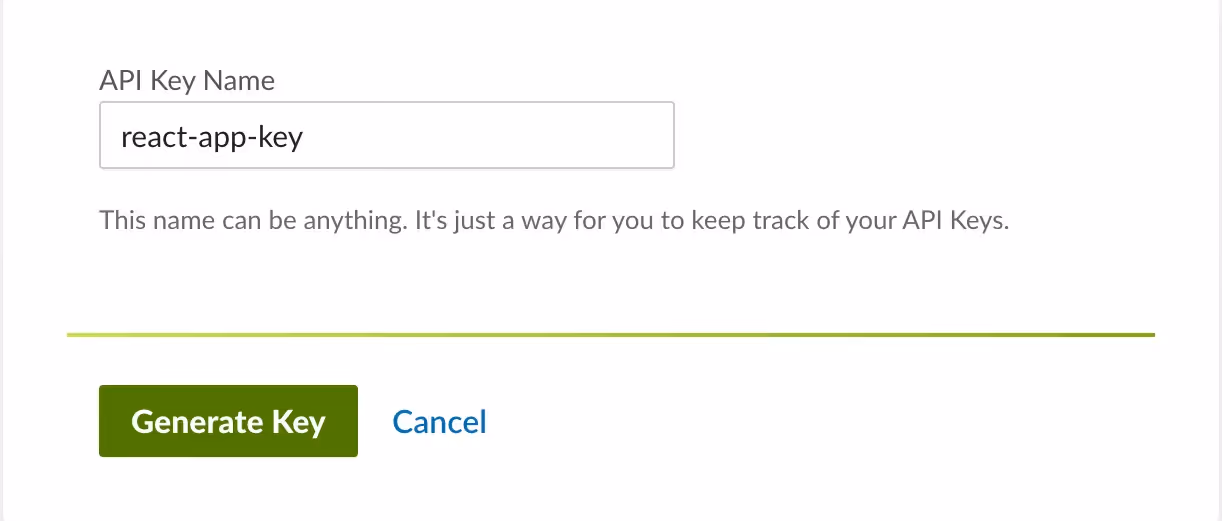
Click on Add New Key, name your key react-app-key, and click on Generate Key:
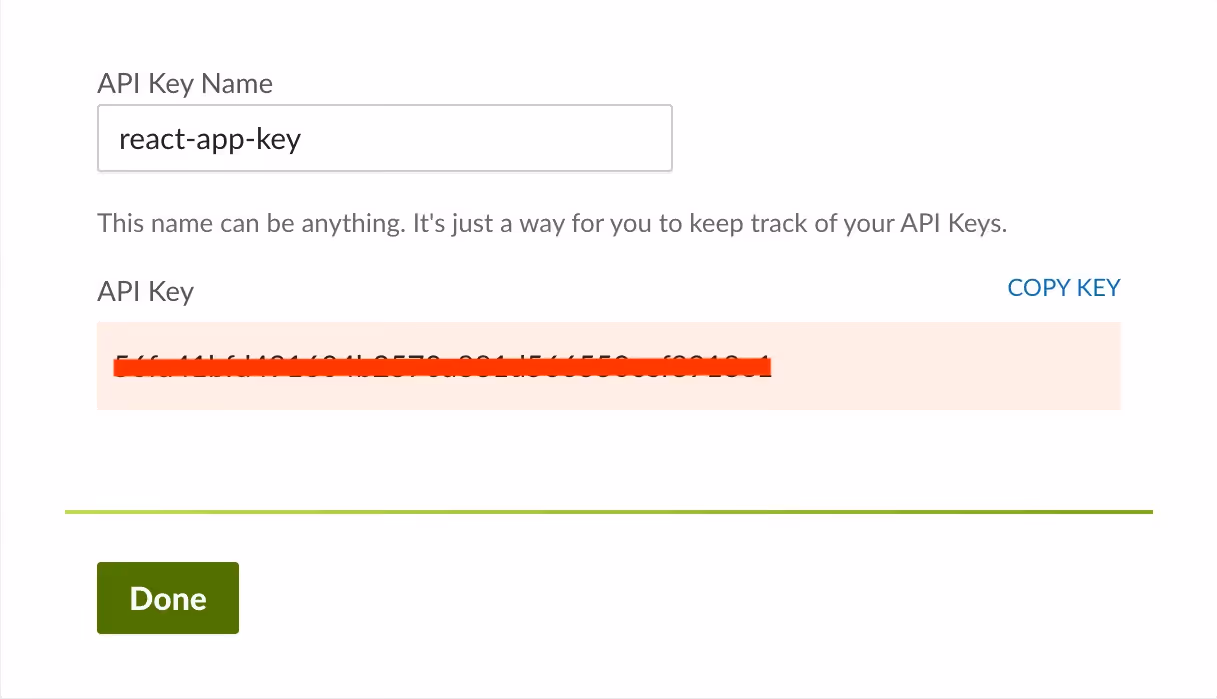
Select the COPY KEY button to copy the key and store it somewhere safe as you'll need it later in your React application. Then click on Done to close the dialog:
Related: How to test API integrations
Set up a proxy
Setting up a proxy in a React application, especially one created using the Create React App (CRA), is straightforward. The proxy helps you resolve cross-origin resource sharing (CORS) issues during development.
In the root of your React project, find your package.json file. This file should be at the same level as your node_modules folder and src folder.
In the package.json file, add a new key called proxy and set its value to the URL of the API you're trying to connect to. Make sure to add this key-value pair at the top level of your JSON object, not inside any other nested objects: <code class="blog_inline-code">{ "name": "bamboohr-app, "version": "0.1.0", "private": true, "proxy": "https://api.bamboohr.com", ...code omitted…}</code>
In this case, the proxy is set to https://api.bamboohr.com, which is the base URL for the BambooHR API. Now, when you make API calls in your React app, you don't have to include the full URL of the API; just include the path, and the proxy setting automatically prepends the base URL.
The React development server automatically routes the requests through the proxy, avoiding the CORS issue.
Please note: This is intended for development purposes only. In production, you'd want to handle CORS issues on your server, not by using a client-side proxy.
Display candidate information from BambooHR
To display candidate information from BambooHR, create a new file called Candidates.js inside the src folder and add the following:
Here, you define a React component called Candidates to display a list of job candidates. The useState and useEffect hooks are utilized for managing state and fetching data from an API, respectively. The component uses Material UI to display a list of candidates, each of which can be clicked to open a dialog box showing more details. The handleClickOpen function sets the selected candidate and opens the dialog, while handleClose closes it. The useEffect hook fetches candidate data when the component mounts and populates the candidates state through the setCandidates function passed as a prop.
Make sure you replace your-subdomain with your BambooHR subdomain and 'your-api-key' with the API key you generated. You can keep the password as is or input any random text.
Create a page to add new candidates
To create a page where you can add new candidates, you need to create a new file called AddCandidate.js inside the src folder and add the following code:
In this code, you create a React component named AddCandidate that allows users to add new job candidates. It uses React hooks like useState and useEffect for state management and API calls, respectively.
The UI relies on Material UI components to render a dialog box that contains a form. Within this form, users can enter first and last names and choose a job from a drop-down. Upon submission, the handleSubmit function makes an API POST request to add the new candidate and updates the parent component's state.
Again, make sure to replace your-subdomain with your BambooHR subdomain and 'your-api-key' with the API key you generated.
Create a Candidate Container
Now, you need to create a container that acts as a parent component for the components you previously created. This lets you share the candidate's list between these two components.
Create a new file called CandidateContainer.js inside the src folder and add the following code:
Here, you define a CandidateContainer React component that serves as the parent component for Candidates and AddCandidate. It maintains the state for the list of candidates through the candidates and setCandidates state variables. Both child components receive candidates and setCandidates as props, allowing them to read and modify the candidate list. The Material UI Container component is used for layout styling.
Next, open your App.js file and update the code to look like this:
Here, you set up the root App component for your React application. It simply imports and renders the CandidateContainer component, making it the central content of the app.
Run and Test the Application
Open your terminal or shell, go to the root directory of your application, and run the following command, which runs your application:<code class="blog_inline-code">npm start</code>
All the code for this tutorial is available in this GitHub repo.
Related: An overview on the API integration process
API integration maintenance
Managing the integration with third-party APIs like BambooHR or other platforms can be tricky and time-consuming. You have to worry about API endpoints changing, new authentication schemes being introduced, and rate limits being altered. Each of these changes requires that you dive back into your code to make adjustments, which is time-consuming and diverts your focus from building features that add direct value to your application.
Unified APIs like Merge offer a way to streamline this aspect of your development workflow. Instead of interacting with multiple disparate APIs, you can interact with one unified interface. Behind the scenes, Merge takes care of routing your requests to the appropriate service and handles any peculiarities or updates in those individual APIs. This means you don't have to constantly monitor changes to every API you integrate; Merge does that for you.
Conclusion
In this article, you learned how to integrate with the BambooHR API using JavaScript and React. You explored both Data Access and Data Manipulation APIs, writing network calls to fetch and add candidates.
However, keep in mind that API integration is a complex and evolving field. If you want to eliminate the complexities and hassles of keeping up with API changes, consider using a unified API solution like Merge.
Simply build once to Merge's Unified API and get access to hundreds of integrations across key software categories—from HRIS to ATS to file storage to CRM.
You can learn more about Merge by scheduling a demo with one of our integration experts.


.png)

